AI and Large Language Models have drastically changed the way we write applications: it started with code autocompletion suggestions, then it was a chat interface able to answer questions about code, which led to specialized code editors that can access our projects and make changes when instructed.
The Model Context Protocol is the latest addition to the AI toolkit, and it promises to improve how LLMs interact with external services to help users achieve their desired tasks more efficiently.
In this article, we will learn how to add an MCP server to a Rails app. Let's start by understanding what it's all about. If you already know about what they are, skip to the application setup.
What is MCP
MCP, which stands for Model Context Protocol, is an open protocol aimed at standardizing the way applications can provide context to LLMs.
Just like how other protocols like REST or RPC standardize how applications interact with other applications by providing a set of rules, MCP servers can allow LLMs to interact with applications that implement the protocol.
We can think of the protocol as an API for APIs.
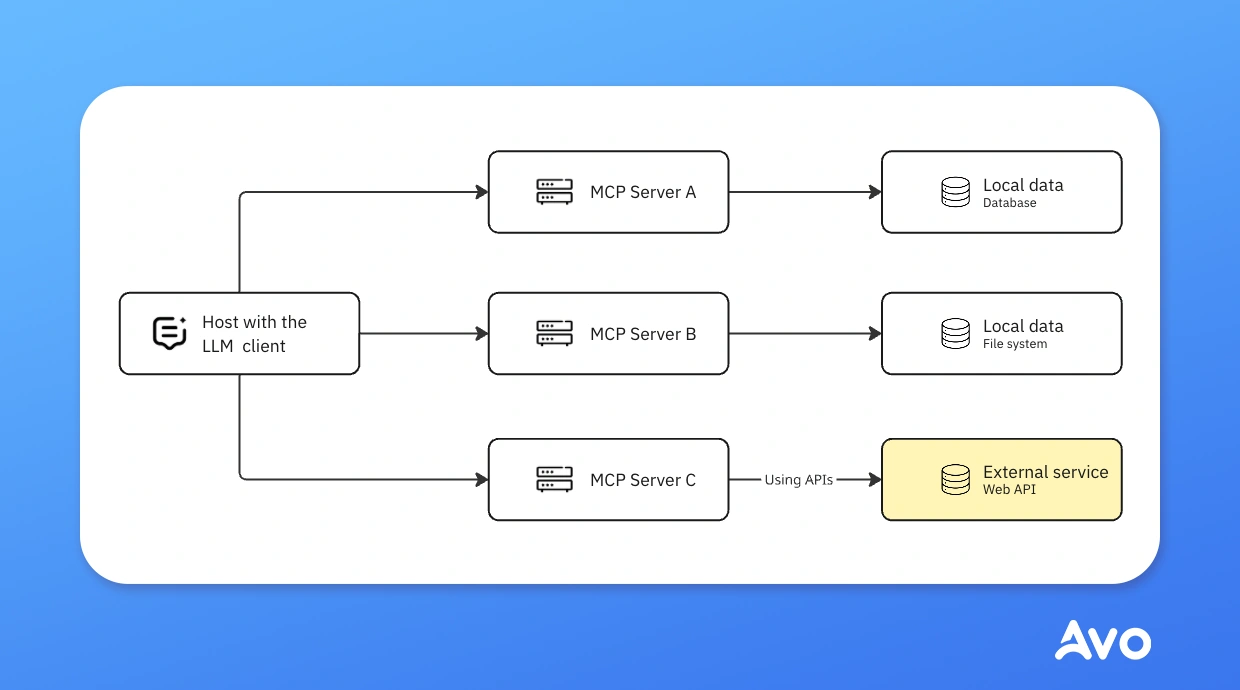
Just like APIs, the protocol uses the client-server model where the client is an LLM which is a consumer of the MCP server and can retrieve data from it or perform actions when needed.
The architecture for the protocol looks like the following:
Use cases
The formal definition of MCP servers gives us an idea about how they work but, at least in my case, it wasn't enough to actually understand what they were.
Even though there are probably innumerable use cases for MCP servers, in the context of Rails applications, an MCP server is a lightweight application that can access things from our application and perform predefined actions.
Some useful examples that come to mind are:
- Data analysis: by providing some tools and giving the AI access to some part of our data, we can ask the LLM client to analyze data to help us drive decisions based on the data.
- Reporting: we can have a reporting flow where we provide the necessary resources to LLMs for them to create reports in our desired format without the need to manually export or process any data.
- Conversational tasks: these can include things that go from document or project management to updating records in our database conversationally.
- Customer support aid: we can create an MCP server aimed at helping our team perform customer support by automating tasks with AI.
- Anomaly detection: accessing data directly from our app, LLMs can provide anomaly detection analysis.
- Image generation: we can automate the image generation process by giving LLMs the ability to directly provide the images to our application.
- A long list of etc.: as long as a task can be reasonably performed by an LLM by itself, it can probably be done with an MCP server.
However, these are examples in the context of Rails, or any data-backed application for that matter, but if we combine these abilities with the use of external MCP servers, the possibilities are endless.
We could ask an LLM to modify a view in our application or update a dependency and create a pull request in GitHub on our behalf.
Or, we could ask it to send a report to stakeholders by email, integrating an email provider's MCP server.
To continue with the API analogy: the technology itself is not what's actually revolutionary, but the things people can do with it potentially are.
Now that we've explored some use cases, let's dive into some MCP server concepts:
MCP concepts
In a typical MCP implementation, we have the following actors:
- Client: these are the applications that consume the information from the appointed servers. For example, Claude Desktop or IDEs like Cursor.
- Server: a lightweight app that exposes specific capabilities through the MCP protocol using resources, tools, and prompts. In the context of Rails applications, the MCP server is a part of the app that responds to requests from the client and implements specific, previously defined behavior.
- Local data sources: these can be files on our computer, databases, or other services that the server can access securely.
- Remote services: external systems that are available via APIs.
Then, we have three primitives to give functionality to MCP servers:
-
Resources: data that's accessible by our application: database records, file contents, etc. Calls to these can be thought of as
GETrequests: they can retrieve data but shouldn't mutate anything. For example, we can add the ability for LLMs to access a list of books from our database to give a particular recommendation or to ask which one of the books is the most popular. - Tools: functions that LLMs can invoke to perform actions within the MCP server. Things like computations, API calls or anything that can mutate data. For example: we can instruct an LLM to update the book cover with an AI-generated image.
- Prompts: these are predefined and reusable prompt templates that clients can use to guide their way into the conversation to better achieve their goals.
What we will build
For this tutorial, we will add an MCP server to bukclub, our book repository app, which we previously used in the social login with Rails and structured data in Rails tutorials.
We will use the data that we already have in the application to create MCP servers that can perform a couple of tasks:
- Create a book: we will be able to add a book to our repository just by asking the LLM and passing a valid title.
- Add an author if not in the database: if we ask the LLM to add a book whose author doesn't exist in our database yet, the LLM will be able to access a tool to create an author and associate it with the book if necessary.
- Add a cover to a book: we will create a tool to allow the LLM client to add a cover from a URL.
The best thing is that we won't need to explicitly tell the LLM to perform the tasks. By defining the appropriate tools in our MCP server, the LLM will manage to perform the tasks, even if we just ask it to add a book we don't have in the repository yet.
Let's start by setting our application up:
Application setup
Because we are working with an existing application, the first step is to install the fast-mcp gem:
bundle add fast-mcp
Next, we need to run the installation command:
bin/rails generate fast_mcp:install
This command will add a fast_mcp.rb initializer where we can configure the gem. It adds two directories: app/tools and app/resources, and the following classes:
-
ApplicationTool: the base class from which other tools can inherit behavior. It's empty by default, and it inherits from
ActionTool::Base. -
ApplicationResource: the base resource from which other resources can inherit behavior. It's empty by default, and it inherits from
ActionResource::Base. - SampleTool and SampleResource: these are sample classes added to show how to set up tools and resources using the gem. We can safely remove them when we add our own.
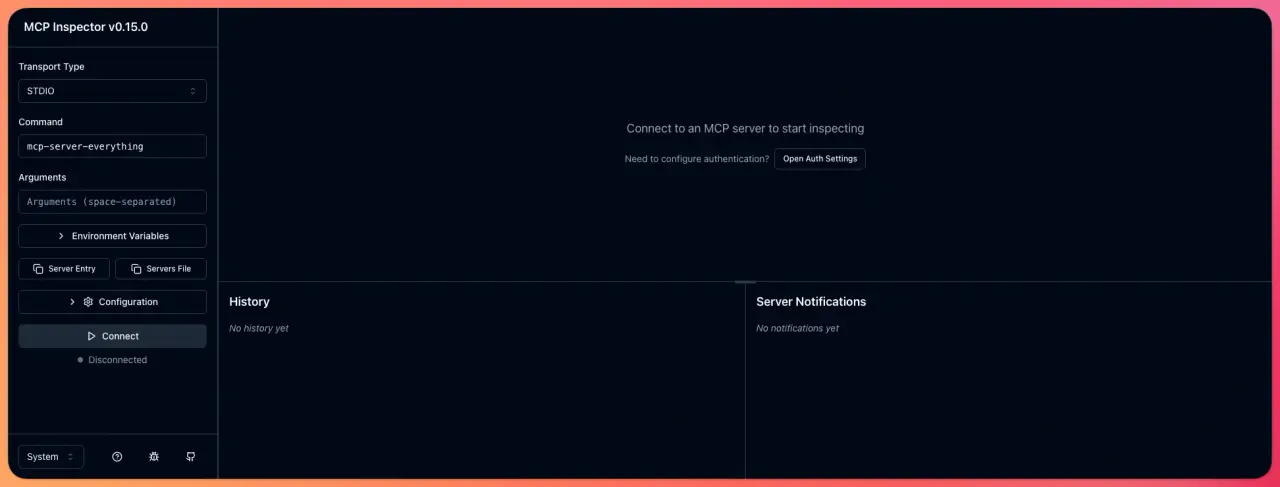
Now that we have the gem installed, let's also install the MCP Inspector tool that allows us to test our implementation without the need to interact constantly with the client:
npx -y @modelcontextprotocol/inspector
If the command runs successfully, we will be able to access the inspector at localhost:6274 and we will see something like this:
Now, to establish a connection, we need to run our application server:
bin/dev
Then, in the inspector tool, we need to add http://localhost:3000/mcp/sse as the URL and, in the Configuration section, we have to add our Proxy Session Token that's provided by the inspector on startup:
Starting MCP inspector...
⚙️ Proxy server listening on 127.0.0.1:6277
🔑 Session token: a7b2c849f6d3e5128c9f4a73b8e6d2f1aa847bdd22d9cb17dc2e7f57892d9e8a
After adding these, we can hit Connect and, after navigating to the Tools tab and clicking on the List Tools button, we should see our SampleTool listed there:

Now that we have fast-mcp and the inspector installed, let's start by creating tools and resources of our own:
MCP servers on Rails
Just by installing the fast-mcp gem in our project and running the server, we get an MCP Server that's available at http://localhost:3000/mcp/sse, which by default lists the default tool and resource installed by the gem.
So now, let's start by learning how to add resources:
Resources
The gem allows us to add resources with a structure that looks like this:
class LatestBooks < ApplicationResource
  uri "latest_books"
  resource_name "Latest Books"
  description "The latest 5 books that have been added to bukclub"
  mime_type "application/json"

  def content
    JSON.generate(Book.descending_by_date.limit(5).as_json)
  end
end
To create a resource, we need to provide a uri which associates the resource with a unique URI within our MCP server, a resource_name which has to be unique as well, a description which can help users understand what the resource is about and a mime_type which tells the client about the expected formatting for the resource.
Then, in the content method, we return something that matches the expected response format.
Following this structure, we can define as many resources as we need to make our MCP server useful for our end-users.
Tools
To add a tool, we have to add a class that inherits from ApplicationTool inside the tools directory.
It should have a description method call with a string argument which describes what the tool does. Giving a detailed description here can probably improve the way the clients understand what they do.
Then, it should also have an arguments method that receives a block with each of the fields that are required to use the tool. These fields are validated using dry-schema.
Finally, it should also define a call method which can receive the fields we declared in the arguments method as arguments. Inside this method, we can execute code in our application, access data, make changes or anything we can regularly do in our Rails app.
If the call method modifies data or if we think that the output might be useful for other tools, returning JSON might be a good idea.
class SendEmailToUserTool < ApplicationTool
  description "Send a welcome email to a user"

  arguments do
    required(:id).filled(:integer).description("The id of the user to send the email to")
    required(:subject).filled(:string).description("The subject of the email")
    required(:body).filled(:string).description("The body of the email")
  end

  def call(id:, subject:, body:)
    user = User.find(id)
    UserMailer.welcome_email(user.email, subject, body).deliver_later

    JSON.generate({ success: true, user_id: id, email: user.email })
  end
end
Adding resources to our app
Now that we've learned how to add tools and resources to our application, let's start by adding a couple of resources that can be useful to achieve our goals.
The first thing we will add is a resource to get an author by name. Because our Author model defines a first_name and last_name we will add both to the resource:
class AuthorByNameResource < ApplicationResource
  uri "author_by_name"
  resource_name "Author by name"
  description "Get an author by first name and last name"
  mime_type "application/json"

  def content(first_name:, last_name:)
    author = Author.find_by(first_name: first_name, last_name: last_name)

    if author
      JSON.generate(author.as_json)
    else
      JSON.generate({ error: "Author not found" })
    end
  end
end
Next, we will add a tool, so the LLM can create an Author:
class CreateAuthorTool < ApplicationTool
  description "Create a new author"

  arguments do
    required(:first_name).filled(:string).description("The first name of the author")
    required(:last_name).filled(:string).description("The last name of the author")
    required(:nationality).filled(:string).description("The nationality of the author")
    required(:birthdate).filled(:date).description("The birth date of the author in the format 1960-07-11 00:00:00.000000000 +0000")
    required(:bio).filled(:string).description("A short bio of the author")
    required(:wikipedia_url).filled(:string).description("The Wikipedia URL of the author")
  end

  def call(first_name:, last_name:, nationality:, birthdate:, bio:, wikipedia_url:)
    author = Author.create!(
      first_name: first_name,
      last_name: last_name,
      nationality: nationality,
      birthdate: birthdate,
      bio: bio,
      wikipedia_url: wikipedia_url
    )

    JSON.generate(author.as_json)
  end
end
We're including every field as required even though we could probably have some fields as optional, that's up to you.
Next, let's add the actual tool to create a book and add it to the repository:
class CreateBookTool < ApplicationTool
  description "Create a new book"

  arguments do
    required(:title).filled(:string).description("The title of the book")
    required(:isbn).filled(:string).description("The ISBN of the book")
    required(:author_name).filled(:string).description("The full name of the book's author")
    required(:excerpt).filled(:string).description("A short excerpt of the book")
    required(:description).filled(:string).description("A short description of the book")
    optional(:pages_count).filled(:integer).description("The number of pages of the book")
    required(:published_at).filled(:date).description("The date of publication of the book in the format 1960-07-11 00:00:00.000000000 +0000")
  end

  def call(title:, isbn:, pages_count: 0, published_at:, author_name:, excerpt:, description:)
    book = Book.find_by(isbn: isbn)

    if book
      book.update!(pages_count: pages_count, published_at: published_at)
    else
      book = Book.create!(
        title: title,
        isbn: isbn,
        pages_count: pages_count,
        published_at: published_at,
        excerpt: excerpt,
        description: description
      )
    end

    if book.persisted?
      first_name, last_name = author_name.split(" ", 2)
      author = Author.find_or_create_by!(first_name: first_name, last_name: last_name)
      book.authors << author unless book.authors.include?(author)
    end

    JSON.generate(book.as_json)
  end
end
Finally, we will add a tool to populate the book's cover, which allows the LLMs to add a cover by providing a cover_url:
require 'open-uri'

class PopulateCoverTool < ApplicationTool
  description "Populate the cover of a book"

  arguments do
    required(:book_id).filled(:integer).description("The ID of the book")
    required(:cover_url).filled(:string).description("The URL of the cover in a standard image format")
  end

  def call(book_id:, cover_url:)
    book = Book.find(book_id)
    return JSON.generate(book.as_json) if book.cover.attached?

    begin
      book.cover.attach(io: URI.open(cover_url), filename: "cover.jpg")
      book.save!
      JSON.generate(book.as_json)
    rescue OpenURI::HTTPError, SocketError => e
      JSON.generate({ error: "Failed to attach cover: #{e.message}" })
    end
  end
end
Even though these tools don't seem like a big deal by themselves, after we integrate our MCP server with an LLM client, we will see that they can use them intelligently to achieve our goals.
Of course, adding many more tools will probably cause some confusion down the road unless we are careful about specifying what each tool does and how it differs from the other tools.
Connecting with clients
We can connect our server to multiple clients if we like, let's start with Cursor:
Cursor
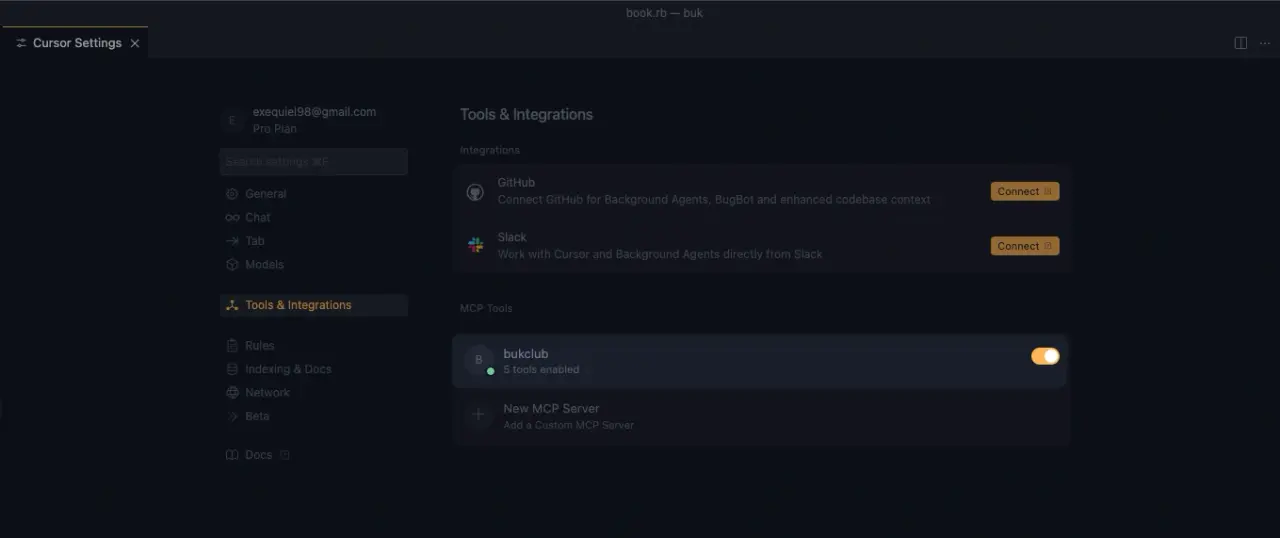
Cursor defines an mcp.json file located at ~/.cursor where we can add our server:
{
  "mcpServers": {
    "bukclub": {
      "url": "http://localhost:3000/mcp/sse"
    }
  }
}
Then, we need to restart Cursor, navigate to Settings ⇾ Tools & Integrations section, and we should see our server in the MCP Tools section:
Now, let's ask Cursor to create a new Book instance by passing the name of the book to see if it's able to achieve the task:
As you can see, I only passed the book name with a typo in the name and Cursor was able to not only create the Book itself, but it also recognized that Martin Kleppmann wasn't registered as an author in the app, and it added him using the CreateAuthorTool.
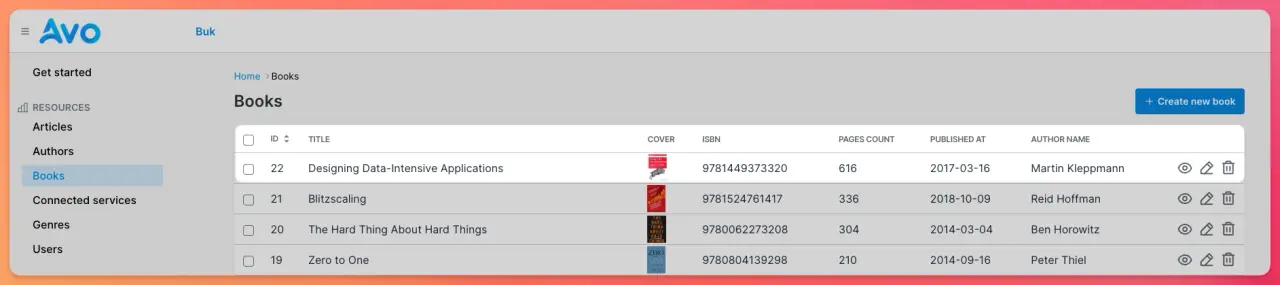
The result of this interaction was that the book was correctly created with a cover, author and correct information about the book:
Claude Desktop
At the time of writing this, Claude Desktop doesn't support remote hosts, it only accepts STDIO transports. This means that, out of the box, we cannot use the SSE implementation that comes by default when using fast-mcp with Rails.
To solve this, we need to use a proxy that acts as a bridge between the Server-sent events and the STDIO transport. We will be using the mcp-proxy library, which is a Python library.
Let's start by installing uv if we don't have it:
curl -LsSf https://astral.sh/uv/install.sh | sh
Next, let's install mcp-proxy using uv:
uv tool install mcp-proxy
To test the installation, we should be able to successfully run the following command if our Rails server is running:
mcp-proxy http://localhost:3000/mcp/sse
The next step is to add our MCP server to Claude Desktop's config at ~/Library/Application\ Support/Claude/claude_desktop_config.json and add the following:
{
  "mcpServers": {
    "bukclub": {
      "command": "/Users/erozas/.local/bin/mcp-proxy",
      "args": ["http://localhost:3000/mcp/sse"]
    }
  }
}
Make sure to add the absolute location for the command because, otherwise, the connection might fail.
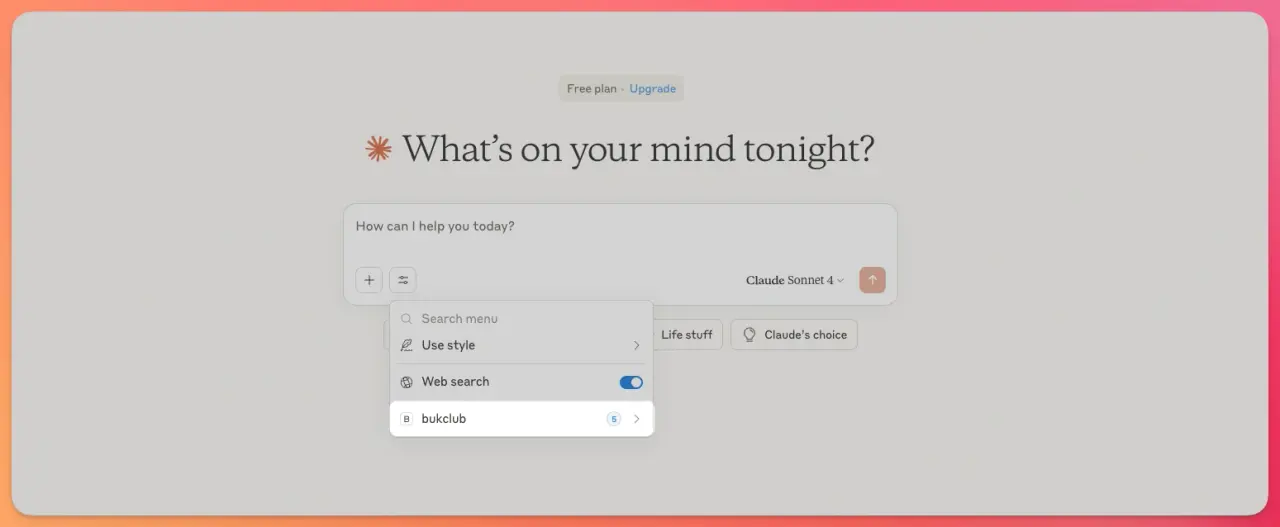
Now, if everything was successful, after we open Claude Desktop and click on the settings button, next to the "plus" icon, we should see our MCP server:
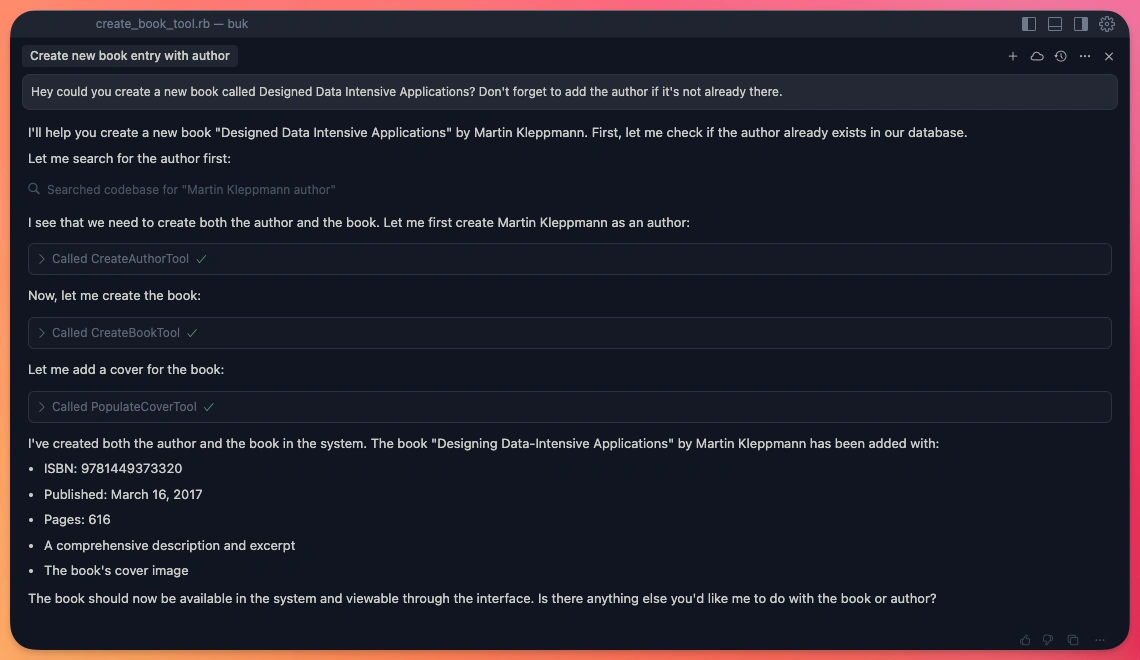
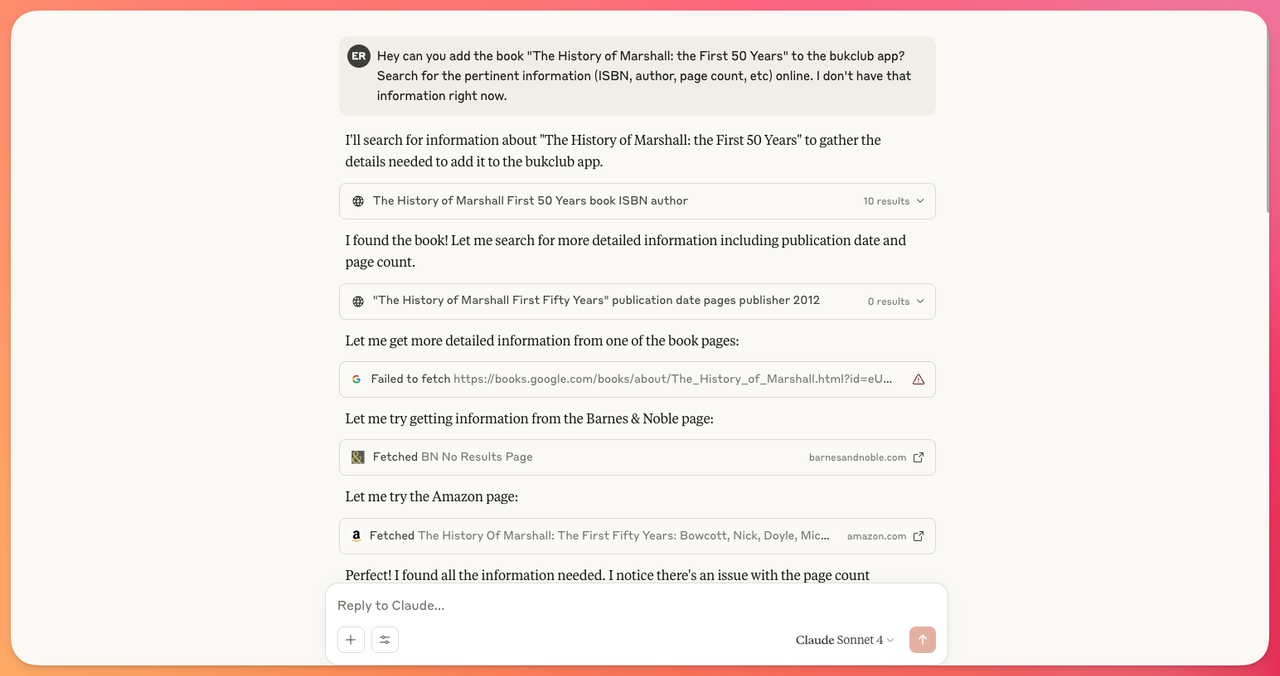
Now, we'll try to add a new book using Claude:
The first time Claude needs to use any of the tools in our MCP server, it will ask for permissions using a prompt like this:
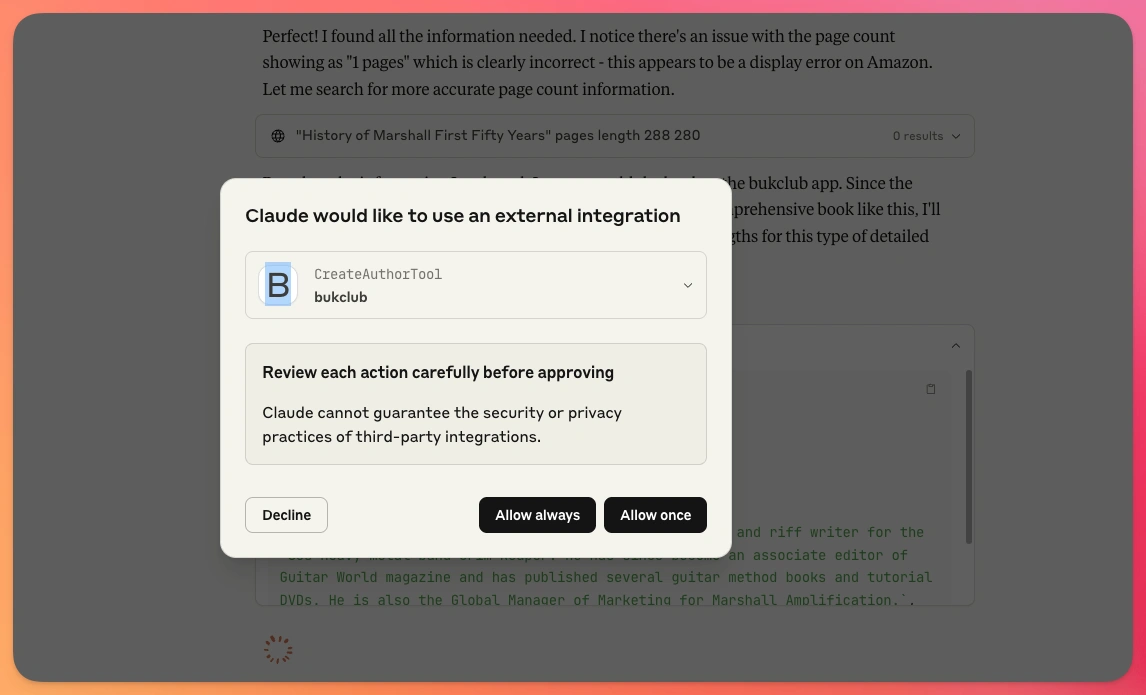
After searching for the book on various internet sources, Claude was able to successfully add the book to the application but, for some reason, it didn't use the PopulateCoverTool out of the box, so I had to explicitly tell it to use it:
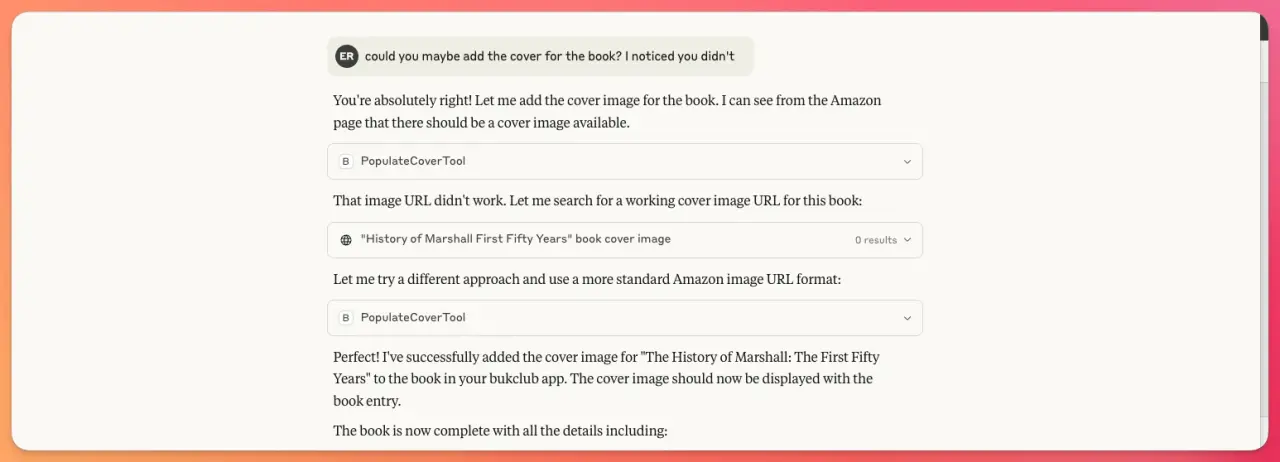
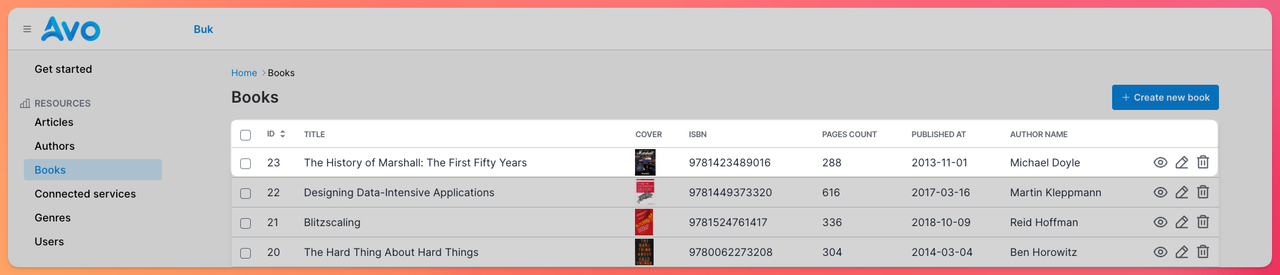
After this, the book and its author were successfully added to the repository:
Summary
The Model Context Protocol is an open-source protocol that enables LLM clients like Claude Desktop or other AI agents to connect with external data sources and tools in a standardized way.
The main purpose of its existence is to improve the way LLMs interact with external applications or data sources, so users can achieve advanced tasks conversationally, without the need to manually add the information to the context.
Using the fast-mcp gem, we can easily create an MCP server for any Ruby or Rails application and add as many resources or tools as we need to perform our goals.
Then, we can always test them using the MCP Inspector tool locally by providing the SSE transport address, or with clients like Claude Desktop using tools like mcp-proxy to make the integration work locally.
MCP servers are a very useful tool to improve the way we work with LLMs and the efficiency they bring to the table.
Adding MCP servers judiciously to our application to achieve concrete tasks is a sure way to improve our team's productivity, especially for people who don't have a technical background.
I hope you enjoyed this article and that it can help you implement your first MCP server and improve your productivity.
Have a good one and happy coding!
