
Working with React in Rails usually comes with a tradeoff: get access to the JS frontend ecosystem at the cost of losing development velocity or becoming frustrated.
The modern Rails frontend stack, Turbo and Hotwire, is enough to achieve interactive applications without the JS downsides.
However, there are times when we might need React: to build highly interactive applications or to have access to its ecosystem, which is massive.
To solve this issue, let's introduce you to Superglue: a framework for working with React and Redux without slowing down or surrendering our app to an API.
In this article, we will learn how to build a React app in Rails with Superglue step by step and learn about the library at the same time.
Let's start by learning what Superglue is:
What is Superglue?
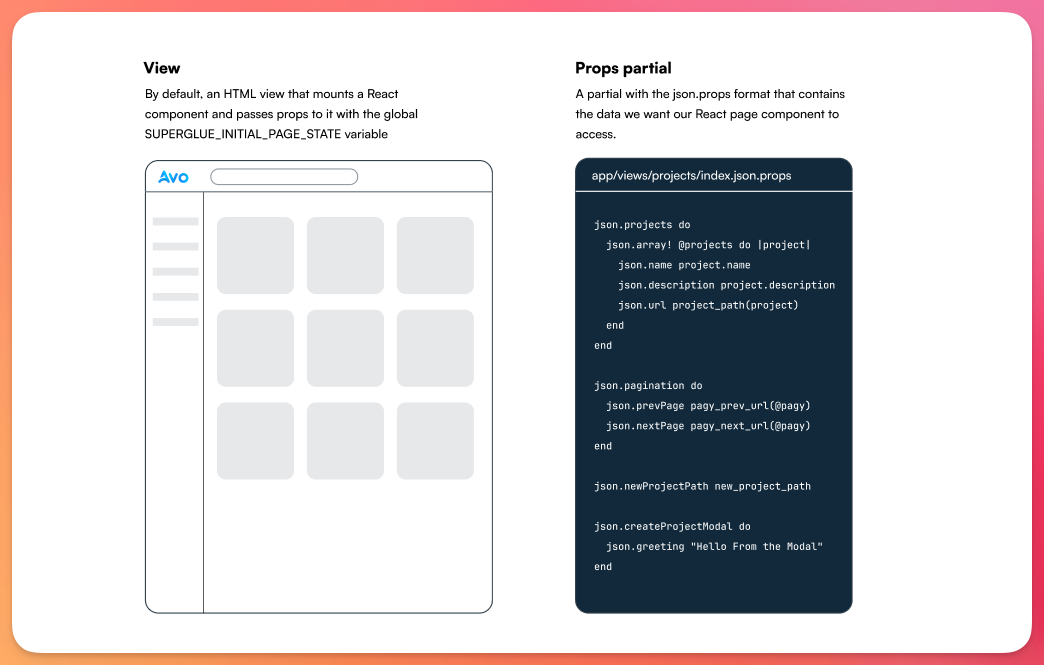
Superglue helps integrate React and Redux into Rails without losing key Rails features: form helpers, tag helpers, flash messages, cookies, and more.
Besides developing Rails in API-only mode and having a separate React application, we have roughly three ways of integrating React into Rails:
- Partially: this implies loading React for specific components but keeping it contained within a Rails view. This means we can manually pass props and keep server-side state for the app shell. However, this approach can quickly become a mess.
-
Using a library: solutions like
react_on_railswhich are aimed at improving the integration by providing some goodies like prop passing, bundle size optimization, i18n, among others. However, this library requires us to use Webpacker or its continuation,shakapackerwhich makes it less desirable for modern Rails apps. - Mixed approach: this approach implies having our view layer replaced by React components with the difference that they're rendered using Rails controllers, meaning we can pass props, flash messages, cookies, and authenticate/authorize routes in the controllers themselves. Solutions like Inertia Rails and Superglue fall in this category. A clear advantage of this approach is we can keep a lot of what Rails gives us while also enjoying the advantages of building views with React.
Spiritually, Superglue and Inertia are very similar, but they differ in the way they work. While Inertia passes the props directly from the controller, Superglue gets them from a .json.props file that matches the name of the controller action.
The other difference is that Inertia is framework-agnostic while Superglue uses React with Redux, which seems a reasonable alternative considering the popularity of both libraries.
How does it work?
Superglue bridges our Rails application with React views without the need to create an explicit API by leveraging view files that define JSON, using PropsTemplate, a JSON templating DSL also created by Thoughtbot.
React components are used to render views, and they get the data from the JSON templates we define in .props.json files. Then, we access that data using the useContent hook, which, behind the scenes, uses Redux to get that data for us.
The main feature behind PropsTemplate is that the specified JSON can be traversed by the library when we specify a specific node, giving us the ability to produce partial updates without the need to evaluate the whole file.
Rails views are replaced with React page components, which are nothing more than components that represent an entire view. The good thing is that we don't have to worry about API calls or passing props manually to these components because Superglue takes care of that for us.
The same happens with cookies and routing: because React is mounted after the initial view is rendered, we can perform authentication, authorization, and any other action to make sure our app is secure without having to rely on React.
Moreover, Superglue uses UJS to produce an SPA-like navigation experience and to produce partial page reloads without the need to write any JavaScript at all: we just define a link with an appropriate data attribute and href value.
What we will build
For this tutorial, we will build a fictional application called Pomoflow: a project management app that helps freelancers keep track of work done for different projects.
The application will include a public-facing part consisting of a home page, a login page, and a simple blog to demonstrate how SSR works with Inertia.
It will also have an example dashboard with a global search and a projects field with pagination and a form using Superglue.
The result should look something like this:
Application setup
Let's start by creating a new Rails application:
rails new pomoflow --skip-javascript
Now, we add and install the vite_rails gem:
bundle add vite_rails && bundle install
Next, we install Vite specifically:
bundle exec vite install
This command does the following:
- Add a
bin/viteexecutable to start the dev server. - Installs
viteand thevite-plugin-rubylibrary. - Add
vite.config.tsandconfig/vite.jsonconfiguration files. - Creates an
application.jsentrypoint for the application that's located atapp/frontend/entrypoints. - Adds the
bin/vite devcommand to theProcfile.devfile.
Now, to test that everything's working as expected, set a test route as the root, run bin/dev, and visit the page.
It should be empty, but if we check the console, we should see the following:

Now that we have Vite installed, let's install Superglue:
Installing Superglue
The first step is to add the gem to the Gemfile and install it:
bundle add superglue && bundle install
Next, we run the installation command. To use TypeScript, we have to pass the --typescript flag:
rails g superglue:install # or pass the --typescript flag
This command adds many files inside the app/javascript directory:
- An
application.jsx, the core of the React application, responsible for rendering the components for each one of the views we define in our application. - An
application_visit.jsfile: responsible for making UJS visits. - A
store.jsfile: a Redux store created using Redux Toolkit. It acts as a container for the application state. In this file, we define reducers, which are functions that receive the current application state and an action as an argument and return a new state. In the context of a Superglue application, they allow us to modify global state like the flash object, a shopping cart, notifications, etc. - A
page_to_page_mapping.jsfile: it's used to map our props template to the component. We have to modify this file every time we add a page-level component. However, we can automatically populate it if our build tool supports globbing. Vite does, so we won't have an issue with that. - A
componentsdirectory: we're supposed to add the individual components that make up our application's UI here. It includes anInput.jsxcomponent for commonly used inputs and aLayout.jsxcomponent that wraps our application. - A
slicesdirectory: in Redux Toolkit, a slice is a collection of reducer logic and actions for a given feature in our app. Superglue includes aflash.jsslice, which is responsible for populating and clearing the flash. We will add some custom slices to see how they work later.
Now, because we're using Vite, which uses the frontend directory, let's move the Superglue-added files into it:
mv app/javascript/* app/frontend
The next step is to rename entrypoints/application.js to application.jsx and copy the contents of the application.jsx from Superglue while updating the imports:
// app/frontend/entrypoints/application.jsx
import React from "react"
import { createRoot } from "react-dom/client"
import { Application } from "@thoughtbot/superglue"
import { buildVisitAndRemote } from "../application_visit"
import { pageIdentifierToPageComponent } from "../page_to_page_mapping"
import { store } from "../store"

// Rest of the code
Now, we have to make sure to pass application.jsx to the vite_javascript_tag in the application layout:
<%= vite_javascript_tag 'application.jsx' %>
Next, let's add a sample greet resource to show how to integrate everything:
resource :greet, only: [:show]
Then, we add a GreetsController and make sure we have the following in there:
class GreetsController < ApplicationController
  before_action :use_jsx_rendering_defaults

  def show
  end
end
Now, we create the greets directory, and within it, we add a show.json.props file where we will define the props that our React component will receive, it essentially uses the Jbuilder syntax:
# app/views/greet/show.json.props
json.body do
  json.greet "Hello, World!"
end

json.footer "Making Rails developers genuinely happy since 2020"
Then, we add our React page component inside the directory:
// app/views/greet/show.jsx
import React from 'react'
import { useContent } from '@thoughtbot/superglue';

export default function GreetsShow() {
  const {
    body,
    footer
  } = useContent()

  const { greet } = body

  return (
    <>
      <h1>{greet}</h1>
      <span>{footer}</span>
    </>
  )
}
Note that we're getting the props with the useContent function from Superglue. The component itself doesn't need to receive props in the traditional React way.
Now, if we run our server with bin/dev and navigate to the greet route, we will see a blank page and the following error: Uncaught Error: Superglue Nav component was looking for greets/show but could not find it in your mapping.
This is because we have to manually add the mapping to the page_to_page_mapping.js file:
// app/frontend/page_to_page_mapping.js
import GreetsShow from "../views/greet/show"

const pageIdentifierToPageComponent = {
  'greet/show': GreetsShow
}
export { pageIdentifierToPageComponent }
Now we can actually navigate to /greet and see the following:

You might have thought that manually adding the component mapping doesn't sound too fun, so let's add the following to avoid having to add them like that:
const pageIdentifierToPageComponent = {}
const pages = import.meta.glob("../views/**/*.jsx", { eager: true })

for (const key in pages) {
  if (pages.hasOwnProperty(key)) {
    const identifier = key.replace("../views/", "").split('.')[0];
    pageIdentifierToPageComponent[identifier] = pages[key].default;
  }
}

export { pageIdentifierToPageComponent }
Now, let's install Tailwind to make things look nice as we code our app:
Adding Tailwind
The first step is to add Tailwind and its Vite plugin as dev dependencies:
yarn add -D tailwindcss @tailwindcss/vite
Then, let's add the @tailwindcss/vite plugin to our Vite config:
// vite.config.ts
import { defineConfig } from 'vite'
import RubyPlugin from 'vite-plugin-ruby'
import path from "path"
import tailwindcss from "@tailwindcss/vite";

export default defineConfig({
  plugins: [
    RubyPlugin(),
    tailwindcss(),
  ],
})
Next, we have to create an application.css file in the entrypoints directory and then a separate application.tailwind.css within a newly created stylesheets directory:
touch app/frontend/entrypoints/application.css && mkdir app/frontend/stylesheets && touch app/frontend/stylesheets/application.tailwind.css
Then, let's add the following to the application.tailwind.css file:
@import "tailwindcss";

@source "../../../app/views/**/*.jsx";
@source "../../../app/views/**/*.html.erb";
And, in the application.css entrypoint, let's import this:
@import "../stylesheets/application.tailwind.css";
Finally, let's include the stylesheet in our application layout:
<%= vite_stylesheet_tag 'application' %>
Now, without changing anything, we should see the following when we visit /greet:

Building the application
Now that we have everything set, we can start working on our application.
For practical reasons, we won't include everything in the form of code blocks because a lot isn't directly related to Superglue, but you can check the repository if you want to see how everything was implemented.
Let's start by seeing how the flash messages work and how to abstract them to a component:
Flash messages
Like we learned, Superglue adds a <script> tag to the body of the rendered page that contains information about the page component it should mount, the CSRF token, the props we're passing to it, and in the slices key of the initial state object, we have the flash object:
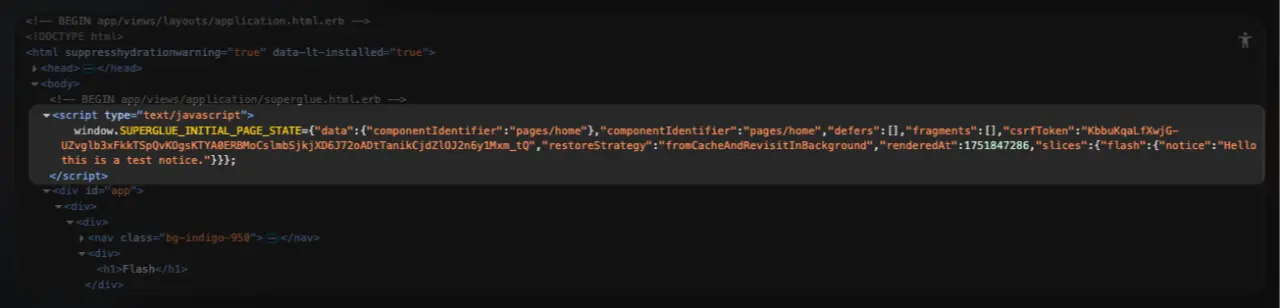
This is all mounted into the Redux store in order for that state to be accessible globally, which means that any React component can access it using the useSelector hook from Redux:
import { useSelector } from "react-redux";

export default function Test() {
  const flash = useSelector((state) => state.flash)

  // Rest of the component
}
Superglue adds a rudimentary flash message feedback to the Layout component, but it doesn't have styling, and it feels a bit clunky to leave it there, so let's extract everything to a Flash component.
As we're using Tailwind, let's add the tailwind-variants library to handle the different types of flash messages our application will have.
yarn add tailwind-variants
Now, let's add Lucide for the flash message icons. You can use any other library or SVG icon if you like:
yarn add lucide-react
Now, let's create a Flash.jsx component in our components directory:
// app/frontend/components/Flash.jsx
import React from 'react'
import { tv } from 'tailwind-variants';
import { useSelector } from 'react-redux'
import { CircleAlert, TriangleAlert, Info } from 'lucide-react'

export default function Flash() {
  const flash = useSelector((state) => state.flash)
  const key = Object.keys(flash)[0]

  const iconMap = {
    alert: <CircleAlert />,
    notice: <Info />,
    warning: <TriangleAlert />
  }

  const flashStyles = tv({
    slots: {
      base: "w-full flex items-center space-x-2 justify-center p-4 rounded-md bg-slate-200 border border-slate-300",
      iconContainer: "text-slate-700",
      message: "text-base text-slate-700"
    },
    variants: {
      type: {
        alert: {
          base: "bg-rose-100 border-rose-200",
          iconContainer: "text-rose-800",
          message: "text-rose-800"
        },
        notice: {
          base: "bg-blue-100 border-blue-200",
          iconContainer: "text-blue-800",
          message: "text-blue-800"
        },
        warning: {
          base: "bg-yellow-100 border-yellow-200",
          iconContainer: "text-yellow-700",
          message: "text-yellow-700"
        }
      }
    }
  })

  const { base, iconContainer, message } = flashStyles({ type: key })

  if (!flash[key]) return null

  return (
    <aside className={base()}>
      <div className={iconContainer()}>
        {iconMap[key]}
      </div>
      <p className={message()}>{flash[key]}</p>
    </aside>
  )
}
Notice that if we set a flash[:notice] in our controller action, Superglue doesn't return an object like {type: "notice", message: "Your account was created successfully"} it just returns an object with a single key that depends on the flash type, like {notice: "Your account was created successfully"}.
We use that key for our component variants, and we add an iconMap object to return the appropriate icon.
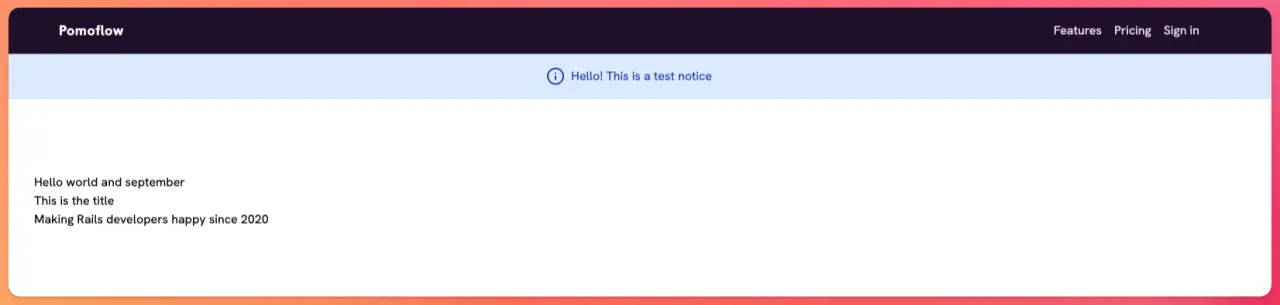
We then add our <Flash/> component to the layout and set a test flash message:
class GreetsController < ApplicationController
  def show
    flash[:notice] = "Hello! This is a test notice"
  end
end
And we should see the following result:
Further reading
Component variants with the "class_variants" gemNow that we've added our first functionality, let's understand how Superglue uses UJS (Unobtrusive JavaScript) to improve user experience with an SPA-like experience:
Navigation with UJS
Out of the box, Superglue acts like a multipage application: Rails handles the routing, and controllers end up rendering a layout that has the JSON for each response, which is picked up by Superglue and loaded into the view within a <script> tag.
However, we can use Superglue to generate visits without producing a full-page reload using the data-sg-remote and data-sg-visit data attributes in links.
The data-sg-visit
We can use links with this data attribute whenever we want to navigate to a specific page while updating the address bar without reloading:
<a href="/blog" data-sg-visit />
These links are well suited for SPA-like navigation. We can add them to any part of our application to give users the impression of an instantaneous visit.
Superglue intercepts the link visit, makes a request to the endpoint, swaps the page component for the new one, and passes the payload to it.
Navigating with links that use the data-sg-visit attribute looks like this:
Content refresh with data-sg-remote
On top of SPA-like navigation, we can also add the data-sg-remote attribute to links to perform requests that only reload a part of the page. To achieve this, we have to use prop digging using the props_at parameter in our link's href.
Let's build a refreshable stat card in our dashboard view that fetches the content from /dashboard but only focuses on the part that we want to refresh.
The first step is to add the stats to the dashboard/index.json.props partial:
path = param_to_dig_path(params[:props_at])

json.data(dig: path) do
  json.stats do
    json.total_hours_this_month rand(100)
    json.total_earnings_this_month 4050
    json.active_projects 3
    json.average_hourly_rate 65
  end
end
Now, for our dashboard view at app/views/dashboard/index.jsx we have the following:
// imports

export default function DashboardIndex() {
  const user = useSelector((state) => state.user)
  const data = useContent().data
  const stats = data.stats

  return (
    <AppLayout>
      <div className="py-6 px-6">
        <div className="mb-8">
          <h1 className="text-3xl font-bold text-gray-900">Dashboard</h1>
          <p className="text-gray-600">Welcome back, {user.username}. Here's your freelance activity overview.</p>
        </div>

        <div className="grid grid-cols-12 w-full gap-x-6 gap-y-6 mb-8">
          <div className="col-span-12 md:col-span-6 lg:col-span-3">
            <StatsCard
              title="Hours This Month"
              value={stats.total_hours_this_month}
              refreshPath="/dashboard?props_at=data.data.stats"
              subtitle="vs 148 last month"
              refresh={true}
              icon={<Clock />}
              color="blue"
            />
          </div>
        </div>
      </div>
    </AppLayout>
  )
}
Then, in our StatsCard component, we include a link that looks like this:
<a href={refreshPath} className="ml-12 flex items-center space-x-2" data-sg-remote>
  <RefreshCcw className="w-4 h-4 text-gray-500" />
  <span className="text-sm font-medium text-gray-500">Refresh</span>
</a>
Because the dashboard.json response looks like this:
{
  "data": {
    "data": {
      "stats": {
        "total_hours_this_month": 74,
        "total_earnings_this_month": 4050,
        "active_projects": 3,
        "average_hourly_rate": 65
      }
    }
  }
}
We pass the dashboard?props_at=data.data.stats so it only fetches that part of the response. Right now it might not seem worth it, but as we add features to the dashboard it will eventually reach a point where it makes sense to partially fetch a part of the page.
The result looks like this:
Pagination
To add pagination to a Superglue app, we need to pass the pagination links we want through the .json.props file.
Let's add simple pagination to our project index page using the Pagy gem:
bundle add pagy && bundle install
Then, we need to include the Pagy::Backend concern in our application controller:
# app/controllers/application_controller.rb
class ApplicationController < ActionController::Base
  include Pagy::Backend
end
And the Pagy::Frontend in the application helper:
module ApplicationHelper
  include Pagy::Frontend
end
And, require the Pagy extras in a pagy.rb initializer:
# config/initializers/pagy.rb
require 'pagy/extras/pagy'
Next, we add the pagination links in the index.json.props:
json.pagination do
  json.prevPage pagy_prev_url(@pagy)
  json.nextPage pagy_next_url(@pagy)
end
Now, let's create a Pagination component to avoid repeating logic in views:
import React from 'react'

const Pagination = ({ pagination, className = '' }) => {
  return (
    <nav className={`flex items-center space-x-4 ${className}`}>
      {pagination.prevPage && (
        <a href={pagination.prevPage} data-sg-visit className="text-indigo-700 font-semibold">Previous</a>
      )}
      {pagination.nextPage && (
        <a href={pagination.nextPage} data-sg-visit className="text-indigo-700 font-semibold">Next</a>
      )}
    </nav>
  )
}

export default Pagination
Nothing fancy for the component; we're just using the data-sg-visit attribute to avoid a page reload when paginating our content.
This should result in the following experience:
Working with forms
One of the best things about Superglue is that we can make use of Rails form helpers to create forms. There's no need to reinvent the wheel and solve things like CSRF protection.
We mentioned before that installing Superglue added an Inputs.jsx file with many of the most common inputs. Those are unstyled inputs that we can use together with the form_props gem, which is a dependency for Superglue, to generate functioning forms in our apps.
Let's add a Project model and a form to create and edit projects using Superglue:
bin/rails generate model Project name description:text && bin/rails db:migrate
Let's add the routes:
# config/routes.rb
resources :projects
And controller:
class ProjectsController < ApplicationController
  before_action :use_jsx_rendering_defaults

  def new
  end

  def create
    @project = Project.new(project_params)

    if @project.save!
      redirect_to projects_path, notice: "Project created successfully"
    else
      flash.now[:alert] = "There was an error creating your project"
      render :new
    end
  end

  private

  def project_params
    params.expect(project: [:name, :description])
  end
end
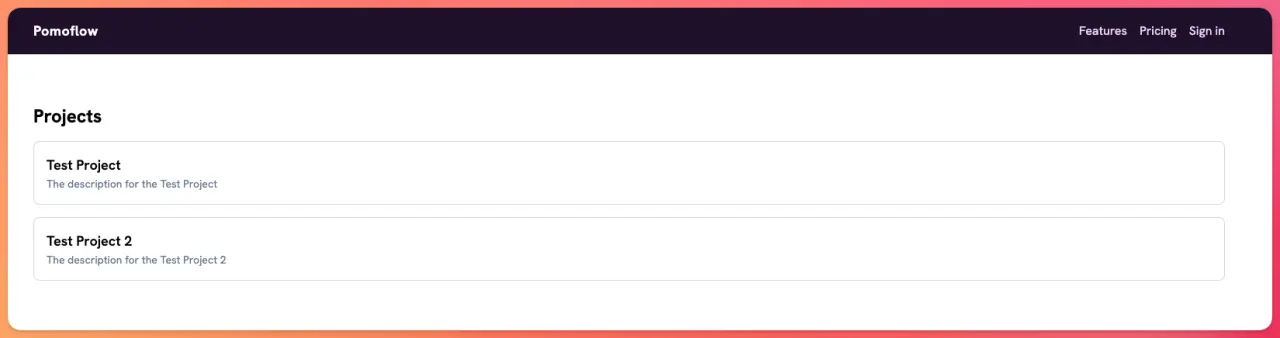
Let's create the index.json.props file so we can pass the list of projects to the React component:
# app/views/projects/index.json.props
json.projects do
  json.array! @projects do |project|
    json.name project.name
    json.description project.description
    json.url project_path(project)
  end
end
Now, let's add the React page component responsible for rendering the list of projects:
// app/views/projects/index.jsx
import React from 'react'
import { useContent } from '@thoughtbot/superglue'
import { Layout } from '@components/layouts/Layout'
import Container from '@components/Container'

export default function ProjectsIndex() {
  const { projects } = useContent()

  return (
    <Layout>
      <Container>
        <div className="my-16">
          <h1 className="text-2xl font-bold mb-4">Projects</h1>
          <ul className="space-y-4">
            {projects.map((project) => (
              <li key={project.id} className="border border-gray-300 rounded-lg p-4">
                <a href={project.url} className="text-lg font-semibold">{project.name}</a>
                <p className="text-sm text-slate-500">{project.description}</p>
              </li>
            ))}
          </ul>
        </div>
      </Container>
    </Layout>
  )
}
After creating a couple of test projects from the console, our /projects view should look like this:
Notice that we're lifting the projects variable from the Redux state with the useContent function provided by Superglue, which behind the scenes is using Redux's useSelector.
Now that we have a list of projects to redirect after creating a project, let's learn how to add form_props to generate the inputs that we will pass to our React component.
Even though it's not explained explicitly in the documentation, the form_props gem is added as a dependency.
The basic task of the gem is to generate forms with inputs as JSON using Rails form helpers. Let's add a form to the new.json.props file:
# app/views/projects/new.json.props
json.new_project_form do
  form_props(model: @project) do |f|
    f.text_field :name
    f.text_field :description
    f.submit
  end
end
If we visit /projects/new.json we will see the following output:
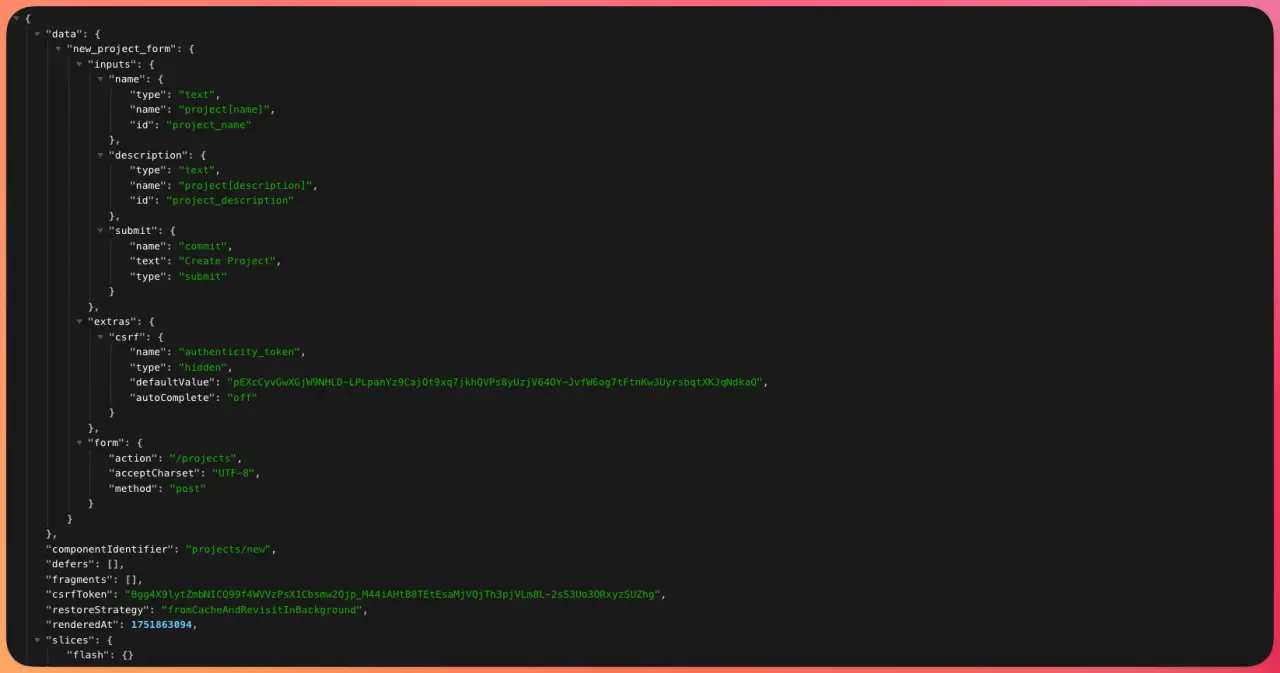
As you can see, the form_props helper generated our desired form as JSON. Now, let's see how we can go from this to a functioning form.
Let's start by creating a page component for the new project view:
// app/views/projects/new.jsx
import React from 'react'
import { useContent } from '@thoughtbot/superglue'

import { Layout } from '@components/layouts/Layout'
import { Form, FieldBase, SubmitButton } from "@components/Inputs"
import Container from '@components/Container'

export default function ProjectsNew() {
  const { form, extras, inputs } = useContent().new_project_form

  return (
    <Layout>
      <Container>
        <div className="max-w-xl mx-auto border border-gray-300 rounded-lg p-8 my-16">
          <h1 className="text-2xl font-bold mb-4">New Project</h1>
          <Form {...form} extras={extras} className="flex flex-col">
            <div className="flex flex-col space-y-2">
              <FieldBase {...inputs.name} label="Name" className="px-3 py-2 border border-gray-300 rounded-lg" />
              <FieldBase {...inputs.description} label="Description" className="px-3 py-2 border border-gray-300 rounded-lg" />
            </div>
            <SubmitButton text="Create Project" className="bg-indigo-700 text-white font-semibold mt-6 py-2 px-6 rounded-full" />
          </Form>
        </div>
      </Container>
    </Layout>
  )
}
We're getting the form, extras, and inputs objects from the new_project_form we defined in the news.json.props. These fields represent:
- The
formhas the request method, action, and charset. - The
extrasinclude the CSRF token and amethodobject, which is responsible for adding a hidden input that is required when the request is not aGETorPOST. - The
inputsdescribe our desired inputs in JSON format.
Then, we import the Form, FieldBase, and SubmitButton from the inputs that Superglue defined for us.
Next, we pass those objects to the input components and, by adding some styling with Tailwind, we obtain the following form:
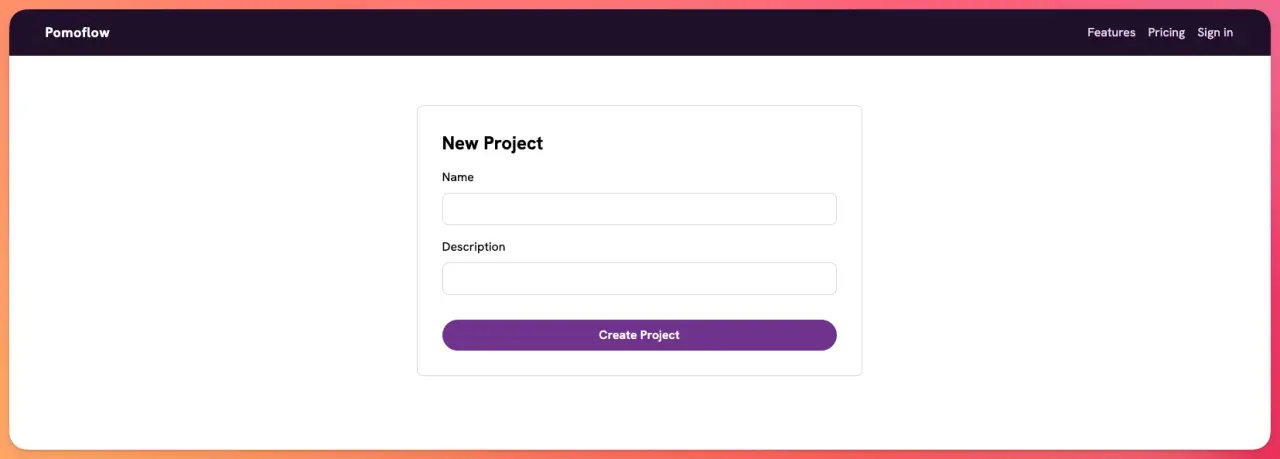
With Superglue and form_props, we can use our typical Rails form helpers in combination with the inputs to produce working forms.
Now, we can create a new project with this form and the controller action we've already defined without having to do anything else:
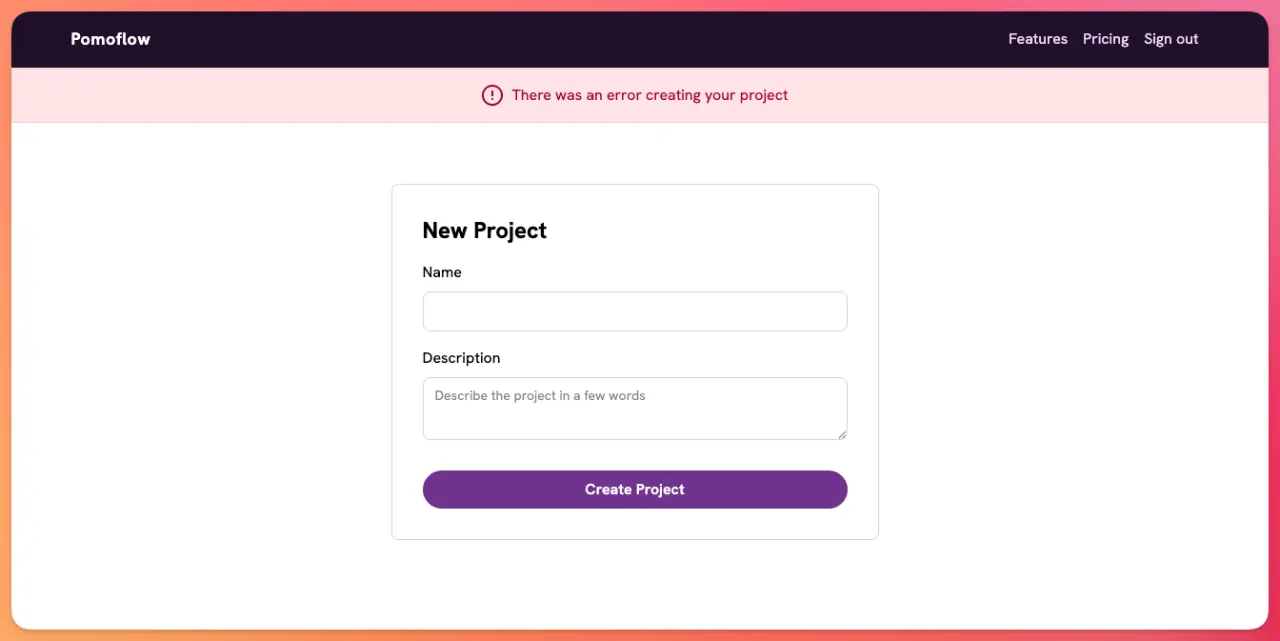
Now, let's see how we can deal with validation issues. Let's add a validation to the Project model:
class Project < ApplicationRecord
  validates :name, presence: true
end
Now, if we submit the form without adding the name of the project, because we're using the Flash component in the layout, we will see the alert message:
If we inspect the Inputs.jsx, we will see that the FieldBase input includes a label, an input, and a FieldError which is a span that contains the error message.
To pass error messages to the form, we need to add them to the new.json.props:
json.new_project_form do
  form_props(model: @project) do |f|
    f.text_field :name
    f.text_area :description
    f.submit
  end

  json.errors @project.errors.to_hash(true)
end
Then, we pick the errors from the useContent helper and pass them to the Form and pass the errorKey to the field:
// Imports
export default function ProjectsNew() {
  const { form, extras, inputs, errors } = useContent().new_project_form

  return (
    <Layout>
      {/* Rest of the code */}
      <Form {...form} extras={extras} validationErrors={errors}>
        <FieldBase {...inputs.name} errorKey="name" label="Name" />
        <TextArea {...inputs.description} placeholder="Describe the project in a few words" label="Description" />
      </Form>
    </Layout>
  )
}
Now, after doing this and styling the FieldError, if we submit the form without a project name, we should see the following:

We can further customize the way validation errors are displayed. If we wanted, we could even add client-side validations, but that's not necessary for now.
User authentication
Now that we know how to work with forms, let's add user authentication with the Rails auth generator. If you're not familiar with the feature, check the tutorial so you're not lost.
To achieve it, we run the generator just like we did in the tutorial:
bin/rails generate authentication
This adds views for user login and password recovery flows. For the sake of brevity, we will just work with the new session page.
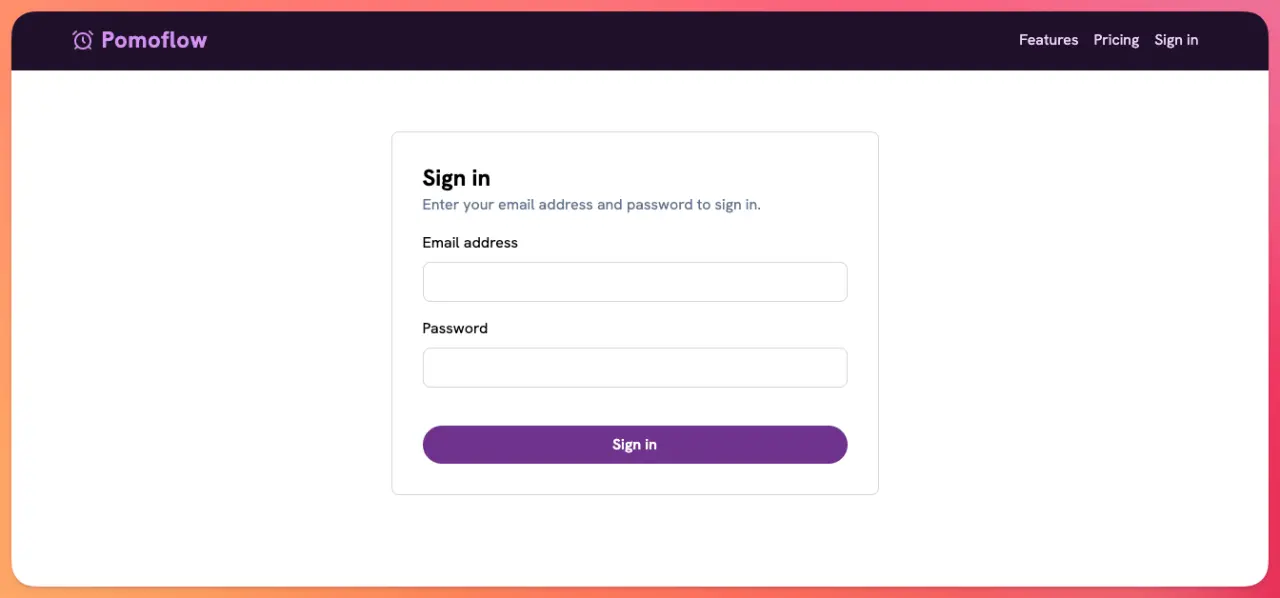
Let's start by defining the login form in the sessions/new.json.props:
json.login_form do
  form_props(url: session_path) do |f|
    f.text_field :email_address
    f.password_field :password
    f.submit
  end
end
Then, let's replace the new.html.erb with a React component:
// app/views/sessions/new.jsx
import React from 'react'
import { useContent } from "@thoughtbot/superglue"
import { Layout } from '@components/layouts/Layout'
import Container from '@components/Container'
import { Form, FieldBase, SubmitButton } from '@components/Inputs'


export default function SessionsNew() {
  const { form, extras, inputs } = useContent().login_form

  return (
    <Layout>
      <Container>
        <div className="max-w-lg mx-auto border border-gray-300 rounded-lg p-8 mt-16 mb-24">
          <h1 className="text-2xl font-bold">Sign in</h1>
          <p className="text-base text-slate-500 mb-4">
            Enter your email address and password to sign in.
          </p>
          <Form {...form} extras={extras} className="flex flex-col">
            <div className="flex flex-col space-y-2">
              <FieldBase {...inputs.emailAddress} label="Email address" className="px-3 py-2 border border-gray-300 rounded-lg" />
              <FieldBase {...inputs.password} label="Password" className="px-3 py-2 border border-gray-300 rounded-lg" />
              <SubmitButton text="Sign in" className="bg-indigo-700 text-white font-semibold mt-6 py-2 px-6 rounded-full" />
            </div>
          </Form>
        </div>
      </Container>
    </Layout>
  )
}
This results in the following login view:
Then, let's modify the Rails-generated create action to include feedback and redirect the user to a dashboard if the login attempt is successful:
class SessionsController < ApplicationsController
  before_action :use_jsx_rendering_defaults
  allow_unauthenticated_access only: %i[ new create ]

  def new
  end

  def create
    if user = User.authenticate_by(params.permit(:email_address, :password))
      start_new_session_for user
      redirect_to dashboard_index_path, notice: "Signed in successfully"
    else
      redirect_to new_session_path, alert: "Try another email address or password."
    end
  end

  # Rest of the code
end
Now, without doing anything else, we can actually sign in to our application and be redirected to the dashboard view:
Global user access
Because Superglue page components are mounted after the page is rendered by Rails we can protect routes like we normally do.
In the case of the auth generator, routes are protected by default. If we wanted to access the dashboard page, which is protected, without being authenticated, we would get redirected to the session/new page.
This is great because we don't have to deal with auth logic on the JS side of things. But, we need a way for our React components to know about the user: if it's authenticated or not and some information like a username or an ID in case we need that to make user-related requests.
We could theoretically pass the user to every page or component that requires it, but it would be impractical.
To solve this, we can add information about the user to the global application.json.props and the information would be included in every request:
# app/views/layouts/application.json.props
json.data(dig: path) do
  json.user partial: ['users/user', fragment: true] do
  end

  yield json
end
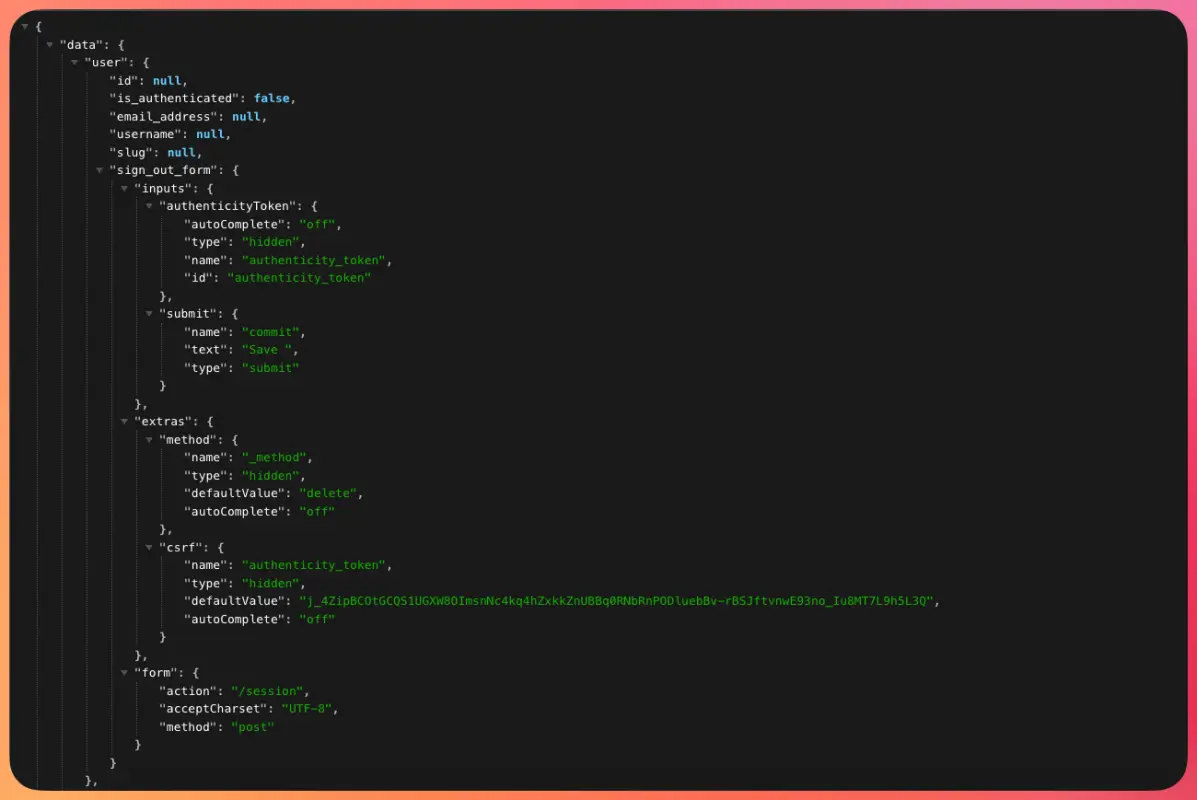
Then, we define the user partial:
# app/views/users/_user.json.props
json.id current_user.try(:id)
json.is_authenticated current_user.present?
json.email_address current_user.try(:email_address)
json.username current_user.try(:username)
json.slug current_user.try(:slug)

json.sign_out_form do
  form_props(url: session_path, method: :delete) do |f|
    f.hidden_field :authenticity_token
    f.submit
  end
end
If we go to the session/new.json path while not logged in, we should see the following:
With this, we can add a condition to the Navbar or any component that requires knowing the status of the user.
Let's conditionally show the Sign Out button if the user is logged in:
import React from 'react'
import Container from '@components/Container'
import Logo from '@components/Logo'
import { useContent } from '@thoughtbot/superglue'
import { Form, SubmitButton } from '@components/Inputs'

export default function Navbar() {
  const { user } = useContent()
  const signedIn = user?.is_authenticated

  return (
    <nav className="bg-indigo-950">
      <Container>
        <ul className="flex items-center justify-between gap-4 py-4 px-4 md:px-6">
          <li>
            <Logo />
          </li>
          <div>
            {signedIn ? (
              <li>
                <a href="/session" data-method="delete">Sign out</a>
              </li>
            ) : (
              <li>
                <a href="/session/new" data-sg-visit>Sign in</a>
              </li>
            )}
          </div>
        </ul>
      </Container>
    </nav >
  )
}
Now, if we're signed in, we will see a Sign Out button, and if we're not, we will see a link to session/new:

Later we will learn how to achieve the same thing using a custom Redux slice.
Signing out
In Rails, we can get away with the feature by simply using a link that is intercepted and processed as a DELETE request by our application. With Superglue, we cannot do that, so we have to define sign out as a form with a submit button.
So, the link to /session with data-method=delete won't work: it will make at a GET request instead of the POST request with the hidden input that Rails is expecting.
You might have noticed that I added a sign_out_form to the user partial in the previous section, we will use that to generate the sign-out form in the Navbar component:
// imports
export default function Navbar() {
  const user = useSelector((state) => state.user)
  const signedIn = user.is_authenticated
  const { form, extras } = user.sign_out_form

  return(
    <nav>
      <Container>
        <ul>
          {/* Rest of the code */}
          {signedIn ? (
            <Form {...form} extras={extras} className="flex flex-col">
              <SubmitButton text="Sign out" className="bg-indigo-700 text-white font-semibold py-1.5 px-4 rounded-full" />
            </Form>
          ) : (
            <li>
              <a href="/session/new" data-sg-visit>Sign in</a>
            </li>
          )}
        </ul>
      </Container>
    </nav>
  )
}
Which produces the following result:
Custom slice with Redux
We added global state by passing the user partial to the application.json.props. However, we can also handle global state using a Redux slice, just like Superglue does by default with the flash.
This type of state management is especially useful when we need to sync state between the client and the server. A shopping cart is a good example of this. If the user adds an item to the cart, we update the state in order for it to contain the new item that was added to the cart, update the total and subtotal amounts and update the items_count.
As the application we're building is oriented to project management, let's add a pomodoro counter to our navbar to show how many 45 minute work-stints we've achieved today:

Ideally, this feature would involve a countdown clock that would update the counter after completing the pomodoro, but we will keep it simple by incrementing the pomodoro count with a button.
Let's start by adding the new slice:
// app/frontend/slices/pomodoro.js
import { createSlice } from "@reduxjs/toolkit"
import { saveResponse, beforeVisit } from "@thoughtbot/superglue"

const initialState = {
  completedPomodoros: 0
}

export const pomodoroSlice = createSlice({
  name: "pomodoro",
  initialState: initialState,
  reducers: {
    increment(state) {
      state.completedPomodoros += 1
    },

    setCount(state, { payload }) {
      state.completedPomodoros = payload
    },

    resetCount(state) {
      state.completedPomodoros = 0
    }
  },
  extraReducers: builder => {
    builder.addCase(beforeVisit, (state, _action) => {
      return state
    })
    builder.addCase(saveResponse, (state, action) => {
      const { page } = action.payload

      if (page.slices.pomodoro) {
        return {
          ...state,
          ...page.slices.pomodoro
        }
      }

      return state
    })
  }
})

export const {
  increment,
  setCount,
  resetCount
} = pomodoroSlice.actions

export const selectPomodoroCount = (state) => state.pomodoro.completedPomodoros
export default pomodoroSlice.reducer
Then, we include the slice in the store.js file:
// Rest of the imports
import { pomodoroSlice } from "./slices/pomodoro"
export const store = configureStore({
  devTools: process.env.NODE_ENV !== "production",
  middleware: getDefaultMiddleware =>
    getDefaultMiddleware({
      serializableCheck: {
        ignoredActions: [beforeFetch.type, beforeVisit.type, beforeRemote.type]
      }
    }),
  reducer: {
    superglue,
    pages,
    flash: flashSlice.reducer,
    user: userSlice.reducer,
    pomodoro: pomodoroSlice.reducer
  }
})
Now, I can fetch the completed pomodoro count from the store inside the navbar:
// imports
const AppNavbar = () => {
  const dispatch = useDispatch()
  const completedPomodoros = useSelector(selectPomodoroCount)

  // Rest of the code

  const incrementPomodoro = () => {
    dispatch(increment())
  }

  return (
    <div className="w-full bg-white px-8 py-4 border-b border-zinc-200">
      <div className="w-full items-center justify-between flex">
        <div className="flex items-center gap-2 cursor-pointer" onClick={incrementPomodoro}>
          <img src={Pomodoro} alt="Pomodoro" className="w-8 h-8 fill-red-600" />
          <span className="text-indigo-950">{completedPomodoros} completed today</span>
        </div>
      </div>
    </div>
  )
}
After defining the slice and including it in the store, we can access the selectPomodoroCount action using the useSelector hook from Redux.
Now, with the current setup we have where we're accessing the pomodoro count using the completedPomodoros variable, we get the following behavior:
Because we're using the data-sg-visit for links in the sidebar, the Redux store is persisted through requests and we don't lose the current count.
This setup is simple, essentially a counter, and probably not very useful, but we can use the same principle to build something that better fits our needs.
Search feature
With Superglue, we can build a search feature by leveraging the Superglue remote requests.
To make it work, let's start by adding the search functionality globally to our application.json.props template:
path = request.format.json? ? param_to_dig_path(params[:props_at]) : nil

json.data(dig: path) do
  yield json
  json.search do
    json.results do
      json.array! Project.search(params[:q]) do |project|
        json.id project.id
        json.name project.name
        json.description project.description
        json.url project_path(project)
      end
    end
  end
end

## Rest of the template
We're adding a search key that returns an array of results. To make things simple we're just searching on the Project model but we could do a global search as well.
Then, let's create a <SearchBar/> component that receives a results array and an onChange function that we will pass the a text field input. If the component receives results, it displays them in an absolutely positioned <div> below the input.
import React from 'react'
import { Search, X } from 'lucide-react'

export default function SearchBar({ onChange, results }) {

  return (
    <div className="w-1/3 border border-neutral-300 rounded-full relative focus:outline-none">
      <input type="text" className="w-full pl-8 py-1.5 focus:outline-none" placeholder="Search projects" onChange={onChange} />
      <Search className="w-5 h-5 absolute left-2 top-1/2 -translate-y-1/2 text-zinc-400" />
      {results.length > 0 && (
        <div className="w-full absolute top-12 rounded-lg bg-white px-4 py-4 border border-zinc-200 z-10 shadow-lg">
          <h4 className="text-base font-semibold text-gray-900">Results</h4>
          <ul>
            {results.map((result) => (
              <li className="text-gray-700" key={result.id}>
                <a href={result.url} className="hover:underline">{result.name}</a>
              </li>
            ))}
          </ul>
        </div>
      )}
      {results.length > 0 && (
        <div className="absolute right-2 top-1/2 -translate-y-1/2 cursor-pointer">
          <X className="w-5 h-5 text-zinc-400" onClick={onChange} />
        </div>
      )}
    </div>
  )
}
Then, let's add the search component to the same <AppNavbar/> component we defined in the previous section:
import React, { useContext, useRef } from 'react'
import { NavigationContext, useContent } from '@thoughtbot/superglue'
import SearchBar from '../SearchBar'
import { debounce } from '../../utils'

const AppNavbar = () => {
  const { remote } = useContext(NavigationContext)
  const currentPageKey = useSelector(state => state.superglue.currentPageKey)
  const searchResults = useContent().search?.results || []

  const debouncedSearch = useRef(
    debounce((value) => {
      remote(`/?q=${value}&props_at=data.search.results`, {
        pageKey: currentPageKey,
        force: true
      })
    }, 250)
  ).current

  const handleSearch = (e) => {
    const value = e.target.value
    debouncedSearch(value)
  }

  return (
    <div className="w-full bg-white px-8 py-4 border-b border-zinc-200">
      <div className="w-full items-center justify-between flex">
        <SearchBar onChange={handleSearch} results={searchResults} />

        {/* Pomodoro counter */}
      </div>
    </div>
  )
}

export default AppNavbar
We add the <SearchBar/> component and pass the handleSearch function and the results array which we will get from the dashboard/index.json.props partial.
Then, in the handleSearch function, we're debouncing the search to avoid making repeat and unnecessary requests to the backend before we require them.
The most important part is the remote call where the actual request is performed.
As we defined the search feature globally in the application.json.props template, we can obtain the results by making a request to the / root path. However, we need to make sure to pass the currentPageKey which, for the /dashboard path, it would be precisely /dashboard.
We also have to pass the force: true because we're making the request to / from the dashboard which has a different componentIdentifier.
After this, we have a functioning search functionality:
Server-Side Rendering
Even though Superglue lets us integrate Rails goodies with React without any major efforts, React components are rendered after the server response when React is mounted into the view.
Real-world applications usually need at least some parts of the application to be server-side rendered. This is considerably important for Rails SEO where search engines require more resources to parse client-rendered pages which, in turn, means that our pages might get deprioritized or that our crawl budget might suffer.
Luckily, we can achieve it with Superglue using Humid, a wrapper around the mini_racer gem that's used to generate SSR pages from bundling builds.
In our example application, we have a blog with a list of posts located at posts/index and each post has its view at posts/show. Currently, the blog looks like this:
However, if we check what's getting loaded before React gets mounted, we will see that only the app shell is loaded:
curl -H "Accept: text/html" http://localhost:3000/blog
And the body of the HTML document looks like this:
<body>
  <!-- BEGIN app/views/application/superglue.html.erb -->
  <script type="text/javascript">
    window.SUPERGLUE_INITIAL_PAGE_STATE={"data":{"posts":[{"id":1,"title":"Cloudflare R2 with Active Storage","slug":"cloudflare-r2-with-active-storage","excerpt":"Let's learn how to add Cloudflare R2 uploads to a Rails application with Active Storage","url":"http://localhost:3000/blog/cloudflare-r2-with-active-storage"},{"id":2,"title":"GitHub-flavored Markdown on Rails","slug":"github-flavored-markdown-on-rails","excerpt":"Your app needs Markdown? Let's add it using the Commonmarker gem","url":"http://localhost:3000/blog/github-flavored-markdown-on-rails"},{"id":3,"title":"Apple Sign in with Rails","slug":"apple-sign-in-with-rails","excerpt":"Let's add Sign in With Apple a.k.a. social login with Apple to our Rails application wi...","url":"http://localhost:3000/blog/apple-sign-in-with-rails"}],"componentIdentifier":"posts/index"},"componentIdentifier":"posts/index","defers":[],"fragments":[],"csrfToken":"xEP7TXoXOlPeNNJU7-BWCzplhA5xd_W1f6X6zJVumWz8_U-f-aNQO8BBYk2d47JOz7wiL_chDL_OTR270VsDHw","restoreStrategy":"fromCacheAndRevisitInBackground","renderedAt":1752030397,"slices":{"flash":{},"user":{"id":null,"is_authenticated":false,"email_address":null,"username":null,"slug":null,"sign_out_form":{"inputs":{"authenticityToken":{"autoComplete":"off","type":"hidden","name":"authenticity_token","id":"authenticity_token"},"submit":{"name":"commit","text":"Save ","type":"submit"}},"extras":{"method":{"name":"_method","type":"hidden","defaultValue":"delete","autoComplete":"off"},"csrf":{"name":"authenticity_token","type":"hidden","defaultValue":"wX9b4AUYy9uATpjpRWV2xPNyI_emT_LQWCAXi3KqzaExvGoIUUkdyqZpuLSeQYv-nN3e58smTEmzafA-_M_7ZA","autoComplete":"off"}},"form":{"action":"/session","acceptCharset":"UTF-8","method":"post"}}}}};
  </script>

  <div id="app"></div>
  <!-- END app/views/application/superglue.html.erb -->
</body>
As users, we might not notice any difference, but search engine crawlers do appreciate if we return the whole HTML from the server.
Further reading
Sitemaps for Rails applicationsUsing Humid and Superglue, the server-side rendering flow looks something like this:
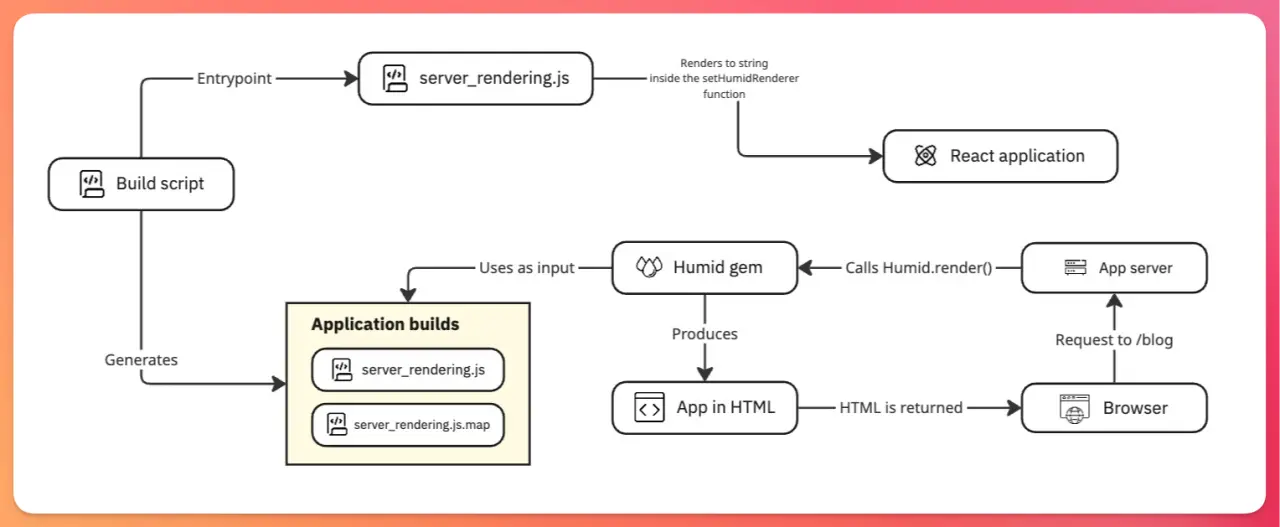
We have a build script that uses the server_rendering.js file which defines a setHumidRenderer function that receives json a baseUrl and a pathas parameters and that is capable of generating the HTML for a given view.
Then, inside a given partial or the entire application layout file, we use Humid to produce the HTML when a browser request is processed using the Humid.render function, which ends up producing the HTML based on the JSON props and the path.
To add server-side rendering with Superglue, let's start by installing Humid:
bundle add humid && bundle install
Then, we can optionally add the source-map-support library to support source maps:
yarn add source-map-support
Next, we add a humid.rb initializer following the instructions from Humid's GitHub repo, and we make sure to include the following:
# config/initializers/humid.rb
require "humid"
config.application_path = Rails.root.join("public", "builds", "server_rendering.js")
config.source_map_path = Rails.root.join("public", "builds", "server_rendering.js.map")
Then, in the server_rendering.js file, we make sure to define the setHumidRenderer function that returns the application as a string:
// app/javascript/server_rendering.js
import React from 'react';
import { renderToString } from 'react-dom/server';
import { Application } from '@thoughtbot/superglue';
import { buildVisitAndRemote } from './application_visit';
import { pageIdentifierToPageComponent } from './page_to_page_mapping';
import { store } from './store';

require("source-map-support").install({
  retrieveSourceMap: filename => {
    return {
      url: filename,
      map: readSourceMap(filename)
    };
  }
});

setHumidRenderer((json, baseUrl, path) => {
  const initialState = JSON.parse(json)
  return renderToString(
    <Application
      className="full-height"
      baseUrl={baseUrl}
      initialPage={initialState}
      path={path}
      buildVisitAndRemote={buildVisitAndRemote}
      store={store}
      mapping={pageIdentifierToPageComponent}
    />,
    {
      concurrentFeatures: false,
    }
  )
})
Then, we install the following libraries for compatibility:
yarn add esbuild-plugin-polyfill-node text-encoding whatwg-url
We create a shim.js for the same purpose:
export { TextEncoder, TextDecoder } from 'text-encoding'
export { URL, URLSearchParams } from 'whatwg-url'

export function MessageChannel() {
  this.port1 = {
    postMessage: function (message) {
      console.log('Message sent from port1:', message);
    },
  };

  this.port2 = {
    addEventListener: function (event, handler) {
      console.log(`Event listener added for ${event} on port2`);
      this._eventHandler = handler;
    },
    removeEventListener: function (event) {
      console.log(`Event listener removed for ${event} on port2`);
      this._eventHandler = null;
    },
    simulateMessage: function (data) {
      if (this._eventHandler) {
        this._eventHandler({ data });
      }
    },
  };
}

export const navigator = { language: "en-us" }
Then, we create a build-server.mjs file and add the following:
import * as esbuild from 'esbuild';
import { polyfillNode } from 'esbuild-plugin-polyfill-node';

await esbuild.build({
  entryPoints: ['app/frontend/server_rendering.js'],
  bundle: true,
  platform: 'browser',
  define: {
    'process.env.NODE_ENV': '"production"',
  },
  sourcemap: true,
  outfile: 'public/builds/server_rendering.js',
  logLevel: 'info',
  loader: {
    ".js": "jsx",
    '.png': 'dataurl',
    '.jpg': 'dataurl',
    '.gif': 'dataurl',
    '.svg': 'dataurl',
    '.svg': 'dataurl',
  },
  inject: ['./shim.js'],
  plugins: [
    polyfillNode({
      globals: false,
    }),
  ],
});
Next, we add a custom script to generate the SSR builds:
// package.json
  "scripts": {
    "build:ssr": "node ./build-server.mjs"
  }
Now, if we try running yarn build:ssr we should get something like this:
yarn run v1.22.19
$ node ./build-server.mjs

  public/builds/server_rendering.js      1.9mb ⚠️
  public/builds/server_rendering.js.map  3.6mb

✨  Done in 0.34s.
Finally, to add SSR only to the blog, we create an index.html.erb partial inside the posts folder and add the following:
<% initial_state = controller.render_to_string(@virtual_path ,formats: [:json], locals: local_assigns, layout: true) %>

<script type="text/javascript">
  window.SUPERGLUE_INITIAL_PAGE_STATE=<%= initial_state.html_safe %>;
</script>

<div id="app"><%= Humid.render(initial_state, request.scheme + '://' + request.host_with_port, request.fullpath).html_safe %></div>
Now, we start the server using bin/dev and we should see the post list:
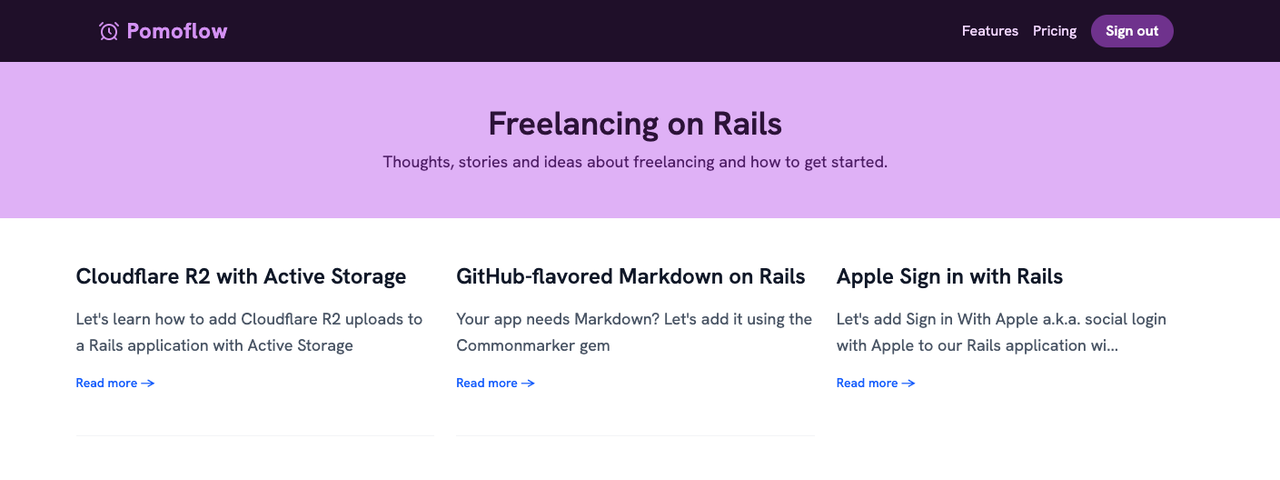
And now, if we perform a request using curl -H "Accept: text/html" http://localhost:3000/blog we should see the application's HTML inside the <div id="app"></div>.
Summary
Rails has improved a lot in the frontend with tools like Turbo and Hotwire, but there are times when we need to build very interactive applications where a frontend using a framework like React makes more sense.
But losing most of what makes us productive and using Rails in API-only mode is not a decision to take lightly.
That's where a library like Superglue, which lets us develop most of our application using a mix of React and Redux without losing Rails features comes into place.
Superglue replaces the typical Rails views with React components, and it passes data to them using partials that use a syntax that is essentially the same as jbuilder.
It also uses Rails UJS to produce an SPA-like experience for navigation and to produce partial content reloads by using links and forms with specific data attributes added which are used by Superglue to intercept the requests and produce the desired results.
In this article we used Superglue to create a sample application that includes the following features:
- User authentication.
- Working with forms.
- Custom flash messages
- Global search
- Pagination
- Server-side rendering.
All in all, Superglue is a nice alternative to integrate React into Rails applications. Its approach is similar but a bit different from Inertia.
If you're looking to integrate React into your next application, I would recommend you to give both libraries a go and decide which one is a better fit for you.
I hope this article was useful and that it can help you with your future projects. Have a good one and happy coding!
