Keeping our users engaged beyond just opening our web application can significantly boost retention and user satisfaction.
That's why integrating with Apple Wallet allows us to put our content directly on users' lock screens and in their daily workflows.
In this article, we will integrate Apple Wallet Passes in Rails to create signed passes that users can add to their phones with a single tap.
Let's start by understanding what they are and why they're useful. Skip to the Apple Developer setup if you're already familiar with Apple Wallet Passes.
What are Apple Wallet Passes?
They are a digital representation of real-world items like tickets, coupons, membership cards, etc.
However, they're not just static images. They can be dynamic and interactive with:
- Real-time updates: we can push updates to passes in case of changes like delays, cancellations, or updates.
- Expiration: we can add expiration dates to them so the user's wallet only shows non-expired passes.
- Points and balances: we can use them to run a loyalty program with store and gift cards.
- QR Codes: our passes can include QR codes or barcodes that we can use for quick scanning and validation at our physical locations.
- Geolocation triggers: passes can have geolocation data attached to them which allows them to appear on the user's lock screen when they're near a relevant location.
- Time triggers: passes can surface at specific dates or times.
These passes are bundled in a special file format .pkpass which is essentially a compressed file that contains a set of common files that constitute an actual Apple Pass.
The structure of a Pass
Passes are just a compressed and signed file that contains the following elements:
- A
manifest.json: it lists all the files in the pass bundle along with their SHA-1 hashes for integrity verification. It ensures none of the files have been tampered with. - A
pass.jsonfile: it contains the actual data about the pass including things like the Apple team ID, background and foreground color, and the information that's actually used to build the passes. -
A set of images: these are the images and icons we use for our passes. Because passes are meant to be displayed on many devices, we can include many resolutions like the original image and
2x,3xand so on. Furthermore, the image type (icon, strip, thumbnail, etc) must be supported by the type of pass we want to create, and the name has to match the image type:icon.png,strip.png, etc. - Signature: the cryptographic signature file that authenticates the entire bundle. It contains the digital signature created by Apple's developer certificate and ensures that the pass was created by the authorized developer.
We could build the .pkpass field ourselves, but we will be using the Passkit gem to save time.
Let's explore the different types of passes we can create:
Types of passes
We can create 5 different types of Apple Wallet Passes, each with its intended use case and layout rules:
Boarding Pass
The Boarding Pass layout has support for three images: logo, icon, and footer and it uses the boardingPass key.
It's appropriate for transit system passes like train tickets, airline boarding passes, etc. Typically, each pass corresponds to a single trip with specific starting and ending points.
The layout looks like this:
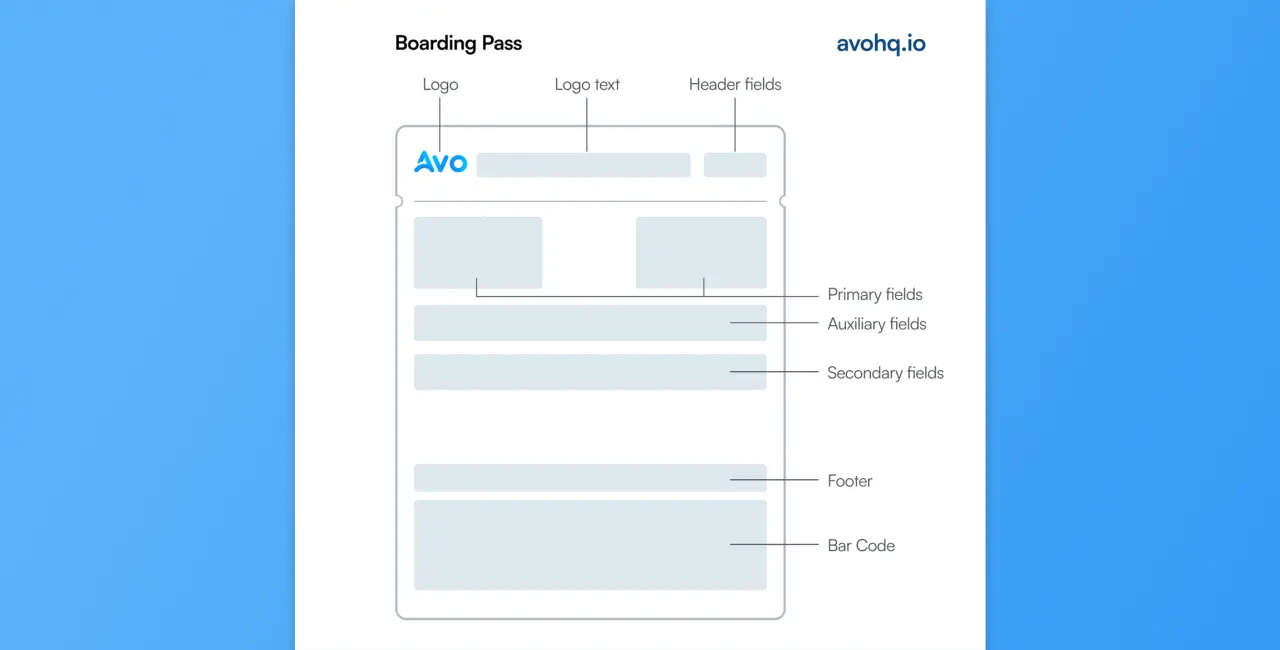
Usually the primary fields represent an origin and destination using unique 3-letter airport codes.
The auxiliary and secondary fields typically add information like flight number, seat, group, scheduled time, etc.
Coupon
Coupon passes layout is optimized for promotional offers and discounts, and it uses the coupon key.
They typically feature a strip image that we can use for branding or to improve the look and feel of the coupon.
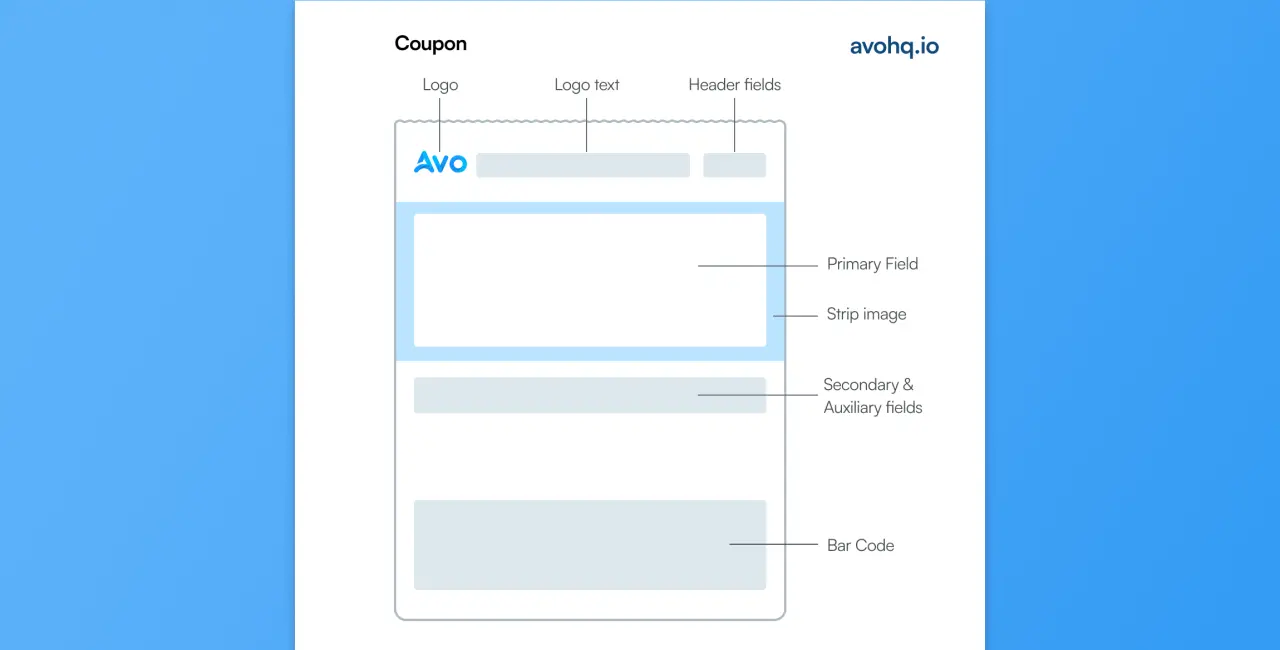
The primary field typically displays the offer title or discount amount. The header fields can show expiration dates, and secondary fields might be used to reinforce the offer's message.
Event Ticket
This pass type layout is optimized for concerts, sport events, and other entertainment or educational events. It uses the eventTicket key.
It supports three types of images: logo, icon, and a strip image that can span the full width of the pass and is located below the primary field.
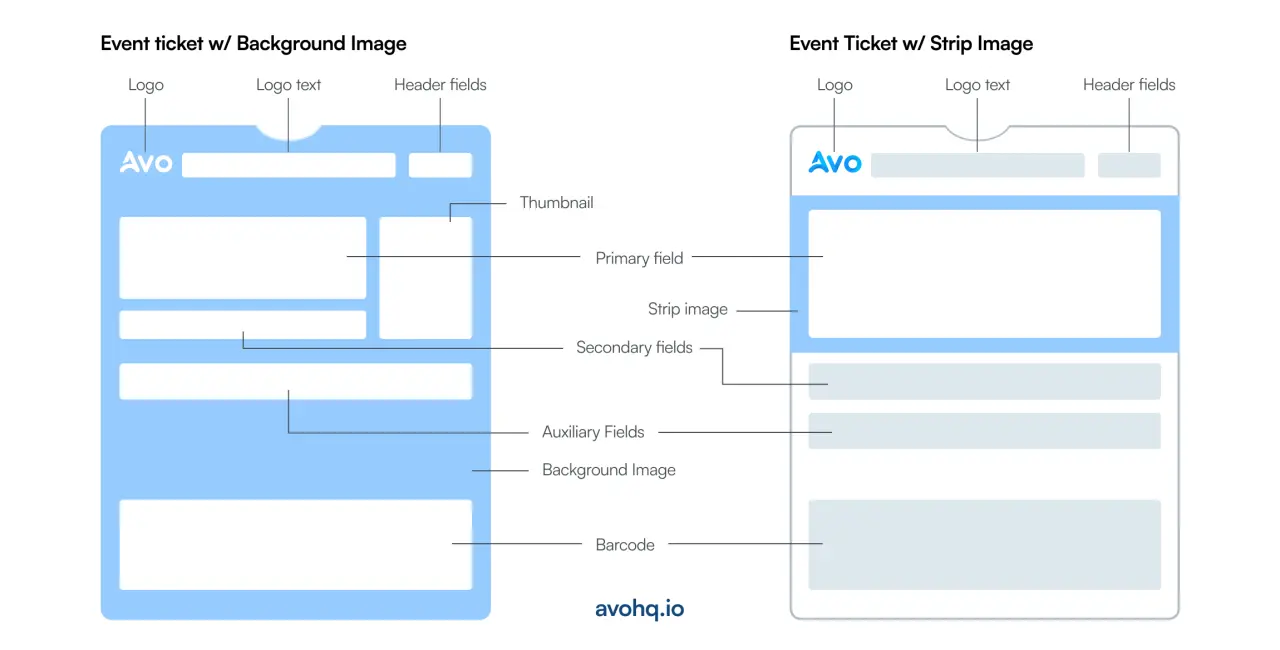
The primary field typically displays the event name while auxiliary fields show important events like the date, time, and the event's venue.
Secondary fields can include things like seat information, section number, entry gates, etc.
Typically, a pass corresponds to a single event, but a single pass could be used for several events or as a seasonal ticket.
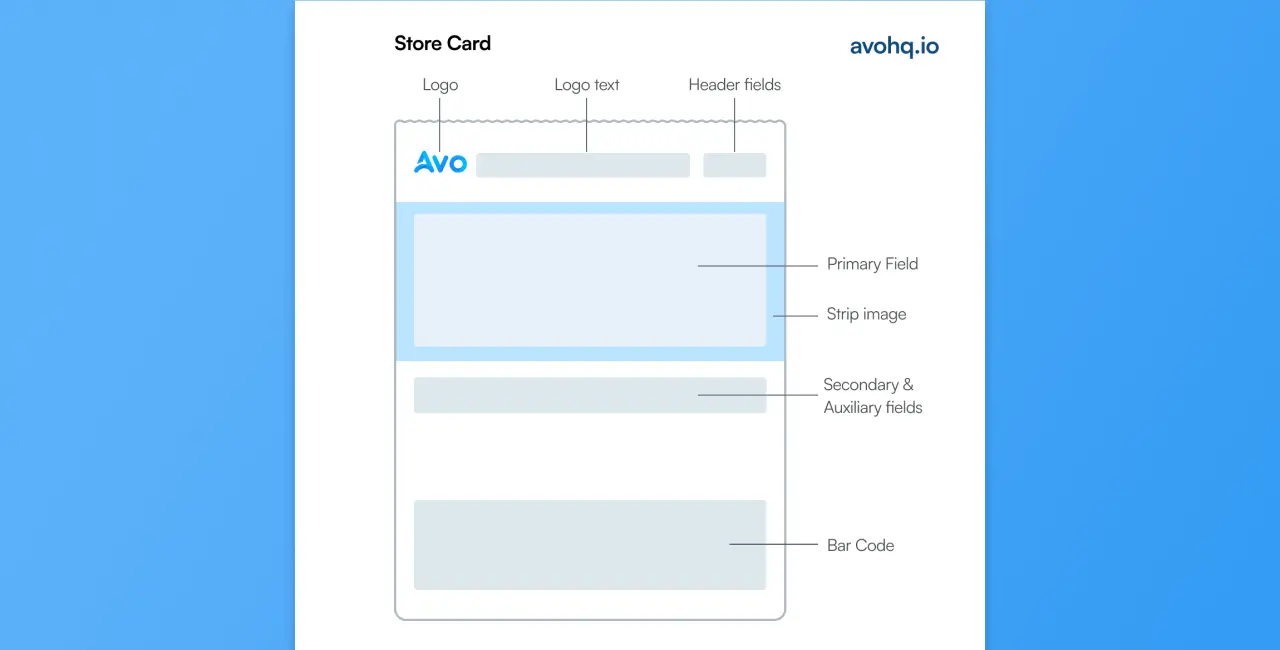
Store Card
These are usually designed for loyalty programs and membership cards. It uses the key storeCard.
It supports three types of images: logo,icon and strip.
The primary fields commonly show the member's name or account number, with secondary and auxiliary fields typically showing things like points balance, expiration dates, etc.
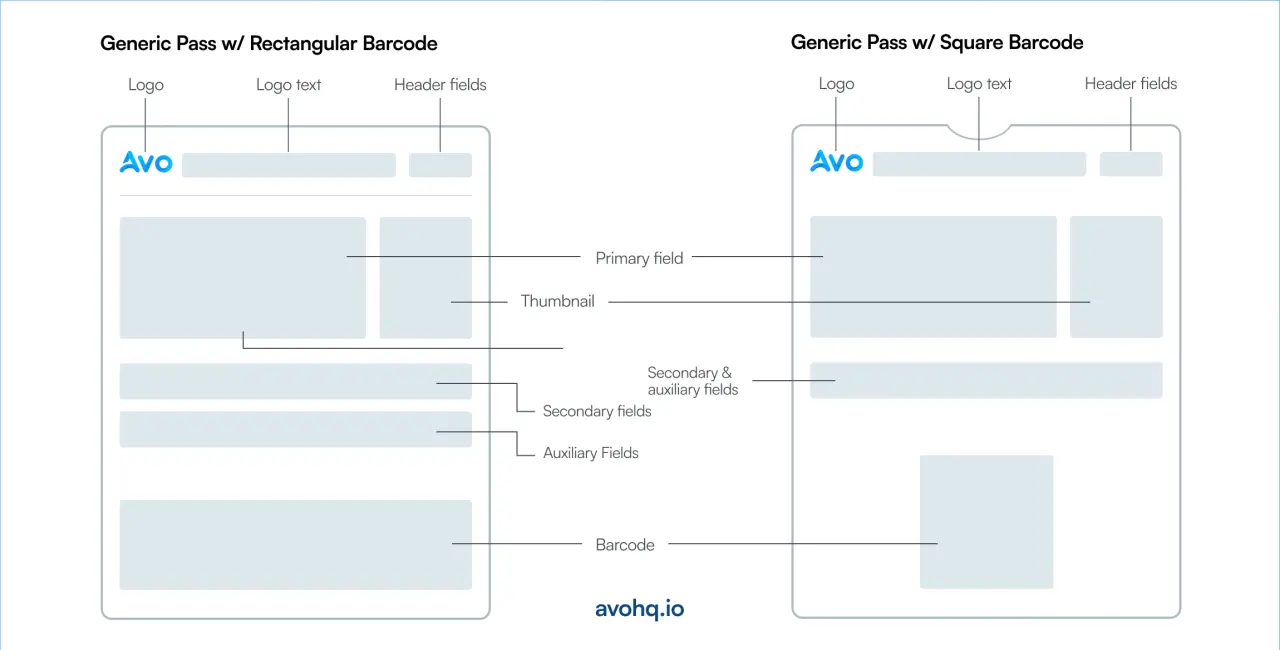
Generic
Generic passes offer the most flexibility and can be adapted for various purposes including tickets, vouchers, ID cards, membership passes, etc. It uses the generic key.
They support all image types: logo, icon, strip, and thumbnail.
The field layout is customizable, allowing us to produce diverse layouts depending on the content we add.
This pass type is ideal for use cases where other passes don't fit our needs or if we think that the default layout is what we need to present the necessary data as we like.
What we will build
For this tutorial, we will build AvoPass, a simple event application that has a list of events and allows users to buy tickets for them.
After a user has purchased a given ticket, we can provide them with access to a ticket details screen with an Add to Apple Wallet button where the user would be able to download the pkpass file and save it to the wallet.
The final result will look something like this:
Apple Developer Setup
Just like we did in our Apple Sign In with Rails tutorial, the first thing we need is to configure things on the Apple side of things.
Concretely, we need to generate or obtain the following:
- An Apple Intermediate Certificate
- Apple Team ID.
- A Pass Type ID.
- A Certificate Signing Request associated with the Pass Type ID.
- A
p12private certificate and the password used to generate it.
Let's see how to get each one of these:
Apple Intermediate Certificate
The first step is to navigate to Apple's Certificate Authority Page and search for the “Worldwide Developer Relations” certificate with the longest expiration date. They are located in the Apple Intermediate Certificates section.
At the time of writing this, the G6 version which expires in March 2036 is the latest option:
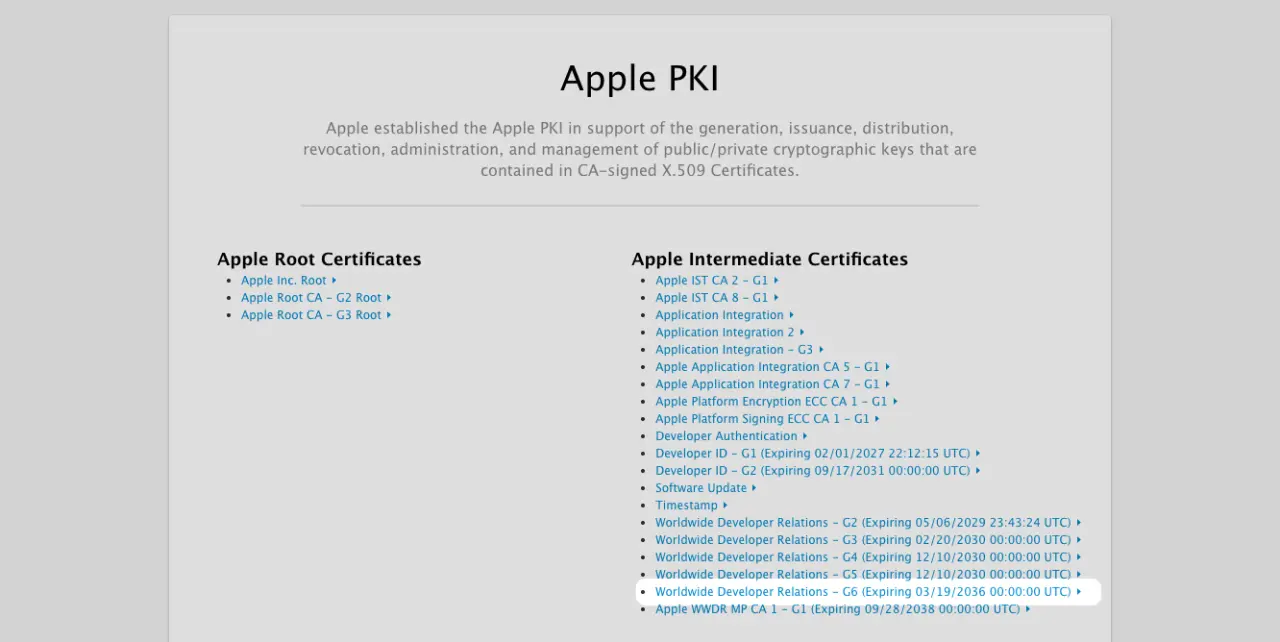
We download it and keep the AppleWWDRCAG6.cer in a safe place as we will use it later.
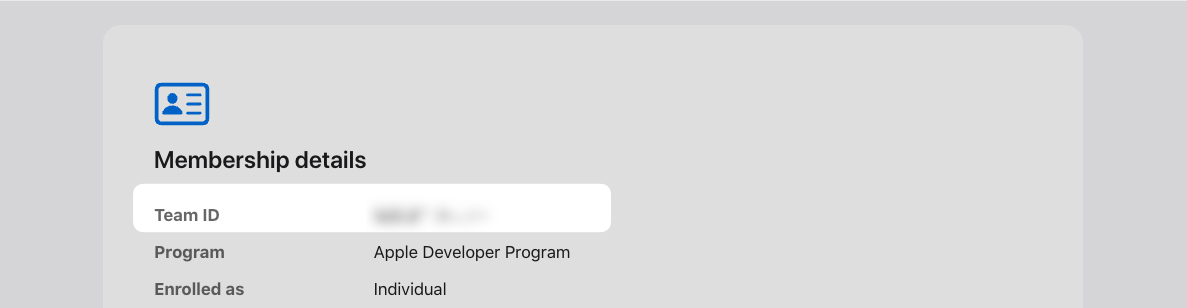
Apple Team ID
The next thing we need is our Apple Team ID. We can do that by going to our Apple Developer Account and searching for the Membership Details section below the Emails section.
Copy the Team ID and save it somewhere:
Pass Type ID
The Pass Type ID is a unique identifier we use to tell Apple who is issuing a given pass. This is required for Apple Wallet to accept and trust the passes we generate.
By itself, it's a string that usually uses a reverse domain name like: pass.com.avopass.ticket.
To create one, we have to go to the Pass Type ID section and click on the Register a Pass Type ID button:
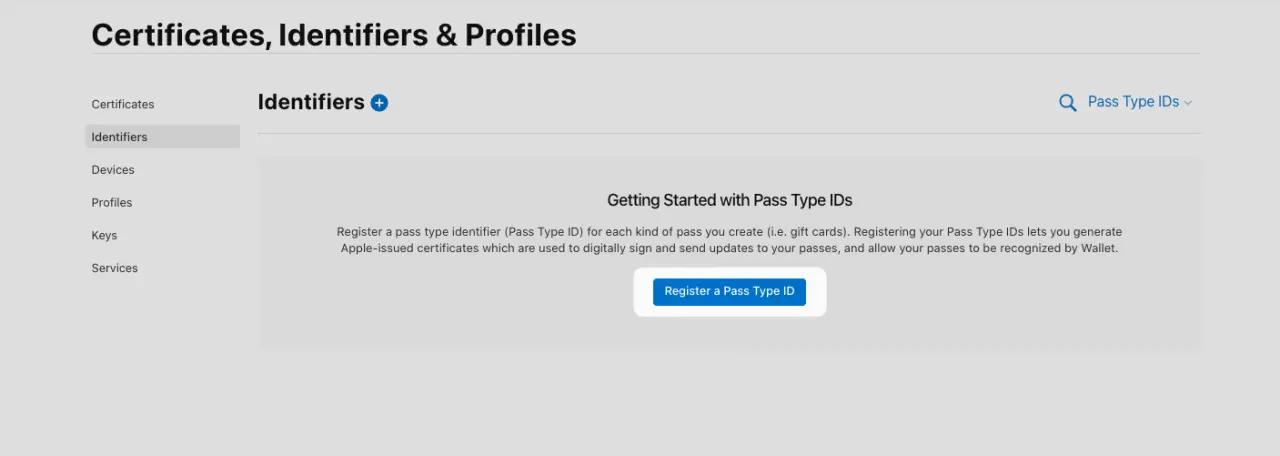
In the next screen, the Pass Type IDs option should be selected, and we click on the Continue button:

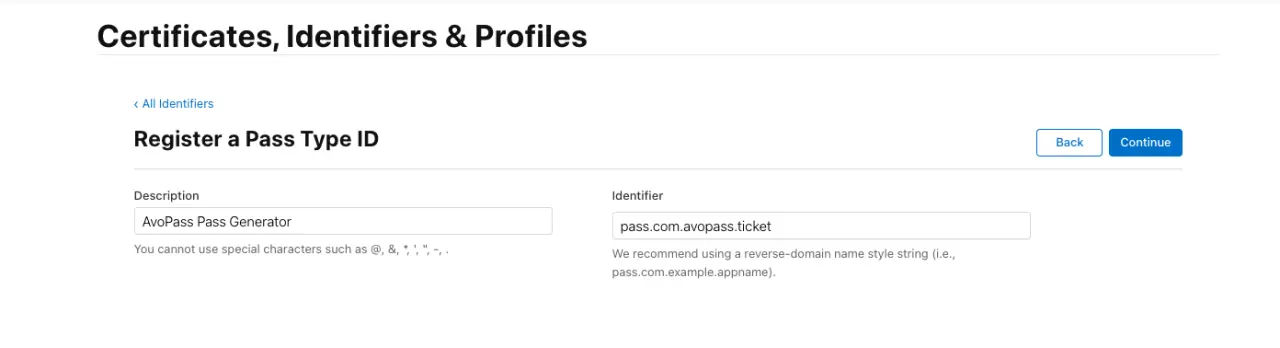
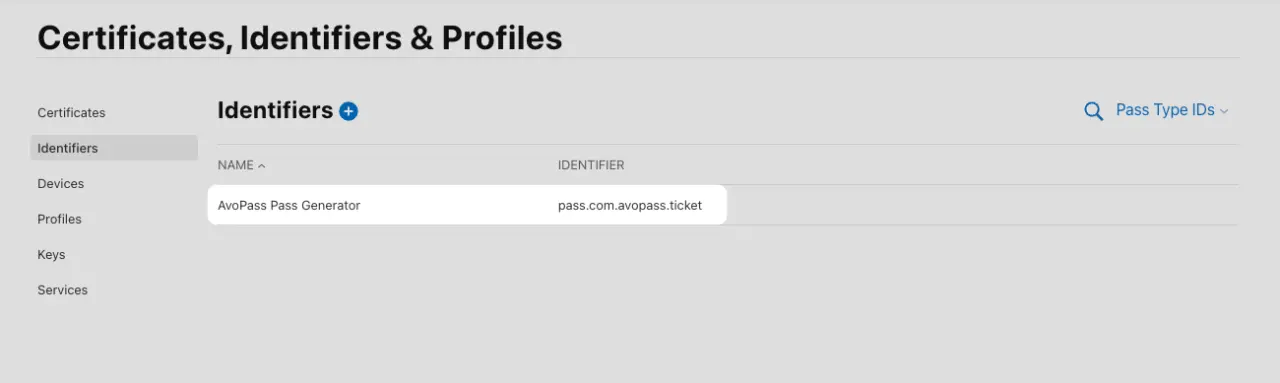
Then, we add a description and custom identifier.
Finally, we register the Pass Type ID:
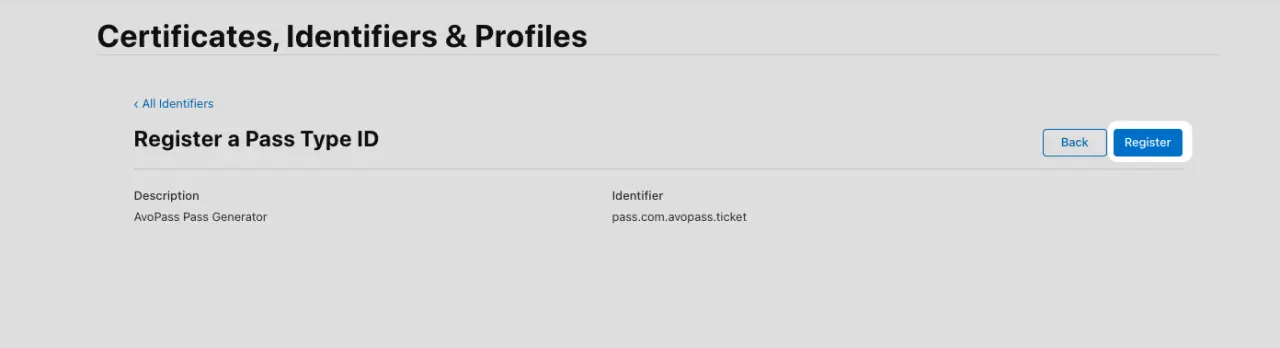
And we should see our new Pass Type ID in the list of identifiers:

Certificate creation
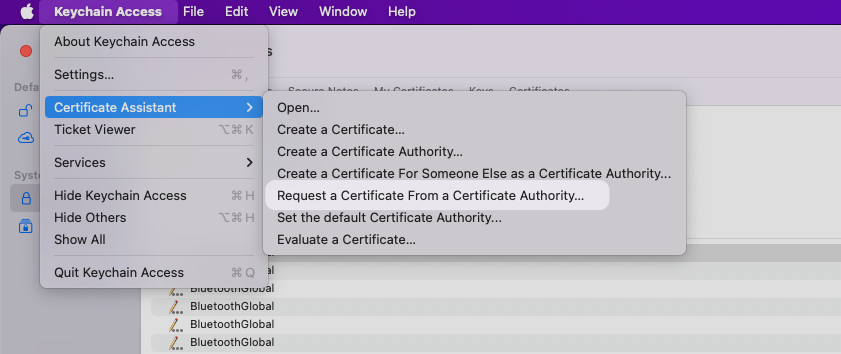
Now that we have our Pass Type ID, we will use it to generate a certificate. But first, we need to create a Certificate Signing Request, which is a request to the Certificate Authority (CA), Apple in this case, in our local machine.
To achieve this, we need to open the Keychain Access app, hover over the Certificate Assistant option on the self-named menu option, and click on the Request a Certificate from Certificate Authority option:
Then, we have to add our information for the CSR:
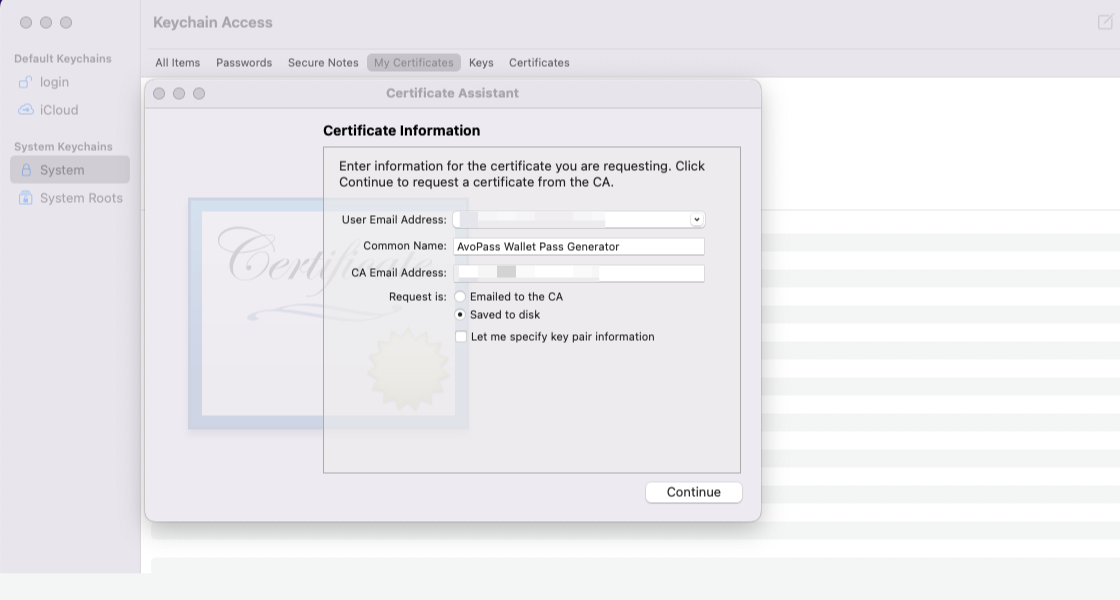
Then, we click the Continue button, and a dialog is shown where we select where we want to store our CSR. Pick a location and save the certificate.
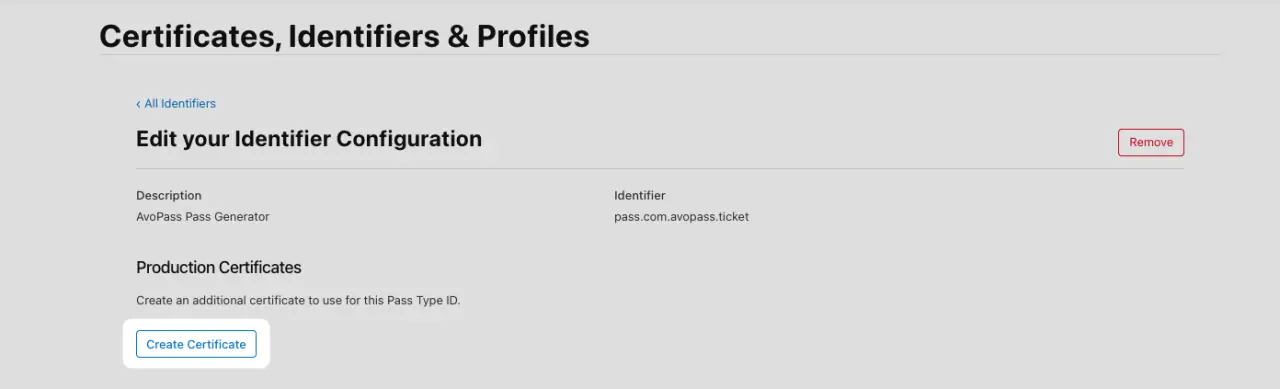
Now, back to our Apple Developer account, we should go to the Pass Type IDs overview and click on the ID we created in the previous step:
Then, we click on the Create Certificate button:
We have to assign a name for our Pass certificate, so we will keep the same name we used for the CSR: AvoPass Wallet Pass Generator.
Then, we have to upload our the CSR before clicking on the Continue button:
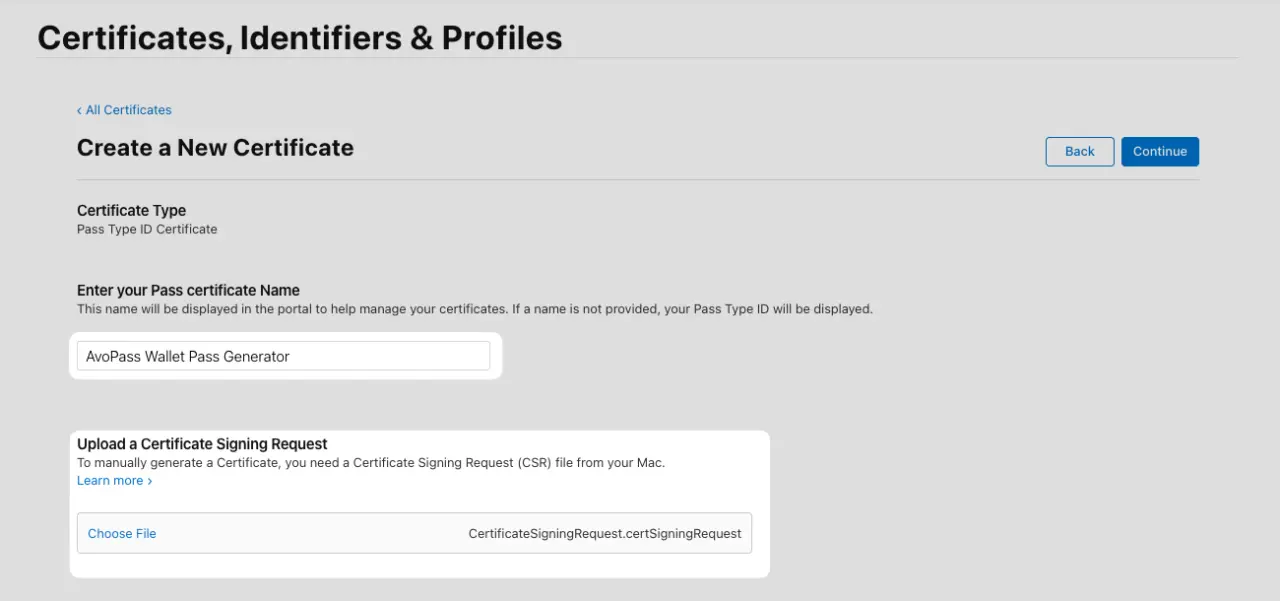
After we click Continue, a new Pass Type Certificate is created. Make sure to download it to your local machine. It should produce a pass.cer file.
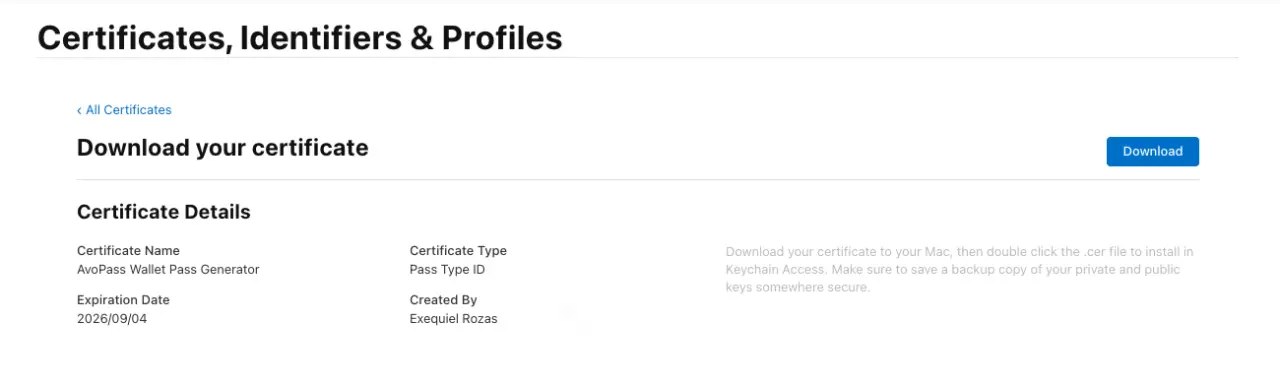
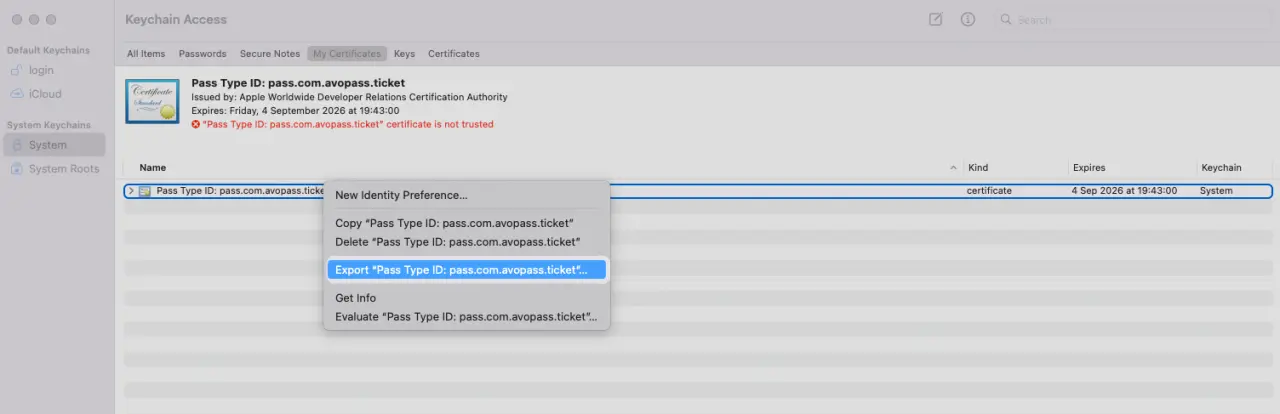
With this file, we double-click to open it in the Keychain Access, where it should be located under the My Certificates section.
In there, we right-click on the certificate and export it, making sure the p12 format is selected:
Before we can finally export the certificate, we will be prompted with a form that makes us input a password and password confirmation. Make sure to remember this password or store it somewhere safe.
After this, we should have a Certificates.p12 file that we will use later.
Potential PKCS12 Parse error
At the time of writing this, the Keychain Access app uses the RC2-40-CBC cipher to export the p12 certificate.
If we use the exported certificate directly with Passkit, we will encounter a PKCS12_parse: unsupported error when trying to preview a pass.
This happens because current versions of OpenSSL 3.0 and up don't support the cipher, and we have to either add support to it via configuration, which is not ideal because RC2 is considered insecure and obsolete, or repackage the certificate manually.
The solution is to re-encrypt it using openssl. Assuming a Certificates.p12 file name, we should run the following:
openssl pkcs12 -legacy -in Certificates.p12 -nodes -out cert-decrypted.tmp # Temporarily decrypt it
Then, we use the temporary decrypted cert and export our new certificate:
openssl pkcs12 -in cert-decrypted.tmp -export -out cert.p12
For each one of these steps we need to input the certificate's password.
After running this, we can use the cert.p12 file normally without any further issues. Don't forget to delete de temporary certificate:
rm cert-decrypted.tmp
Finally, we can test the cert.p12 using the following command:
openssl pkcs12 -in cert.p12 -info -nodes
Which should produce our Apple identity, certificate data, and private key data.
Application Setup
Let's start by creating a new Rails application:
rails new avopass --css=tailwind --javascript=esbuild
Next, let's install the Passkit gem:
bundle add passkit && bundle install
Then, we run the gem's installation command:
bin/rails g passkit:install
This will add migrations and a config passkit.rb initializer file we will explain later.
Then, we add the money_rails gem to display monetary values:
bundle add money-rails && bundle install
Let's add the environment variables that the gem requires:
Setting Passkit ENV variables
The gem requires us to set some important values in environment variables. To achieve this, let's use the Figaro gem so we can keep the values in a centralized YAML file.
bundle add figaro && bundle install
Let's run the installation command:
bundle exec figaro install
This creates a commented config/application.yml file where we can store our environment variable values.
Now, let's add the needed values to our environment variables:
# config/application.yml
PASSKIT_WEB_SERVICE_HOST: https://avopass.ngrok.io # The name of our live service
PASSKIT_APPLE_INTERMEDIATE_CERTIFICATE: <%= Rails.root.join("certs/AppleWWDRCAG6.cer") %>
PASSKIT_APPLE_TEAM_IDENTIFIER: 8K7HX2M9PQ # Our Apple Team ID
PASSKIT_PASS_TYPE_IDENTIFIER: pass.com.avopass.ticket # Pass Identifier
PASSKIT_PRIVATE_P12_CERTIFICATE: <%= Rails.root.join("certs/Certificates.p12") %>
PASSKIT_CERTIFICATE_KEY: password
PASSKIT_DASHBOARD_USERNAME: erozas
PASSKIT_DASHBOARD_PASSWORD: password
With this environment variables in place, let's create a certs directory to store the certificates and move the certificates into it:
mkdir certs
Paste the Apple intermediate certificate AppleWWDRCAG6.cer and the p12 certificate Certificates.p12 into this folder.
Then, unless you are certain that you will deploy this to a private repository, let's add the directory to .gitignore:
/config/application.yml # Ignore Figaro config file with ENV variables
/certs/*  # Ignore certificates in /certs directory
Now that we're done with the setup let's see how we can integrate passes into our application.
The Passkit gem
The fundamental feature of the Passkit gem is that it lets us create custom passes using Ruby.
Like we explained above, a pass is basically a compressed and signed folder that contains a manifest, a pass.json file with all the fields for each type of pass, the images used in the pass, and a signature that proves that the pass is from us (meaning it was signed using the certificate associated with our Apple Team ID and Pass Type ID).
With Passkit, we can build as many passes as we like by creating classes that inherit from Passkit::BasePass in the app/lib/passkit folder.
Then, in the class, we have to override the pass_type method with the type of pass we want to create, adding the fields we need as instance methods, and also adding the required files to the private/passkit/#{pass_name} folder.
However, the gem doesn't just allow us to create passes, it also provides the following features:
-
Serving passes: using the
Passkit::UrlGeneratorclass we can generate URLs to serve our passes by passing it our custom pass and the instance of the@generatorwhich is the object in our application we need to extract information from. For example, aTicketinstance. Then, we call the.iosor.androidmethod on the generator instance, and we get a URL from where we can download the.pkpassfile. -
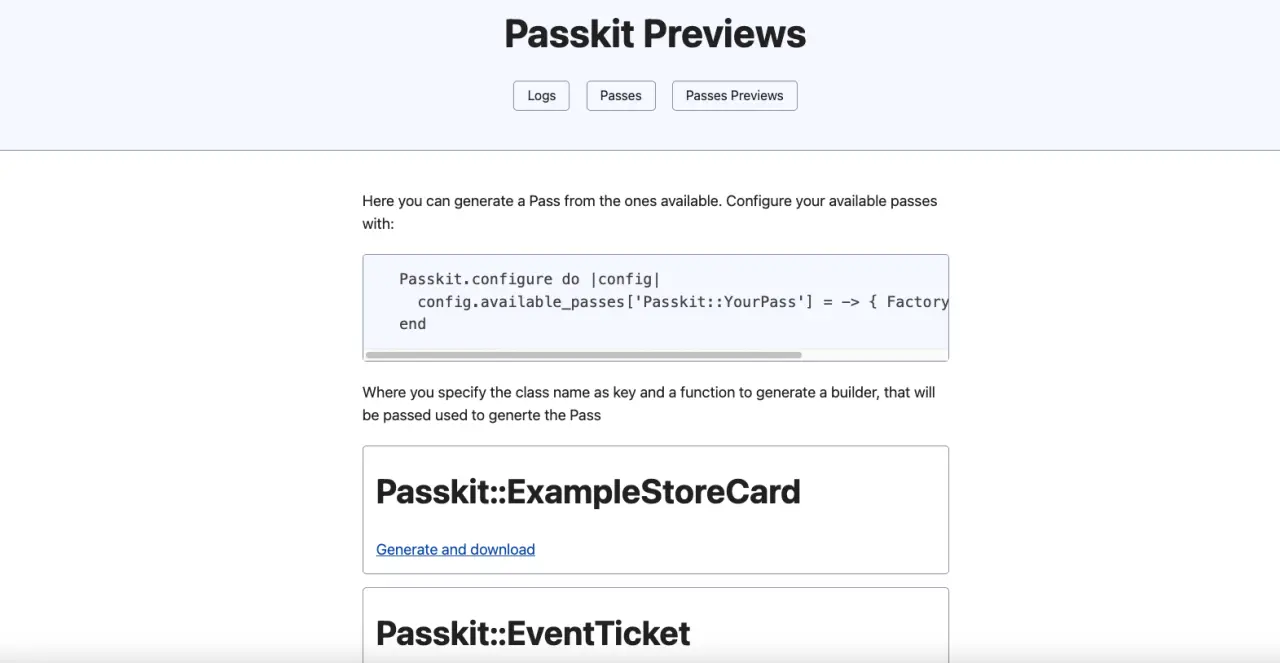
Pass Previews: we can generate pass previews while we develop them by adding our custom pass to the
available_passesconfiguration variable in thepasskit.rbinitializer. -
Dashboard: we can access an authenticated dashboard at
passkit/dashboardwhere we can see the latest created passes, the associated custom pass class, and the devices that accessed them.
Creating an Apple Wallet Pass
In this section, we will create a ticket pass by defining a custom Passkit::EventTicket class.
Ideally, we should start with a design that shows us what our pass will look like. For this application, I downloaded an Apple Wallet Pass UI Kit from the Figma store and edited the ticket template with what I thought would look nice, and I came up with the following:
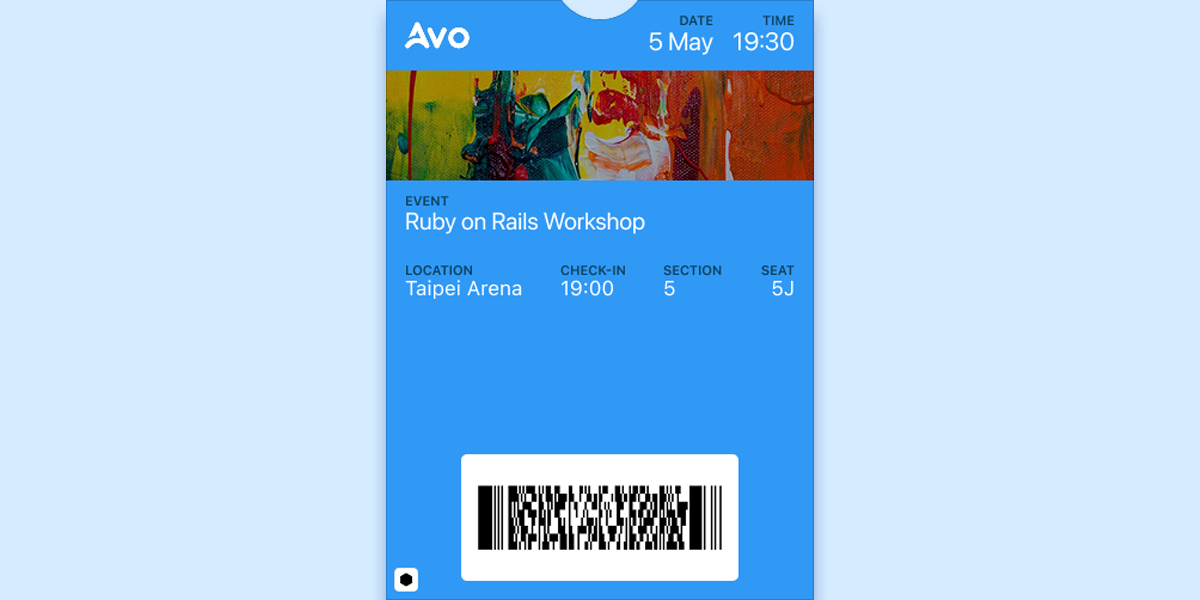
You might notice that we're not including anything for the primary field, and we're just adding secondary and auxiliary field values.
The same with the logo text: we're just displaying the logo without any text, and we're using the header fields to show the date and the time for the event.
Furthermore, this ticket template has a barcode, but we will use the QR Code. However, the idea remains the same: as long as we respect the layout, we can obtain a nice-looking pass that's easy to read and adds relevant information.
With this in mind, let's create our custom pass:
Ticket pass
Before anything, we have to add an icon.png file, which is required for every type of pass and is used when the pass is shown on the lock screen or by apps like Mail. This icon should be 29x29 points.
Then, for this first pass, we will add a logo.png file and a strip.png file that we exported from Figma to the private/passkit/event_ticket folder.
Now, let's create an EventTicket class that inherits from Passkit::BaseClass and assigns an @event instance variable:
# app/lib/passkit/event_ticket.rb
module Passkit
  class EventTicket < BasePass
    def initialize(generator)
      super(generator)
      @event = generator.event
    end

    def pass_type
      :eventTicket
    end
  end
end
Here, the generator parameter is what gets passed to the class initialize method. In our case, that's a Ticket instance of our event app:
ticket_pass = Passkit::EventTicket.new(Ticket.last)
With that in place, we declare an @event variable, which is assigned to the event that's associated with the ticket that we pass to the custom pass.
Let's then add colors to our custom ticket class with a custom hex_to_rgb helper because the colors have to be defined in RGB and a folder_name method that returns the name of the folder where we put the assets in the private/passkit directory:
module Passkit
  class EventTicket
    # Rest of the code

    private

    def folder_name
      "event_ticket"
    end

    def hex_to_rgb(hex)
      return "rgb(0, 0, 0)" if hex.nil? || hex.empty?

      hex = hex.gsub('#', '').upcase
      return "rgb(0, 0, 0)" unless hex.match?(/\A[0-9A-F]{6}\z/)

      r = hex[0..1].to_i(16)
      g = hex[2..3].to_i(16)
      b = hex[4..5].to_i(16)

      "rgb(#{r}, #{g}, #{b})"
    end
  end
end
Next, let's add the rest of the methods to fill the information we need for this pass. It should look like this:
module Passkit
  class EventTicket < BasePass
    include Rails.application.routes.url_helpers

    def initialize(generator)
      super(generator)
      @event = generator.event
    end

    def pass_type
      :eventTicket
    end

    def description
      @event.description || "Event Ticket"
    end

    def background_color
      hex_to_rgb("43A4F9")
    end

    def foreground_color
      hex_to_rgb("FFFFFF")
    end

    def locations
      [
        {"latitude" => @generator.event_venue_lat.to_f, "longitude" => @generator.event_venue_lng.to_f}
      ]
    end

    def header_fields
      [
        {
          key: "date",
          label: "Date",
          value: @event.event_date.strftime("%b %d")
        },
        {
          key: "time",
          label: "Time",
          value: @event.event_date.strftime("%I:%M")
        }
      ]
    end

    def logo_text
      ""
    end

    def primary_fields
      []
    end

    def secondary_fields
      [
        {
          key: "event",
          label: "Event",
          value: @event.title
        }
      ]
    end

    def auxiliary_fields
      [
        {
          key: "venue",
          label: "Venue",
          value: @generator.truncated_venue_name
        },
        {
          key: "price",
          label: "Price",
          value: ActionController::Base.helpers.humanized_money_with_symbol(Money.new(@event.ticket_price_cents || 0, 'USD'))
        },
        {
          key: "section",
          label: "Section",
          value: @generator.section
        },
        {
          key: "seat",
          label: "Seat",
          value: @generator.seat
        }
      ]
    end

    def barcodes
      [
        { messageEncoding: "iso-8859-1",
          format: "PKBarcodeFormatQR",
          message: @generator.barcode_message.to_json,
        }
      ]
    end

    def file_name
      @file_name ||= SecureRandom.uuid
    end

    private
    def folder_name
      "event_ticket"
    end

    def hex_to_rgb(hex)
      return "rgb(0, 0, 0)" if hex.nil? || hex.empty?

      hex = hex.gsub('#', '').upcase
      return "rgb(0, 0, 0)" unless hex.match?(/\A[0-9A-F]{6}\z/)

      r = hex[0..1].to_i(16)
      g = hex[2..3].to_i(16)
      b = hex[4..5].to_i(16)

      "rgb(#{r}, #{g}, #{b})"
    end
  end
end
As you can see, the fields match the name for the layout examples we saw above, and we need to pass an array of hashes with the following format: {key: "name", label: "Name", value: "Ruby on Rails Workshop" }.
We can leave fields empty by passing an empty array or not declaring the method at all as they're already declared in the Passkit::BasePass class.
The locations field can accept up to 10 relevant locations, something that's important for stores or memberships but not so much for events, so we're only adding the venue's location.
Now, for the barcode/QR code, we have to pick a messageEncoding standard, a format and then pass the information we want the code to contain as a string.
The barcode_message that's declared in the Ticket class looks like this:
def barcode_message
  {
    ticket_number: ticket_number,
    event_title: event.title,
    purchaser_id: user.id,
  }
end
In this case, we could use that information to scan the device at the event's entrance and perform validations to make sure the ticket is valid and not yet used.
With this in place, we can generate the URL for the pass:
url = Passkit::UrlGenerator.new(Passkit::EventTicket, Ticket.last).ios
Then, we can access this URL, and the server should respond with a .pkpass file. To test this file, let's open an iOS simulator:
xcrun simctl boot "iPhone 15 Pro"
open -a Simulator
Replace the “iPhone 15 Pro” simulator with whatever you have installed on your computer: you can find which simulator devices you have by running xcrun simctl list devices.
Now, with the simulator running, we drag our .pkpass file to it, and we should see the pass:

Now, let's learn how to make the images in our passes dynamic so we can attach the actual cover for the event:
Dynamic images
Because the passes are just a compressed and signed file where the images have to follow the expected naming, strip.png for example, to use images that are uploaded to the cloud with Active Storage like a cover field for the Event we need to use the add_other_files hook to our pass model:
module Passkit
  class EventTicket < BasePass
    ## Rest of the code

    def add_other_files(temporary_path)
      if @event.cover.attached?
        @event.cover.blob.open do |tempfile|
          FileUtils.cp(tempfile.path, temporary_path.join("strip.png"))
        end
      end
    end
  end
end
Here, we're fetching the event's cover and copying the file into the temporary directory that Passkit creates before packing the .pkpass file.
Of course, we could do the same for the logo.png, thumbnail.png or any other file the Apple Pass uses for each type of pass.
Now, if we purchase another ticket in our application, we'll see that it will include the event's cover as the strip image:

Summary
In this tutorial, we explored how to integrate Apple Wallet Passes into Rails applications using the Passkit gem.
We covered the complete process from understanding what Apple Wallet Passes are and their different types to setting up the necessary Apple Developer credentials and implementing them in a real application.
We learned that Apple Wallet Passes are dynamic digital representations of real-world items that can be very useful because of their unique features.
The five pass types (boarding Pass, coupon, event ticket, store card, and generic) each serve different use cases with their layout rules and field arrangements.
The Apple Developer setup required obtaining an Apple Intermediate Certificate, Team ID, Pass Type ID, and generating a properly formatted p12 certificate. We also addressed the common PKCS12 parsing error by re-encrypting certificates with OpenSSL.
To demonstrate pass creation, we built an EventTicket pass that handles custom colors, fields, barcodes, and even dynamic images from Active Storage uploads.
On top of pass creation, Passkit also provides features like URL generation, pass previews, and a dashboard to monitor created passes.
With this knowledge, you can create any type of Apple Wallet Passes for your applications and even allow users to create their own custom passes and integrate them into their applications.
I hope you enjoyed the article and that it can help you build your projects.
Have a good one and happy coding!
