Implementing OAuth, also known as social login, reduces the friction of account creation and authentication.
On top of the reduced friction, if we plan to launch a mobile application in the Apple App Store, we're required to offer Sign in with Apple if we're also offering any other social authentication.
In this article, we will learn how to add Sign in with Apple to a Rails app. We will learn everything from configuring our Apple Developer account to integrating the authentication code.
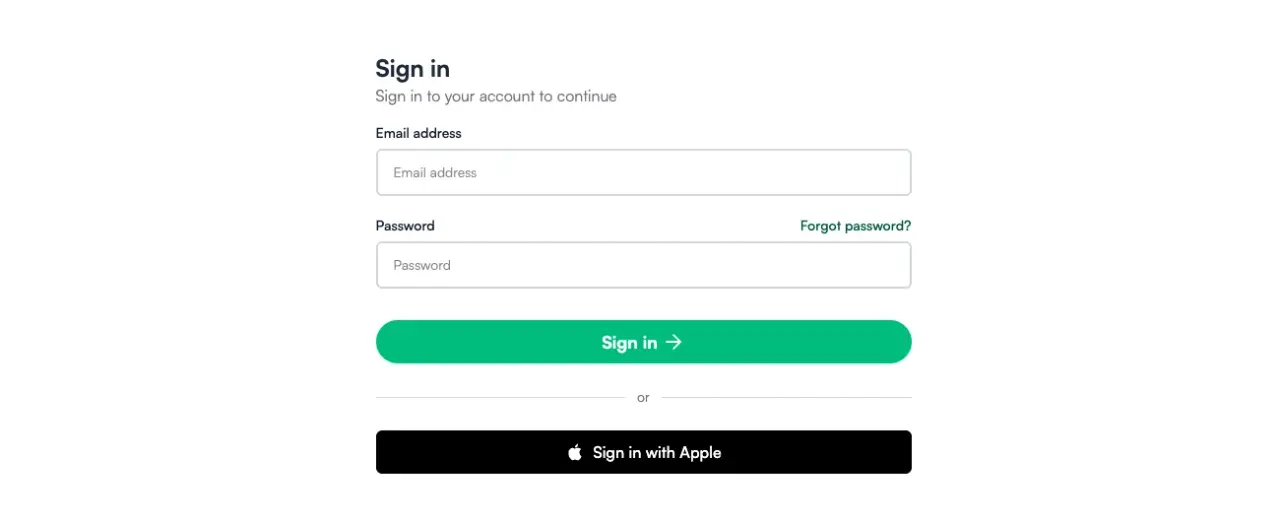
Let's start by seeing what we will build:
What we will build
To build a Sign in with Apple feature using Rails, we will create a simple application that allows users to sign in using an email/password combination or an Apple account with OAuth.
We will use the Rails auth generator with some simple modifications, but you can extrapolate the same outcome if you're using Devise or other authentication methods.
The final result looks like this:
Application setup
The setup for this feature is pretty straightforward: we will build a blank Rails app and add auth generator authentication to show how to integrate that with Apple Sign In.
Let's start by creating a new app:
rails new omniapple --css=tailwind --javascript=esbuild
Next, we will add authentication with the Rails generator:
bin/rails generate authentication
Running this command creates many controllers, models, views, routes, and even tests that provide us with access to signing users in with email and password, session management and a password recovery feature.
Now, we run the migrations:
bin/rails db:migrate
After some customization to the sign-in form, we get the following:
Adding OAuth fields to User
To correctly implement Apple sign in, we need to keep track of at least two fields: provider and uid.
The first would be apple in our case, and the uid is the unique ID within Apple that identifies the users who will authenticate with our application.
To simplify things, we will add both of those fields to our users table, but you can check out the article we wrote on social login with the Rails auth generator where we implement a way to have multiple accounts using a ConnectedService model which belongs to User.
Let's add the fields by creating a migration:
bin/rails generate migration add_uid_provider_and_username_to_users uid provider username
Then, we run the migration:
bin/rails db:migrate
Now our User model is ready for us to implement the authentication later.
Apple configuration
When it comes to development related things, Apple does things differently, no pun intended.
We've implemented this feature in the social login with Rails article, but we used Google and GitHub as providers and showed the steps to properly configure our accounts and obtain the credentials we needed for an OAuth integration.
For example: even though GitHub is easier to configure than Google, Apple's process is a bit more convoluted than both of them.
At the end of this process, we will have a CLIENT_ID, a TEAM_IDand the certificate's KEY_ID and file itself.
Let's see how to get our credentials. Don't hesitate to skip to the application setup section if you already have your credentials, or if you already know the process.
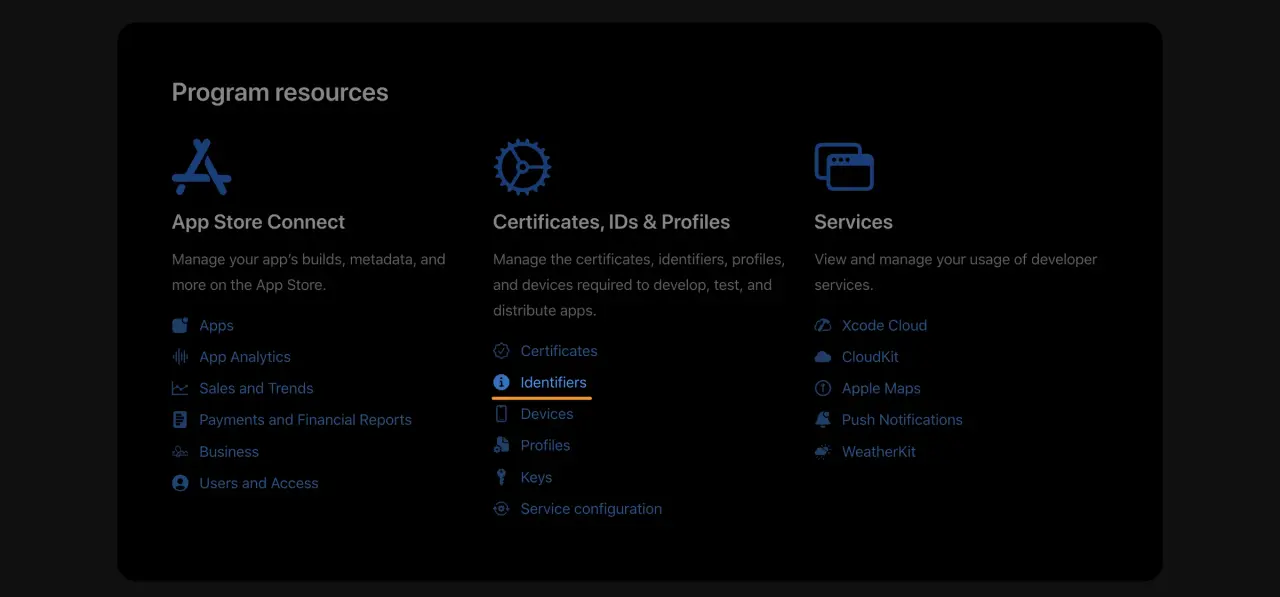
Bundle and App ID
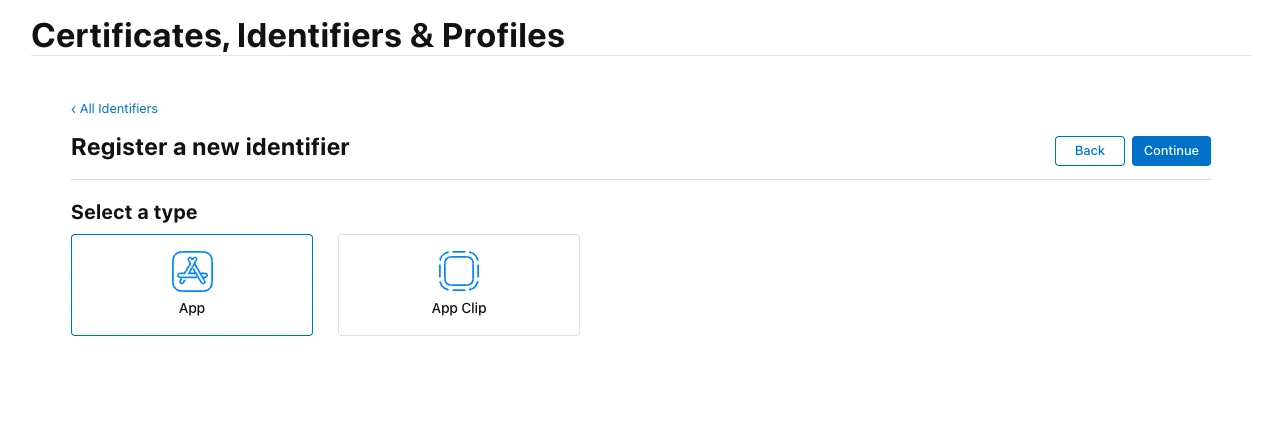
The first step is to navigate to our Apple Developer Account and, from there, pick the Identifiers option under "Certificates, IDs, and Profiles":
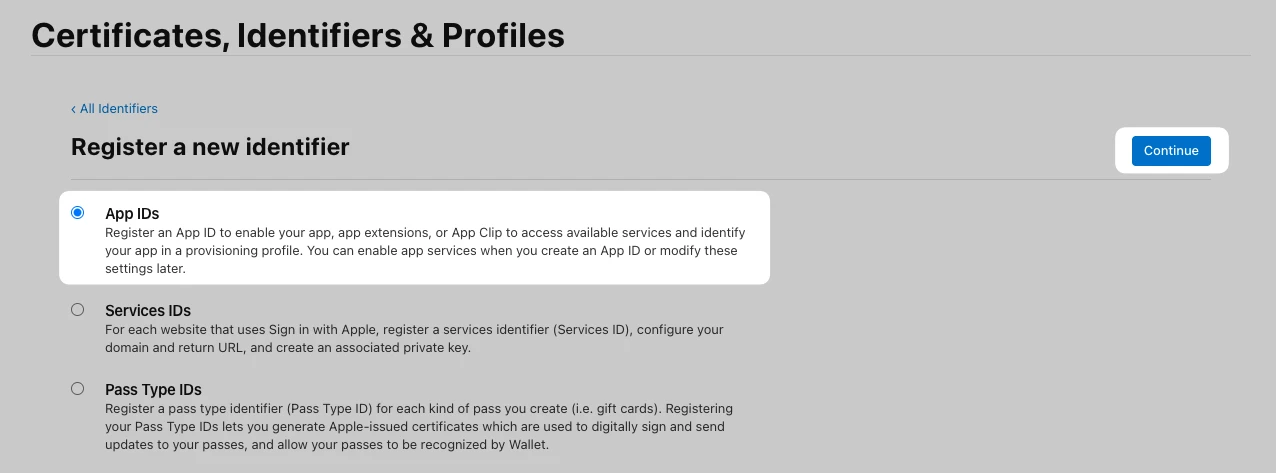
Then, select the App IDs option which should be selected by default, and click Continue:
Next, we see choose the App type for our identifier and click on Continue:
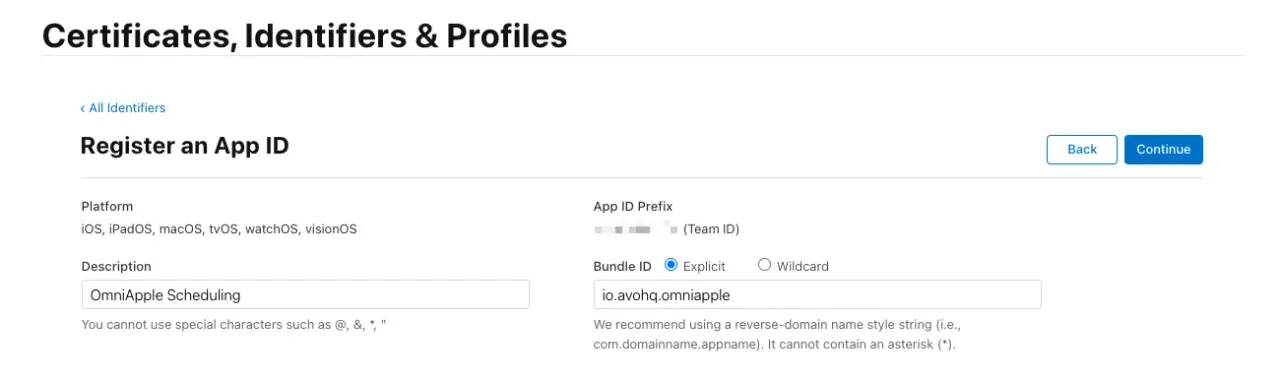
In the next step, we have to pick a Bundle ID and add an optional description. Apple recommends using a reverse domain name with the app name at the end. We are calling this fantasy application “OmniApple” so we are using io.avohq.omniapple as our Bundle ID. Consider that its name cannot be changed, so choose it carefully:
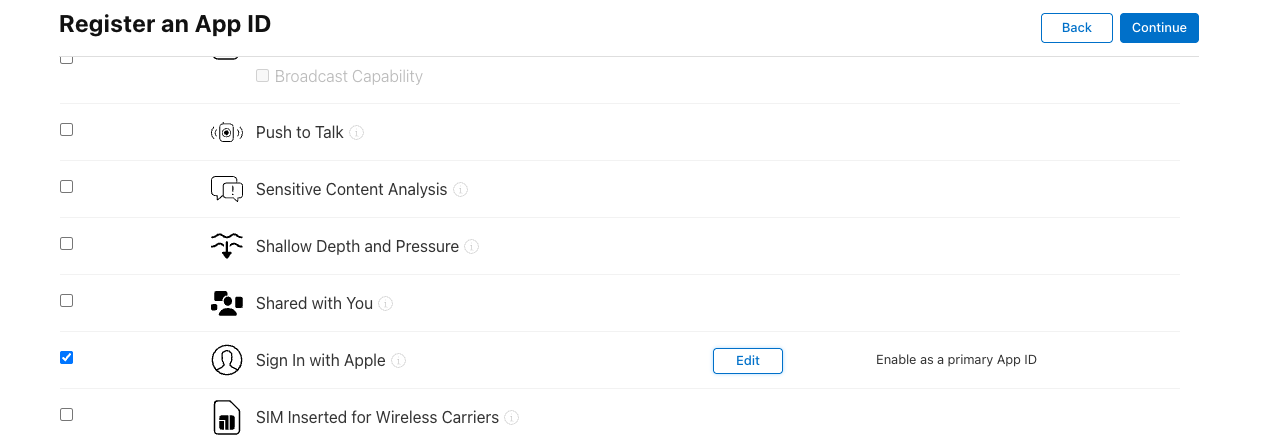
Now, before clicking on Continue, we have to add the Sign in with Apple capability:
Then, when we click on the Continue button, we should get the following message:
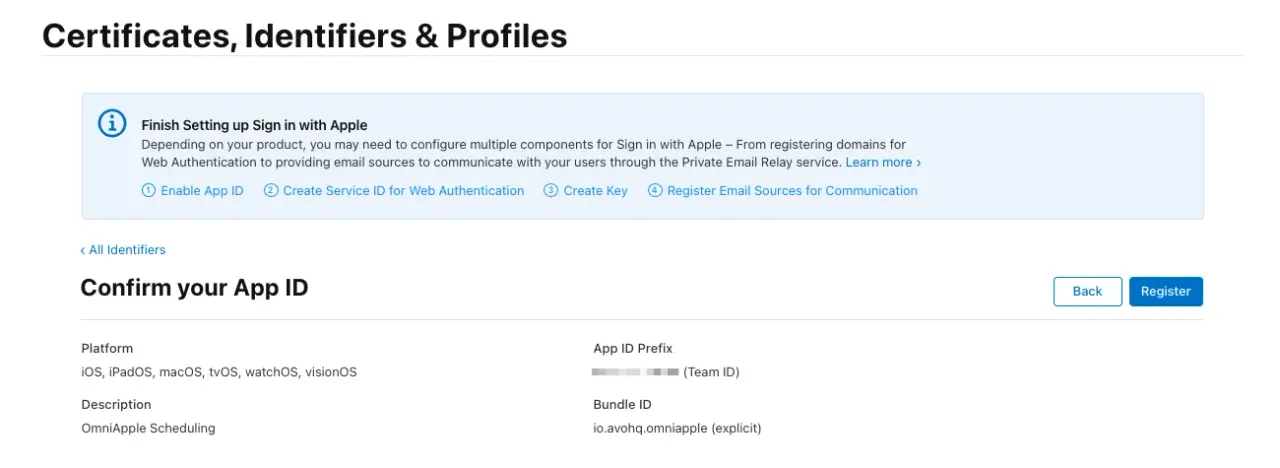
We see the message which states that we still have some steps left two do after we click the Register button. Let's click on it and obtain a Service ID for the sign in capability:
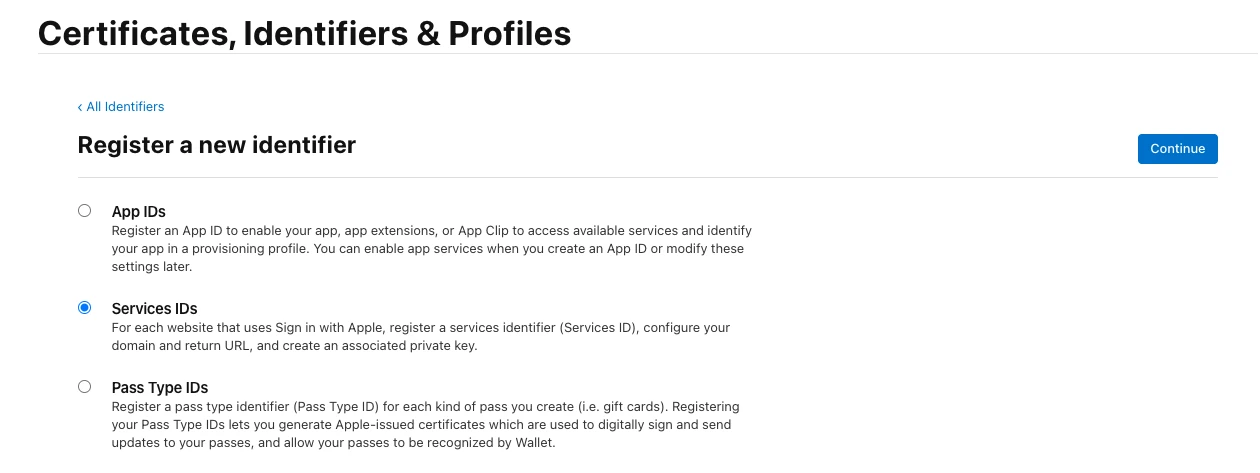
Services ID
The next step in the process is to obtain a Service ID, which is basically an identifier that's associated with our website.
We need to go to the Register a new Identifier page, pick Services ID and click on Continue:
Then, we should be presented with a form where we decide the name for our Service ID:
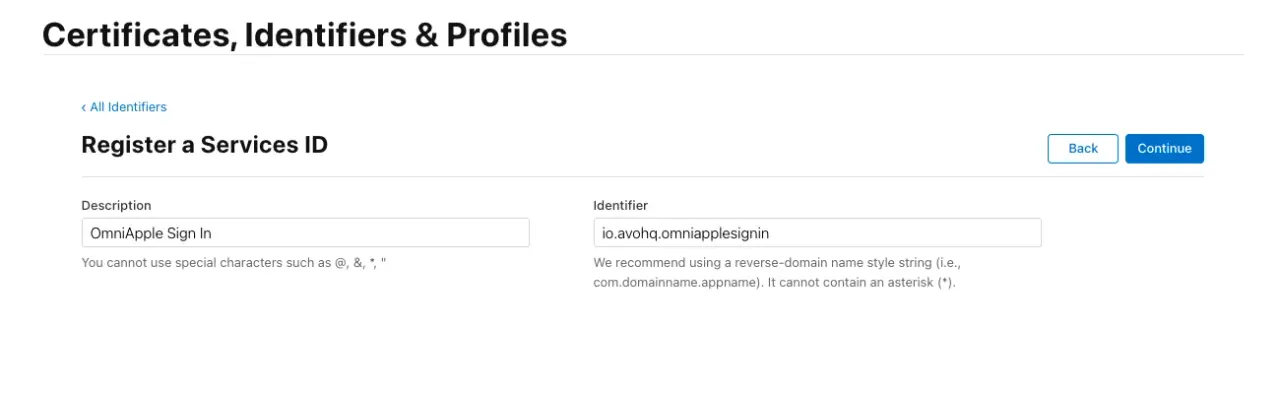
It has to be unique within our account, so I picked, io.avohq.omniapplesignin. Take note of this ID because it will be the CLIENT_ID we will be using later.
We then click on the Continue button before confirming the registration.
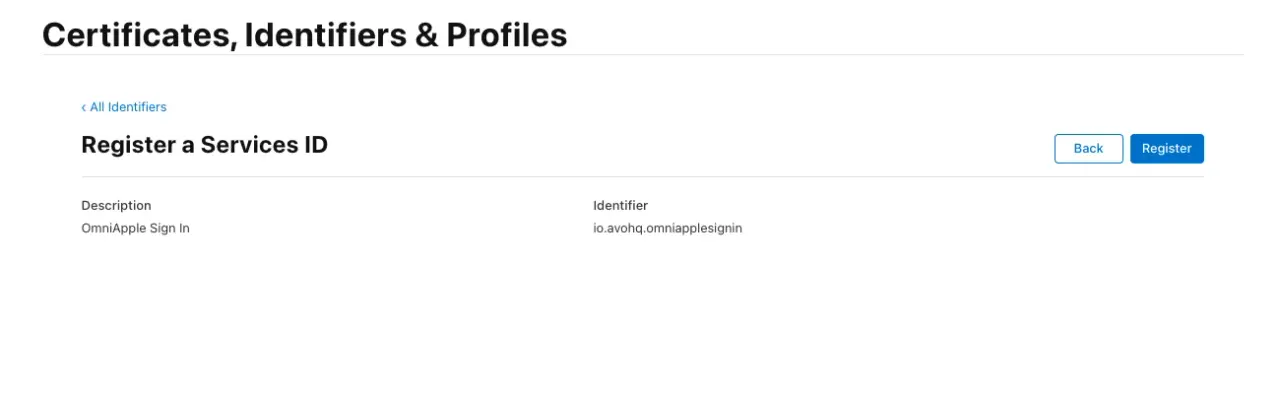
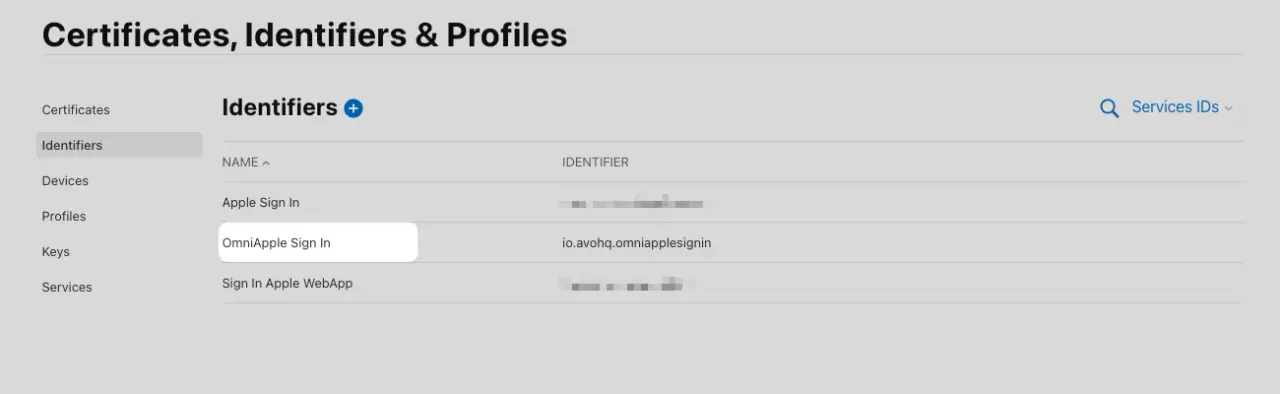
Then, if everything's alright, we confirm using the Register button, and we get redirected to the Service IDs view:
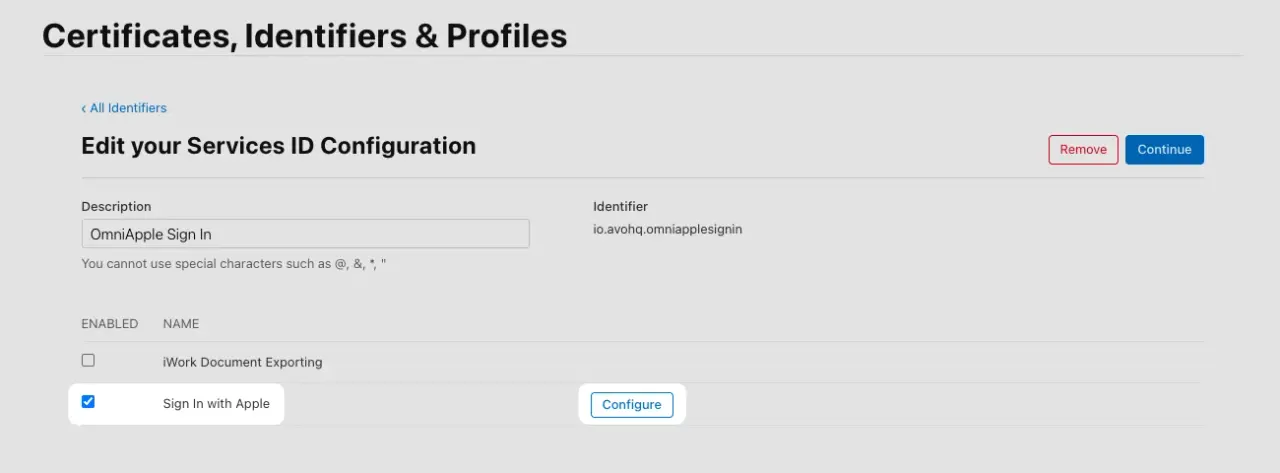
We then proceed to click on the name of the one we just set to configure it:
We then get this screen where we have to check the Sign in with Apple checkbox and then the Configure button:
Then, we get presented with the Web Authentication Configuration dialog where we have to register the domains and return URLs for the feature:
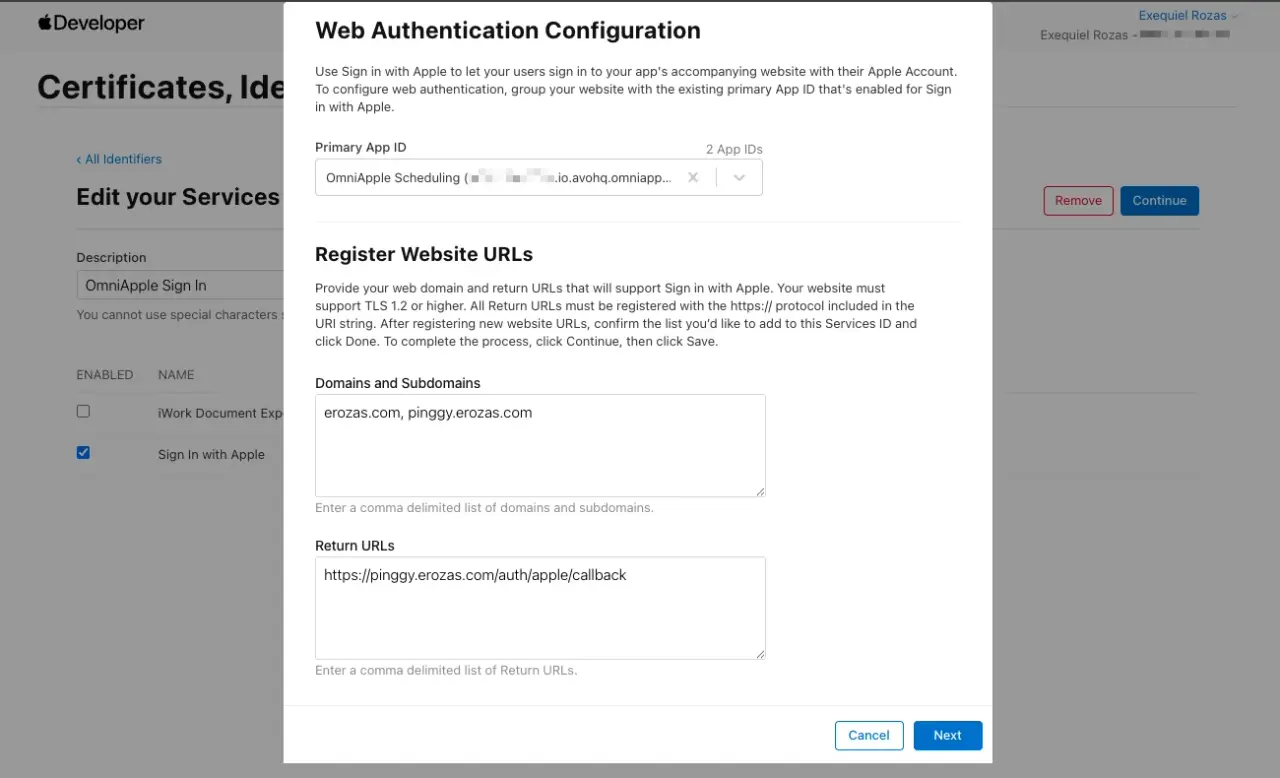
To test the feature, I'm using Pinggy to tunnel requests to my local development environment using a subdomain I control. I previously tried using the puma-dev gem, but .test and .puma domains were not allowed, so I had to use the service instead.
We also added the /auth/apple/callback that we will later use to handle the request from the sign-in process.
Now, after we click Next and confirm the web authentication configuration, we've already associated and configured the Service ID, and we can carry on with the process:
Key ID and generating the certificate
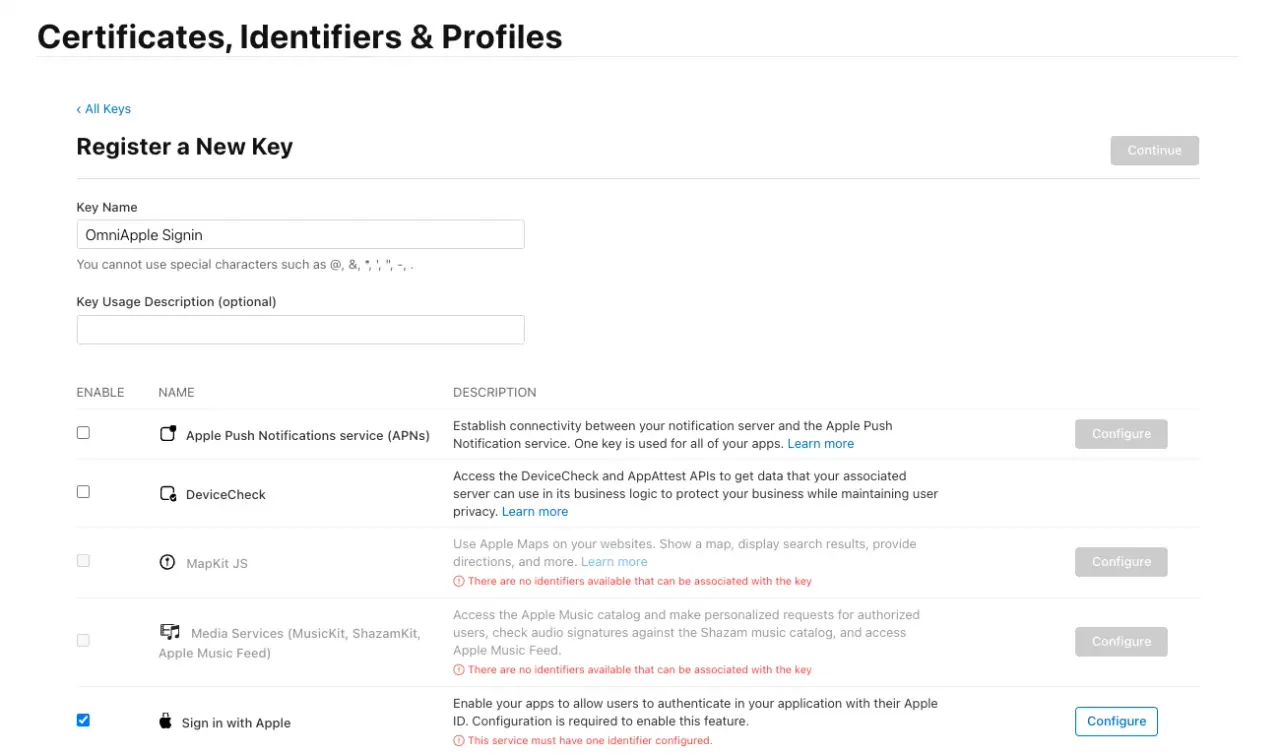
The next step is to create a certificate with public and private keys.
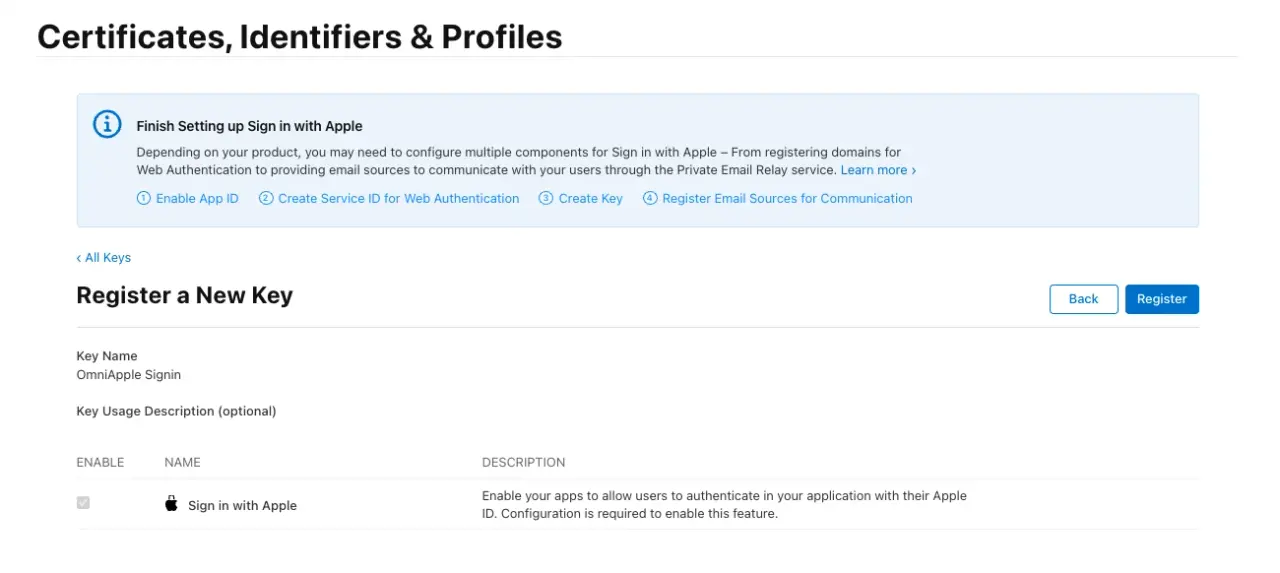
To do so, we need to go to the Register New key screen, give a name to our key and enable the Sign in with Apple option:
Next, we click on the Configure button on the Sign in with Apple row, and we will be presented with a screen where we have to associate the key with the App ID we previously configured:
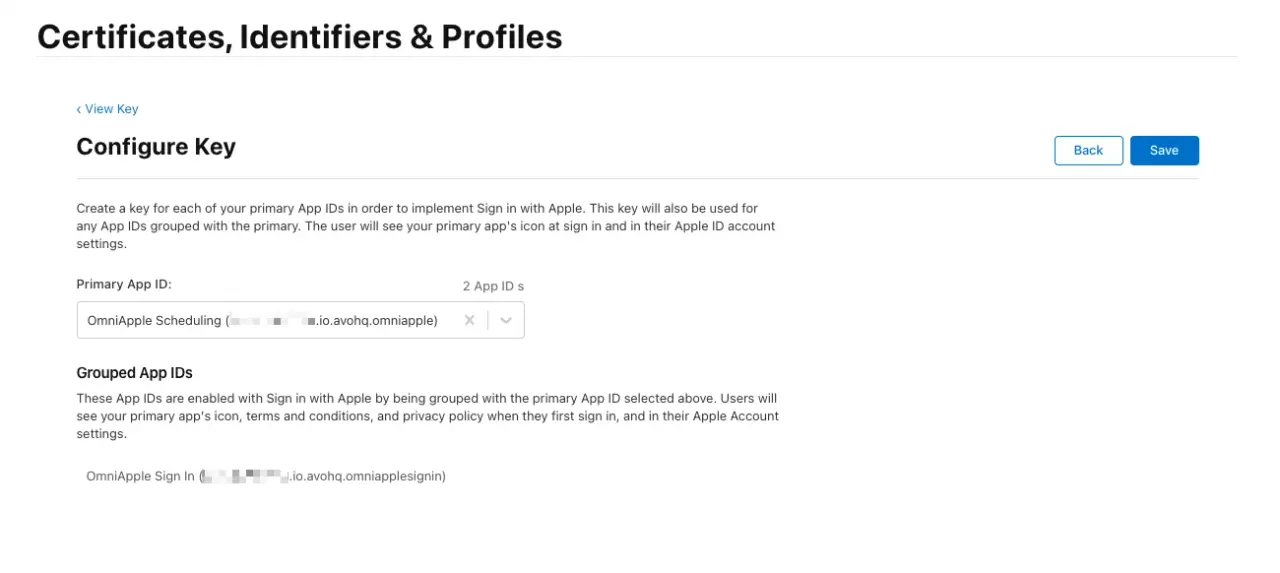
Then, after we save, we are presented with the confirmation step:
Finally, after clicking on the Register button, we get a screen where we can download the key:
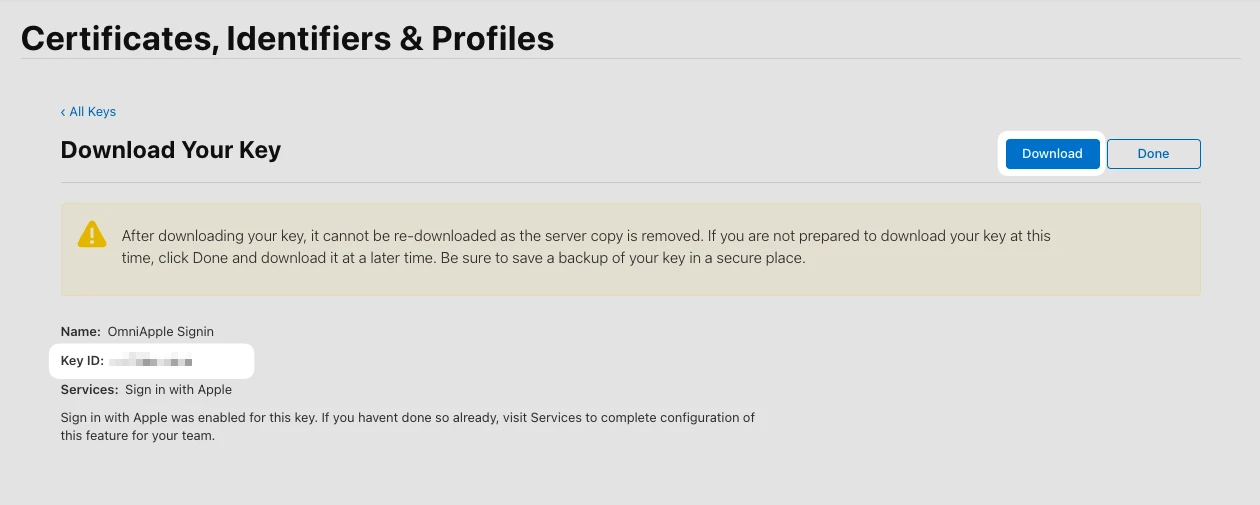
Make sure to download and store the file in a safe place. Even though we can come back later to the screen, we can only download the key once.
If the download is successful, we get a .p8 file with the format: AuthKey_KEY_ID.p8 where KEY_ID corresponds to the Key ID we created.
The content of the file looks something like this:
-----BEGIN PRIVATE KEY-----
MIGTAgEAMBMGByqGSM49AgEGCCqGSM49AwEHBHkwdwIBAQQgXYRLbl1wFuH76vsU
F3Jw2QP4K5RTcH5L5sFlxBSCv5qgCgYIKoZIzj0DAQehRANCAARfID7rj3xTQaGl
p9qqpl65ZgJH23PJjN4rVIZ0FUKQPjfCGYbcs5OJPzD9mpPzpGFpfLLkt6A1mshq
bGwM3NeX
-----END PRIVATE KEY-----
Don't worry, it was generated with AI, but consider that yours should look like that.
Email sources
When a user signs in to our application using Apple to, unless they explicitly decide to share the email address, all we have access to is an anonymized email address that acts as a relay to the actual address.
Even if we wanted to act maliciously and send unwanted emails to them, we wouldn't be able to unless those emails came from domains that are validated with our Apple Developer account.
So, one last step is to configure that. Let's navigate to the Services list where we are presented with this:
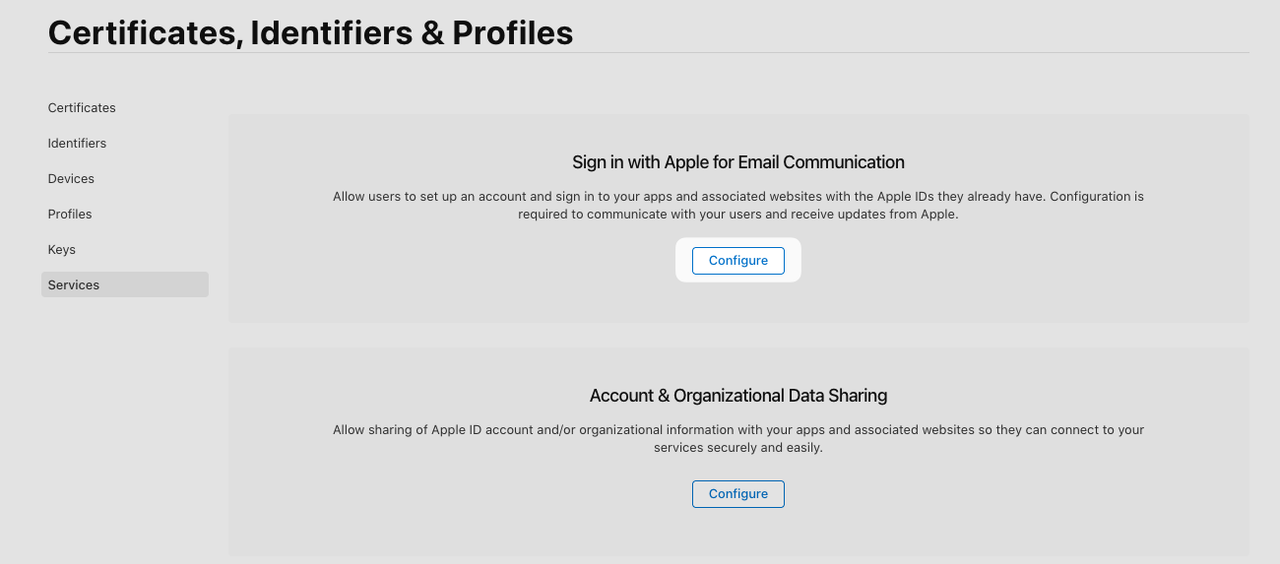
After clicking on the Configure button, we get to see the list of available email sources and an option to add more if we need:
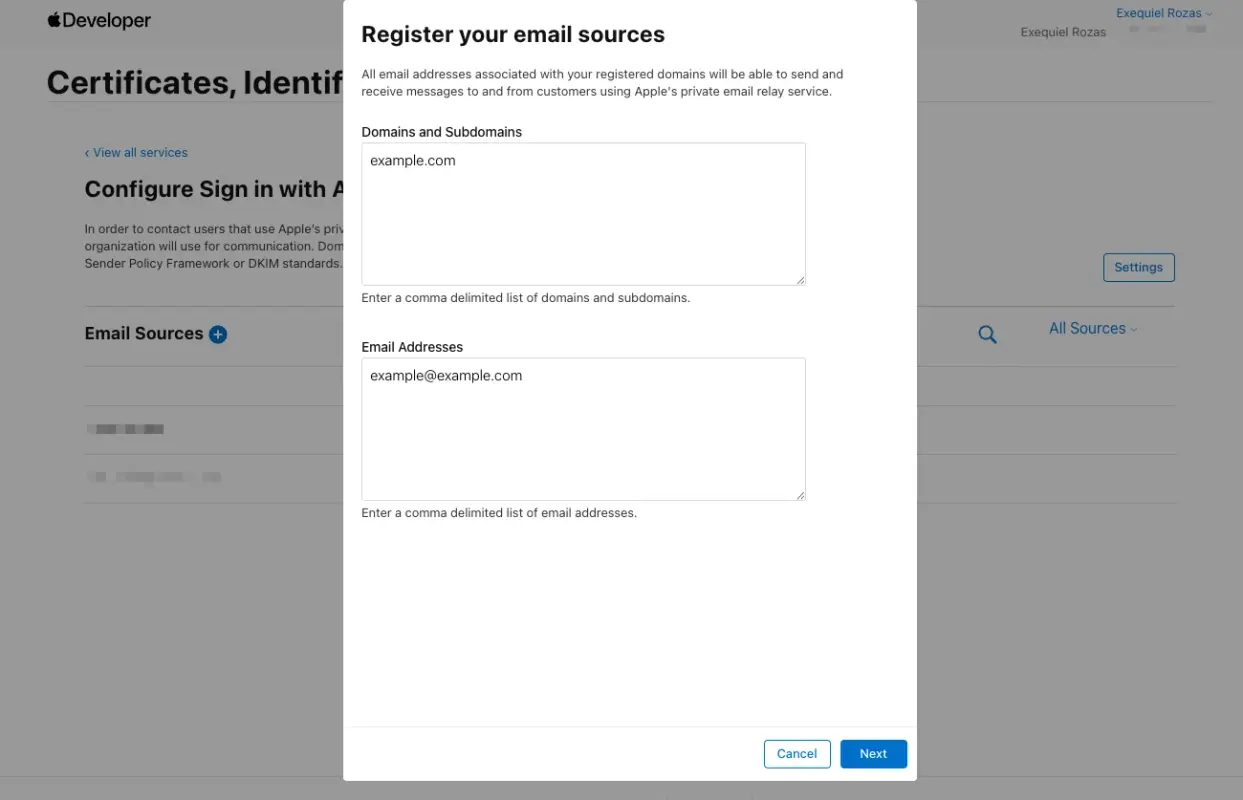
For practical reasons, we added example.com as a domain and example@example.com as an address; otherwise, we would need to verify the domain and address using SPF.
Check Apple's tutorial on configuring the email relay service if you need further instructions about how to verify your domain or email addresses.
Setting credentials
We've basically completed the configuration on Apple's side. Let's set the credentials with everything we obtained during this process:
EDITOR=vim bin/rails credentials:edit --environment=development
Then, inside the editor:
apple:
  team_id: TEAM_ID
  client_id: io.avohq.omniapplesignin
  key_id: KEY_ID
  private_key: |
    -----BEGIN PRIVATE KEY-----
    ASDFGHJKLQWERTYUIOPZXCVBNM1234567890asdfghjklqwertyuiopzxcvbnm
    QWERTYUIOPASDFGHJKLZXCVBNM0987654321qwertyuiopasdfghjklzxcvbnm
    MNBVCXZLKJHGFDSAPOIUYTREWQ1234567890mnbvcxzlkjhgfdsapoiuytrewq
    ZXCVBNMASDFGHJKLQWERTYUIOP0987654321zxcvbnmasdfghjklqwertyuiop
    1234567890QWERTYUIOPASDFGHJKLZXCVBNM0987654321qwertyuiopasdfgh
    -----END PRIVATE KEY-----
Now, having the credentials set up, we can start building the actual feature. Let's go:
Using the omniauth-apple gem
We will start by using omniauth-apple, the most popular gem, together with omniauth-rails_csrf_protection.
gem "omniauth-apple"
gem "omniauth-rails_csrf_protection"
The first implements the Apple OAuth strategy, while the second disables access to the OAuth request phase when using a GET request and inserts a CSRF token verifier before the request is made.
We install the gems:
bundle install
Now, we create an omniauth.rb initializer where we will add the configuration for the Apple sign in:
# config/initializers/omniauth.rb
Rails.application.config.middleware.use OmniAuth::Builder do
  provider :apple, Rails.application.credentials.dig(:apple, :client_id),
  {
    scope: 'email name',
    team_id: Rails.application.credentials.dig(:apple, :team_id),
    key_id: Rails.application.credentials.dig(:apple, :key_id),
    pem: Rails.application.credentials.dig(:apple, :private_key)
  }
end

OmniAuth.config.on_failure = Proc.new { |env|
  OmniAuth::FailureEndpoint.new(env).redirect_to_failure
}
The “scope” is the information we request from the user who's signing in with Apple, the rest of the values are what we configured previously.
We then add a route which has to match the one we configured in the Web Authentication dialog:
# config/routes.rb
get "auth/:provider/callback", to: "omni_auth/sessions#create"
The route will match apple as well as any other provider we wish to implement in the future.
Let's create the controller with the create action, and let's return JSON to see if the request contains what we're looking for:
# app/controllers/omni_auth/sessions_controller.rb
class OmniAuth::SessionsController < ApplicationController
  skip_before_action :verify_authenticity_token

  def create
    render json: request.env["omniauth.auth"]
  end
end
Before testing our implementation, we have to make sure that the Sign in with Apple button is actually a button_to that makes a POST request:
<%= button_to "/auth/apple", method: :post, data: { turbo: false }, class: "w-full flex items-center justify-center space-x-2 py-2.5 px-4 bg-black text-white font-medium rounded-md transition-colors duration-200 text-sm" do %>
  <%= inline_svg_tag "apple_logo_white.svg", class: "w-5 h-5" %>
  <span class="font-medium text-base">Sign in with Apple</span>
<% end %>
Now, let's restart our server, and see how everything's working by navigating to sessions/new, clicking on the Sign in with Apple button, and proceeding with the process on Apple's site.
If everything's correctly configured, we will be able to complete the authentication process on Apple' side. However, after we get redirected back to our site, we get the following error:
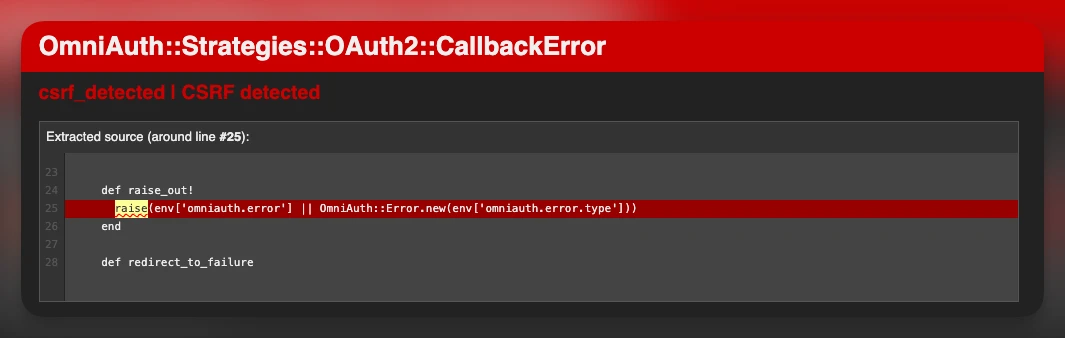
Even though we have skip_before_action :verify_authenticity_token we get the CSRF error.
The issue is that Apple sends a POST request to the callback URL instead of a GET request like most OAuth providers do. This means that samesite=Lax cookies are not sent with the request. So, the server cannot read cookies during the callback and we get the CSRF error.
There are some workarounds, but they are not really secure because they imply setting samesite=None to requests that match to /auth/apple but that's not ideal.
To solve this, we will use a fork of the gem which introduces the ability to pass a nonce option which helps us bypass the issue without the security risk.
We have to replace the omniauth-apple with the fork:
gem "omniauth-apple", github: "bvogel/omniauth-apple", branch: "fix/apple-session-handling"
We install the gems again:
bundle install
Then, we modify the configuration in omniauth.rb to set the nonce option to :local and provider_ignores_state to true:
Rails.application.config.middleware.use OmniAuth::Builder do
  provider :apple, Rails.application.credentials.dig(:apple, :client_id),
  {
    scope: 'email name',
    team_id: Rails.application.credentials.dig(:apple, :team_id),
    key_id: Rails.application.credentials.dig(:apple, :key_id),
    pem: Rails.application.credentials.dig(:apple, :private_key),
    provider_ignores_state: true,
    nonce: :local
  }
end
Now, after restarting the server and trying once again, we should get the authentication information in a JSON format:
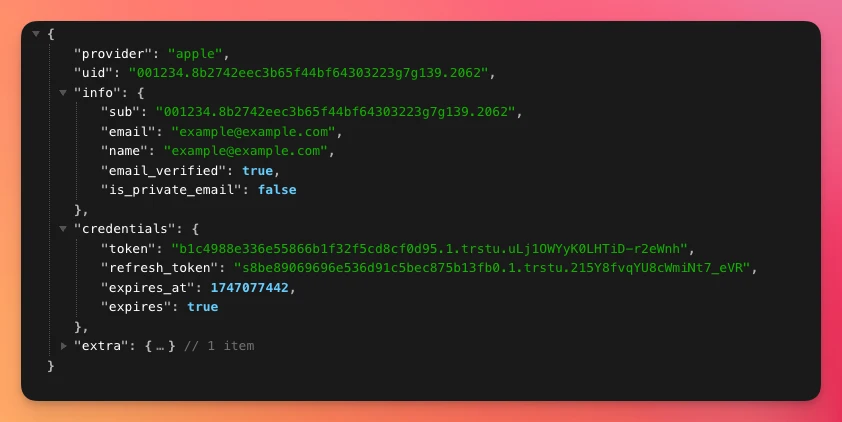
Now, we can use that response to authenticate the user within our application. Let's start by adding a from_omniauth method to our User class:
class User < ApplicationRecord
  # Rest of the code

  def self.from_omniauth(auth)
    if where(email_address: auth.info.email).exists?
      user = where(email_address: auth.info.email).first
      user.provider = auth.provider
      user.uid = auth.uid
    else
      user = where(provider: auth.provider, uid: auth.uid).first_or_create! do |u|
        u.email_address = auth.info.email
        u.username = auth.info.name
        u.password = SecureRandom.hex(16)
      end
    end
    user
  end
end
The method receives auth from the request and tries to find an account with an email_address that matches the auth.info.email string. If it exists, we update the provider and uid to match what we received from Apple.
Otherwise, if there's no account associated with the email, we create one and assign it a password.
Then, in the controller, we call the from_omniauth method on the User class and pass the omniauth.auth hash. Next, we check if the @user was persisted, in which case we start a new session for it and redirect the user to the root_path.
class OmniAuth::SessionsController < ApplicationController
  skip_before_action :verify_authenticity_token, only: [:create]

  def create
    @user = User.from_omniauth(request.env["omniauth.auth"])

    if @user.persisted?
      start_new_session_for(@user)
      redirect_to root_path, notice: "Signed in successfully. Welcome to OmniApple, #{@user.email_address}!"
    else
      redirect_to root_path, alert: "Something went wrong. Please try again."
    end
  end
end
Handling failure
There are more than a couple of scenarios where things can go wrong with the sign-in flow.
Most of those errors are raised before the controller action. To handle them, we need to configure the gem so we get a failure endpoint at /auth/failure.
The first step is to add this to our OmniAuth initializer:
# config/initializers/omniauth.rb
OmniAuth.config.on_failure = Proc.new do |env|
  OmniAuth::FailureEndpoint.new(env).redirect_to_failure
end
The corresponding route:
# config/routes.rb
get "auth/failure" => "omni_auth/sessions#failure"
Now, in the OmniAuth::SessionsController we define a failure action where we handle the errors. Note that when a failure happens, we receive a message and strategy params.
To keep things simple, we will add a case statement handling the possible errors:
class OmniAuth::SessionsController < ApplicationController
  ## Rest of the code

  def failure
    message = params[:message]
    case message
    when "invalid_credentials"
      flash[:alert] = t("omniauth.invalid_credentials")
    when "access_denied"
      flash[:alert] = t("omniauth.access_denied")
    else
      flash[:alert] = t("omniauth.unknown_error")
    end

    redirect_to new_session_path
  end
end
Then, we add the error messages to our en.yml locale file:
en:
  omniauth:
    invalid_credentials: "Invalid credentials. Please try again."
    access_denied: "Access denied. Please try again."
    unknown_error: "Something went wrong. Please try again."
Now, our users will get improved error messages from the flow. You can customize the messages or add any other potential error to the case statement.
TL;DR
Implementing a Sign in with Apple feature in our Rails apps can be a good way to reduce sign up friction for our application, especially if a significant part of our users are on iOS devices.
Consider that we need an Apple developer account, which costs 99 US dollars a year to implement this feature.
Before touching our application, we need to obtain the following from our Apple developers account:
- An App ID and a Service ID with Apple Sign in capabilities. Obtaining the latter requires us to add domains, subdomains and return URLs that are considered valid. For testing purposes, we can tunnel requests using a service like ngrok. When deploying to production, we have to add our domain as well.
- A Team ID.
- A certificate with an associated Key ID and private key.
Because users are allowed to hide their emails from us via the Apple email relay service, we also need to add a domain with subdomains and any number of email addresses and verify those using SPF records, so our emails reach the user's inboxes.
From our application's perspective, we use a fork of the omniauth-apple strategy gem to authenticate with the following considerations:
- We have to use the omniauth-rails_csrf_protection gem to make sure that every request to the OAuth flow from our application is a
POSTrequest to mitigate known security issues. - We make sure that we're using a
button_toorform_tagto make thePOSTrequest to initiate the sign in. - We add two options to the
omniauth-appleconfiguration that are included in the fork, thus not present on the README:nonce: :localandprovider_ignores_state: true. If we don't use those, we will get a CSRF error because of the way Apple handles the return flow by making aPOSTrequest to the/auth/apple/callbackendpoint instead ofGETrequest like most OmniAuth providers. - We handle the user creation by defining a
.from_omniauthclass method inUserthat's in charge of creating a new user if there are no users who match the callback params or return a use that does. - We handle failure by adding the appropriate configuration to the
omniauth.rbinitializer and defining afailureaction in theOmniAuth::SessionsControllerwhich includes a case statement for each possible error message.
Taking these things into consideration, implementing the feature should be a breeze.
I hope you enjoyed the article and that it saved you time so you can dedicate it to building awesome stuff.
Have a good one and happy coding!
