
Improving our users' experience when they sign up for our application is usually a good idea.
That's why dividing long forms into multiple steps increases our chances for conversion.
In this article, we will build a multistep onboarding form using Rails and the Wicked gem to avoid writing any custom JavaScript while getting a comparable experience.
Let's start by seeing what we will build:
What we will build
For this article, we will build a multistep user registration form for a fantasy learning platform focused on programming, we will call AvoCasts.
Our form will have the following steps:
- A section to retrieve information about the user.
- A learning goal and time commitment section.
- Topics of interest and the level of current knowledge.
- A “how you heard about us” section.
To achieve this, we will use the Wicked gem, which allows us to generate a multistep flows without having to introduce complex logic into our controllers.
The final result should look like this:
Alternatives
If you're reading this, you've probably considered some of the alternatives we have to build a multistep form in Rails.
Besides using something like the Wicked gem, we could create a multistep form with:
- Individual controller actions and views for each step: this implies that we would define each step as a controller action and manually redirect the user through each step. It seems simple enough, but it has some downsides: keeping track of the redirections, no partial object creation unless we perform some complicated tricks, no logical step order, among other things.
-
A big tabbed form using vanilla JS or Stimulus: this implies creating a big form inside a single view and showing the parts we want the user to see using a tabbed navigation. The main issue is that we would have to handle validations in the frontend and to store progress in cookies or
localStoragein case the user doesn't complete the flow at once. Moreover, changes to the steps logic would probably require some changes in our JavaScript. - Using Hotwire: this implies rendering the multistep form progressively, with something like Turbo frames to conditionally render the content. With this approach, we could re-gain some Rails features, but keeping state and the lack of URLs would be the main issue.
- Using a frontend framework: this approach is more drastic, and I've been guilty of using it inside a Rails application. It's similar to the tabbed form approach, but we lose almost every frontend related Rails features. We would need to add frontend validations, handle state and progress using JavaScript and, in case of needing something like nested models, we would have to shape those objects too. Unless you have a highly interactive form, or you're already using something like Inertia with Rails you're probably better off with other approaches.
- Poorly rebuilding the Wicked gem: at its core, the Wicked gem is a state machine hooked to a controller, so if we tried to recreate its features, we would likely end up with a lot of code and a partial implementation of its features.
Nowadays, with features like link prefetching, using a solution like Wicked is a no-brainer, and it can actually save us plenty of time if our forms are more or less complicated.
Now that we've learned about the alternatives, let's start by setting our application up:
Application set up
The first step is to create a new Rails application with Tailwind and ESBuild:
rails new wizard --css=tailwind --javascript=esbuild
Then, we will add and install the wicked gem:
bundle add wicked && bundle install
Now, we will add a User model to authenticate with it, just like we did in the authentication with the Rails generator article:
bin/rails generate authentication
This will add everything we need to authenticate users into our application, with views for the sign and password reset flows.
However, we need to add a registration flow to be able to sign up users and redirect them to our onboarding flow after they've created their account. For this, we will create to add a RegistrationsController with a corresponding route and views:
# config/routes.rb
resources :registrations, only: [:new, :create]
For the controller:
class RegistrationsController < ApplicationController
  allow_unauthenticated_access only: %i[new create]

  def new
    @user = User.new
  end

  def create
    @user = User.new(user_params)
    if @user.save
      start_new_session_for @user
      redirect_to root_path, notice: "Your account was successfully created. Welcome to AvoCasts!"
    else
      flash[:alert] = "Something went wrong. Please try again."
      render :new, status: :unprocessable_entity
    end
  end

  private

  def user_params
    params.expect(user: [:email_address, :password, :password_confirmation])
  end
end
After also adding the view, when we visit /registrations/new we get the following:
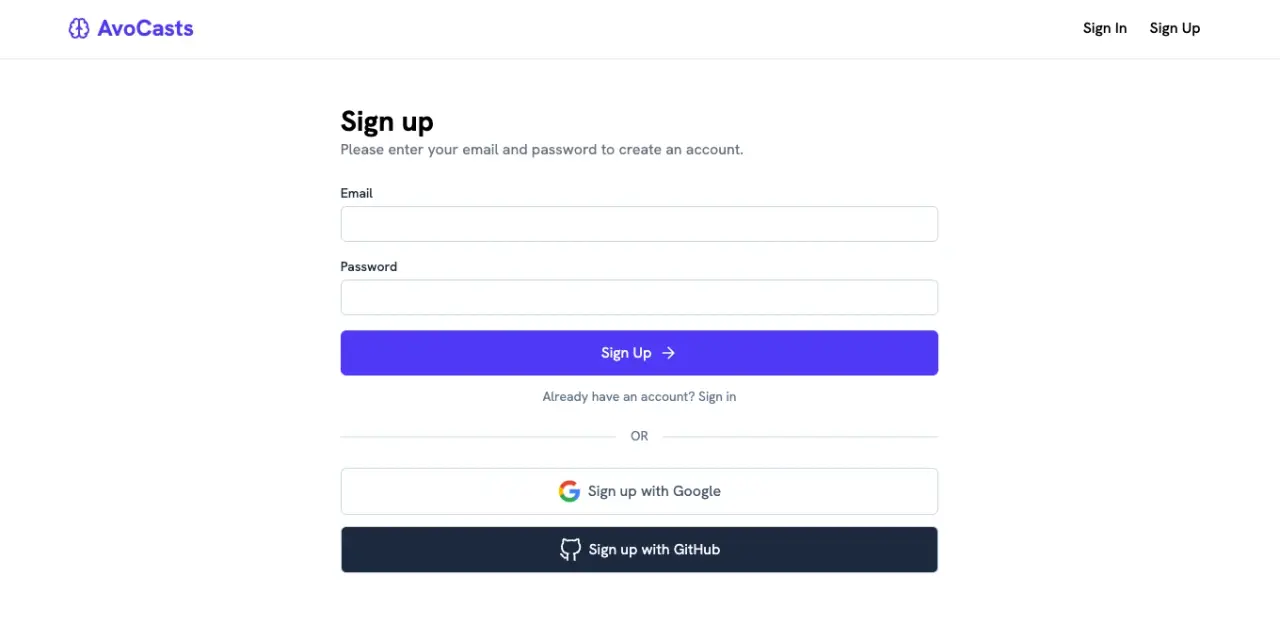
You can safely ignore the OAuth links, but if you want to implement the feature, check our social login with Rails with the Rails auth generator article.
I also used the view_component and class_variants gem out of habit, but you can probably get away with partials because we will define a single component.
In case you wish to copy and paste the code, install those dependencies too:
bundle add view_component && bundle add class_variants && bundle install
Now that we have the gems installed and a working sign up view, let's add a field to store the user input:
User preferences
For this step, we will add a preferences JSON attribute to our user model and use the ActiveRecord::Store API to handle serialization and access to the preferences.
Your requirements may be more complex, so you would have to consider how to store the user input in the corresponding steps. However, the process is similar.
We start by adding and running the migration:
bin/rails generate migration add_preferences_to_users preferences:text && bin/rails db:migrate
Then, we will use Active Record's store with a JSON code to parse and set the preferences:
class User < ApplicationRecord
  # Rest of the code
  store :preferences, accessors: [:preferred_language, :experience_level, :bio, :time_commitment], coder: JSON
end
Now, we can access and store preferences by doing:
user.update(preferred_language: "Ruby")
user.preferred_language # => Returns "Ruby"
We can also add the ability to query against the preferences in case we want to retrieve users based on them later. Notice that I'm using SQLite for this example, your implementation may vary if you're using something else:
class User < ApplicationRecord
  store :preferences, accessors: [:preferred_language, :bio, :time_commitment], coder: JSON
  scope :with_preference, -> (key, value) { where("json_extract(preferences, '$.#{key}') = ?", value) }
end
Then, we can retrieve every user who prefers Ruby to send them a welcome message:
ruby_programmers = User.with_preference(:preferred_language, "Ruby")
Onboarding layout
To make the onboarding experience a bit better, we will add a custom layout exclusively for it.
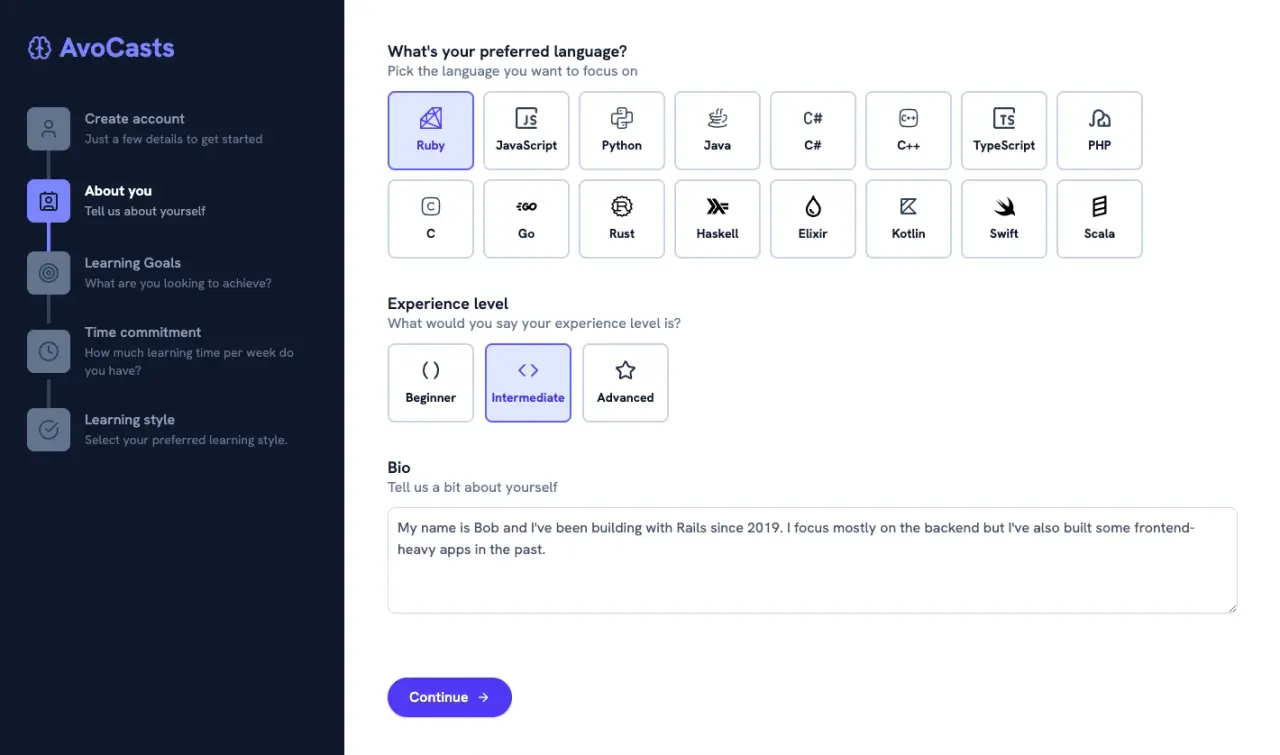
The layout consists of a left sidebar with the steps that the user is taking, where the current step has vivid colors while the inactive steps are shades of gray.
The result looks like this:
To achieve this, we need to create an onboarding layout with a sidebar where we define the steps. For this particular example, I built a StepComponent, but you can probably get away with a partial if you would rather not add the dependency:
# app/components/step_component.rb
class StepComponent < ViewComponent::Base
  include ClassVariants::Helper

  class_variants do
    # Container styles
    base do
      slot :container, class: "flex items-center space-x-4 px-3 py-1 rounded-lg hover:bg-slate-700 transition-colors"
    end

    # Icon container styles with active state
    base do
      slot :icon_container, class: "rounded-lg min-h-[48px] min-w-[48px] flex justify-center items-center relative"
    end
    variant active: true do
      slot :icon_container, class: "bg-indigo-400 before:animate-pulse-indigo-bg before:absolute before:inset-0 before:rounded-lg before:bg-indigo-300/30 before:-z-10"
    end
    variant active: false do
      slot :icon_container, class: "bg-slate-500"
    end

    # Icon styles
    variant active: true do
      slot :icon, class: "text-slate-900"
    end
    variant active: false do
      slot :icon, class: "text-slate-700"
    end

    # Name styles
    base do
      slot :name, class: "text-base"
    end
    variant active: true do
      slot :name, class: "text-white font-bold"
    end
    variant active: false do
      slot :name, class: "text-slate-400 font-medium"
    end

    # Description styles
    base do
      slot :description, class: "text-sm"
    end
    variant active: true do
      slot :description, class: "text-slate-400"
    end
    variant active: false do
      slot :description, class: "text-slate-500"
    end

    # Line container styles
    base do
      slot :line_container, class: "w-[48px] h-8 flex justify-center items-center"
    end

    # Line styles
    base do
      slot :line, class: "w-1 h-8 transition-all"
    end
    variant active: true do
      slot :line, class: "bg-indigo-400"
    end
    variant active: false do
      slot :line, class: "bg-slate-700"
    end

    # Set defaults
    defaults active: false
  end

  def initialize(name:, description:, icon:, active: false, last: false)
    @name = name
    @description = description
    @icon = icon
    @active = active
    @last = last
  end

  def active?
    @active
  end

  def container_classes
    raise class_variants(:container).inspect
    class_variants(:container)
  end

  def icon_container_classes
    class_variants(:icon_container, active: @active)
  end

  def icon_classes
    class_variants(:icon, active: @active)
  end

  def name_classes
    class_variants(:name, active: @active)
  end

  def description_classes
    class_variants(:description, active: @active)
  end

  def line_container_classes
    class_variants(:line_container)
  end

  def line_classes
    class_variants(:line, active: @active)
  end
end
And the HTML:
<div class="transition-all">
  <div class="flex items-center space-x-4">
    <div class="<%= icon_container_classes %>">
      <i data-lucide="<%= @icon %>" class="<%= icon_classes %>"></i>
    </div>
    <div class="flex flex-col -mt-0.5">
      <span class="<%= name_classes %>"><%= @name %></span>
      <span class="<%= description_classes %>"><%= @description %></span>
    </div>
  </div>
  <% unless @last %>
    <div class="<%= line_container_classes %>">
      <div class="<%= line_classes %>"></div>
    </div>
  <% end %>
</div>
Then, the <body> of the onboarding layout:
<body>
  <div class="flex h-screen">
    <%= render "shared/onboarding/sidebar", step_array: @step_array %>

    <div class="flex-1 overflow-auto">
      <%= render "shared/onboarding/mobile_progress_bar", step_array: @step_array %>
      <%= render "shared/flash_messages" %>

      <main class="px-6 py-8 lg:px-12 lg:py-12">
        <%= yield %>
      </main>
    </div>
  </div>
</body>
The sidebar partial:
<div class="hidden md:flex w-60 lg:w-96 xl:w-96 bg-slate-900 text-white flex-col">
  <div class="px-8 pt-12 pb-6">
    <h1 class="text-3xl font-bold text-indigo-400 flex items-center gap-2">
      <i data-lucide="brain" class="w-7 h-7"></i>
      <span>AvoCasts</span>
    </h1>
  </div>
  <div class="flex-1 px-8 mt-6">
    <% step_array.each_with_index do |step, idx| %>
      <%= render StepComponent.new(name: step[:name], description: step[:description], icon: step[:icon], active: step[:active], last: idx == step_array.size - 1) %>
    <% end %>
  </div>
</div>
Then, we also create another partial to show the progress on mobile devices:
<div class="flex md:hidden">
  <nav class="w-full flex flex-col items-center px-2 py-4 bg-slate-900">
    <div class="flex items-center justify-between w-full mb-3">
      <% step_array.each_with_index do |step, idx| %>
        <div class="flex flex-col items-center flex-1">
          <div class="rounded-full w-8 h-8 flex items-center justify-center mb-1 <%= step[:active] ? 'bg-indigo-400' : 'bg-slate-700' %>">
            <i data-lucide="<%= step[:icon] %>" class="w-5 h-5 <%= step[:active] ? 'text-slate-900' : 'text-slate-400' %>"></i>
          </div>
          <span class="text-xs <%= step[:active] ? 'text-indigo-300 font-semibold' : 'text-slate-400' %>"><%= step[:name] %></span>
        </div>
      <% end %>
    </div>
    <div class="bg-slate-200 w-full rounded-full overflow-hidden">
      <div class="h-1.5 bg-indigo-500 rounded-full" style="width: <%= @progress %>%"></div>
    </div>
  </nav>
</div>
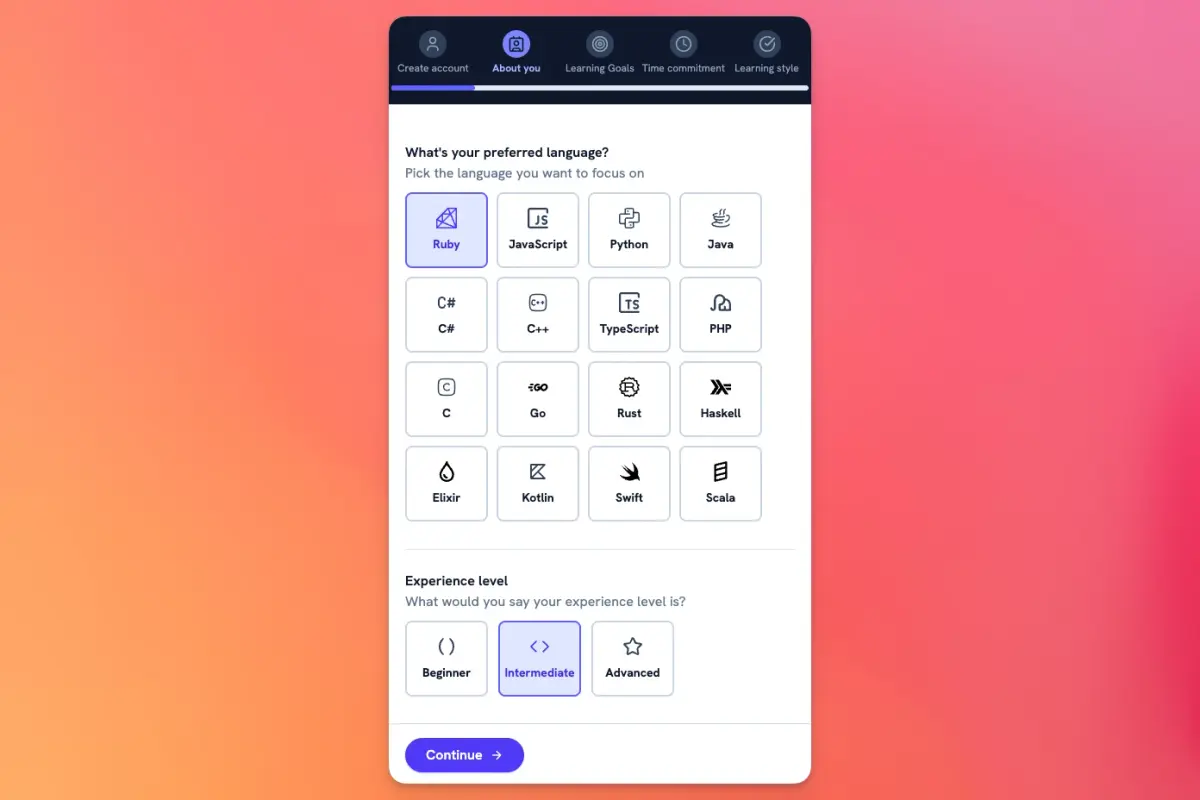
We will later set the @step_array and the @progress variables in the OnboardingController. The result on mobile will look like this:
You might have noticed that I added Create account as the first step of the onboarding flow. I did it to show a typical flow where the onboarding is actually presented as a part of the signup process.
So, to make it work, we need to assign the onboarding layout to the RegistrationsController and redirect the user to the onboarding after a successful signup as well:
class RegistrationsController < ApplicationController
  # Rest of the code
  layout "onboarding"

  # Code for the new action
  def create
    @user = User.new(user_params)
    if @user.save
      start_new_session_for @user
      redirect_to onboarding_path(:about_you), notice: "Welcome to AvoCasts! Please complete the onboarding process to get started."
    else
      flash[:alert] = "Something went wrong. Please try again."
      render :new, status: :unprocessable_entity
    end
  end
end
The actual onboarding will consist of the steps after the signup, but the user will not know that because it will all look like part of the same flow:

However, we haven't defined the @steps_array yet, but we need it to render the steps correctly, so here's the code for it:
class RegistrationsController < ApplicationController
  before_action :set_step_array, only: [:new]

  ## Rest of the code

  private

  def set_step_array
    @step_array = [
      {
        name: "Create account",
        description: "Just a few details to get started",
        icon: "user",
        active: true
      },
      {
        name: "About you",
        description: "Tell us about yourself",
        icon: "contact",
        active: false
      },
      {
        name: "Learning Goals",
        description: "What are you looking to achieve?",
        icon: "target",
        active: false
      },
      {
        name: "Time commitment",
        description: "How much learning time per week do you have?",
        icon: "clock",
        active: false
      },
      {
        name: "Learning style",
        description: "Select your preferred learning style.",
        icon: "check-circle",
        active: false,
        last: true
      }
    ]
  end
end
We will later replace the boolean calculation for the active parameter dynamically but, for now, that's all we need.
The flow finally looks like this:
Now that we are done with the setup, let's start with the actual wizard behavior.
Multistep form
The first step is to assign a route for our form. I will use the /onboarding route:
# config/routes.rb
resources :onboarding, only: [:show, :update]
Next, we have to create the OnboardingController, include the gem's behavior using Wicked::Wizard and define the steps for our wizard using the steps method:
# app/controllers/onboarding_controller.rb
class OnboardingController < ApplicationController
  include Wicked::Wizard
  before_action :resume_session, only: [:show, :update]

  steps :about_you, :learning_goals, :time_commitment, :preferences

  layout "onboarding"
end
The first thing we have to do is to add a view for each one of the steps under the app/views/onboarding folder. The names have to match the names we passed as arguments to the steps method.
Then, we define the show method where we set a @user variable and then call the render_wizard, the method in charge of rendering the view that corresponds to the step we're in:
def show
  @user = Current.user
  render_wizard
end
But if we navigate to /onboarding/about_you, we will get an error because we haven't defined the @step_array variable we're passing to the sidebar and mobile progress partials:
class OnboardingController < ApplicationController
  include Wicked::Wizard
  steps :about_you, :learning_goals, :time_commitment, :preferences, :review
  before_action :resume_session, only: [:show, :update]
  before_action :set_step_array, only: [:show]

  layout "onboarding"

  # Rest of the code

  private
  def set_step_array
    @step_array = [
      {
        name: "Create account",
        description: "Just a few details to get started",
        icon: "user",
        active: controller_name == "registrations"
      },
      {
        name: "About you",
        description: "Tell us about yourself",
        icon: "contact",
        active: @step == :about_you
      },
      {
        name: "Learning Goals",
        description: "What are you looking to achieve?",
        icon: "target",
        active: @step == :learning_goals
      },
      {
        name: "Time commitment",
        description: "How much learning time per week do you have?",
        icon: "clock",
        active: @step == :time_commitment
      },
      {
        name: "Learning style",
        description: "Select your preferred learning style.",
        icon: "check-circle",
        active: @step == :learning_style,
        last: true
      }
    ]
  end
end
Then, we add the show action that will be responsible for rendering the actual steps:
def show
  @user = Current.user
  render_wizard
end
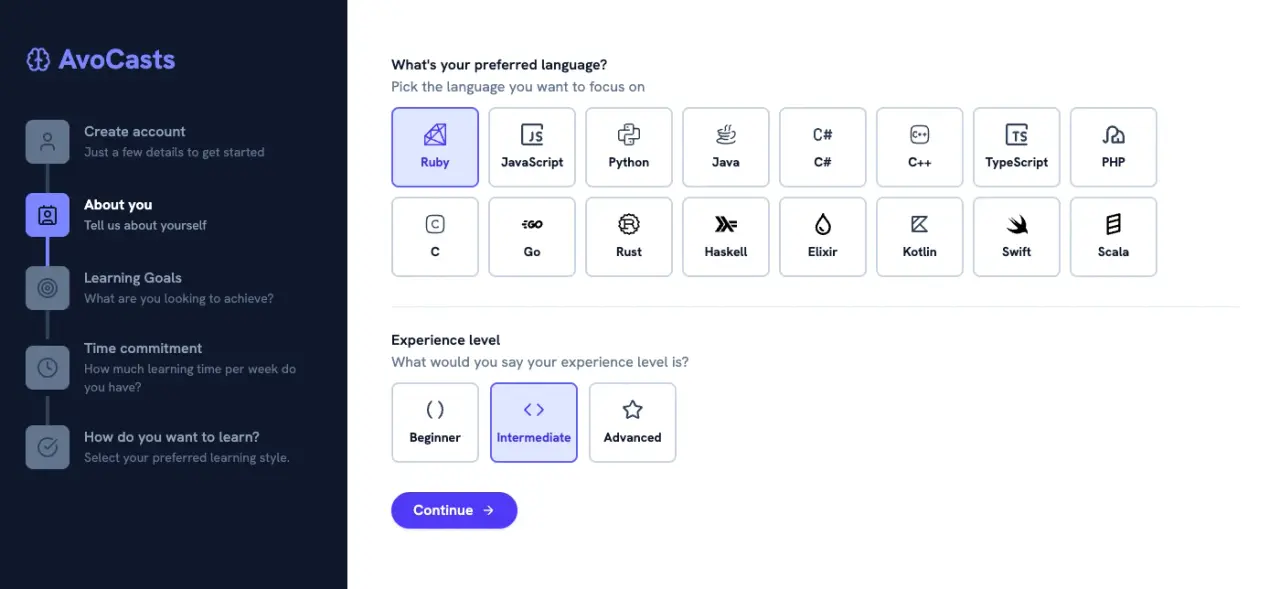
Now, after adding some content to the about_you view step, when we navigate to /onboarding/about_you, or access via the onboarding path with the step we wish to render onboarding_path(:about_you), we should see the following:
Without going into too many details for the sake of length, let's see how the bio field of the about_you view is implemented:
# app/views/onboarding/about_you.html.erb
<%= form_with model: @user, url: onboarding_path(step), method: :patch do |f| %>
  <%# Rest of the form %>
  <section class="mt-4 md:mt-6 mb-16">
    <div class="flex flex-col">
      <span class="text-slate-900 text-lg font-semibold leading-5 mb-0">Bio</span>
      <span class="text-slate-500">Tell us a bit about yourself</span>
    </div>
    <%= f.text_area :bio, rows: 4, class: "w-full mt-2.5 placeholder:text-slate-400 text-slate-600 border border-slate-300 rounded-lg p-2.5" %>
  </section>
  <%= render "onboarding/steps", step_name: :about_you %>
<% end %>
We're defining a form with the @user as the model and the onboarding_path as the URL. The step which we're passing to the route helper is defined automatically by the Wicked gem, and it's available in the views of controllers that inherit its behavior.
Now, if we submit the form, we will reach the update action so let's define it to store the user preferences:
class OnboardingController < ApplicationController
  # Rest of the code

  def update
    @user = Current.user

    case step.to_sym
    when :about_you
      @user.experience_level = params.dig(:user, :experience_level)
      @user.preferred_language = params.dig(:user, :preferred_language)
      @user.bio = params.dig(:user, :bio)
    when :learning_goals
      @user.learning_goals = params.dig(:user, :learning_goals)
    when :time_commitment
      @user.time_commitment = params.dig(:user, :time_commitment)
    when :learning_style
      @user.learning_style = params.dig(:user, :learning_style)
    end

    @user.save!
    redirect_to next_wizard_path
  end
end
The step value, which is provided by the gem, corresponds to what we passed to the onboarding_path route helper so, in this case, we will execute the code for the :about_you branch of the switch statement and perform save! on the user instance and return a redirection to the next_wizard_path helper which is pretty self-explanatory.
Because we're using the gem to create an onboarding flow, we will not perform validations or make any fields required.
In case we needed to perform validation, we would have to conditionally redirect to the next step or redirect to the current step:
if @user.save!
  redirect_to next_wizard_path
else
  flash[:alert] = "There was something wrong with your submission. Please try again."
  redirect_to onboarding_path(step)
end
Step navigation
Right now, we have a functioning multistep form, but we haven't seen how the step navigation component works. Let's add it.
The first step is to create a _steps partial inside the onboarding view directory. In there, we will use the previous_wizard_path route helper to check whether we should show the back button or not.
We also use the wizard_steps array and the step_name to change the advance button text:
<div class="flex justify-start gap-x-4 mt-10 px-6 py-4 md:p-0 bg-white md:border-none border-t border-slate-300 absolute bottom-0 left-0 right-0 md:relative md:mt-8 md:flex-row md:gap-x-4">
  <% if previous_wizard_path != onboarding_path(step_name) %>
    <%= link_to previous_wizard_path, class: "flex items-center gap-x-2 rounded-full bg-white px-1 md:px-6 py-2.5 text-base font-semibold text-slate-700 hover:bg-slate-200 duration-400 transition-colors focus-visible:outline focus-visible:outline-2 focus-visible:outline-offset-2 focus-visible:outline-indigo-600" do %>
      <i data-lucide="arrow-left" class="w-4 h-4"></i>
      <span>Back</span>
    <% end %>
  <% end %>
  <%= button_tag type: "submit", class: "flex items-center gap-x-2 rounded-full bg-indigo-600 px-6 py-2.5 text-base font-semibold text-white shadow-sm hover:bg-indigo-500 focus-visible:outline focus-visible:outline-2 focus-visible:outline-offset-2 focus-visible:outline-indigo-600" do %>
    <% if wizard_steps.index(step_name) == wizard_steps.count - 1 %>
      <span>Finish</span>
    <% else %>
      <span>Continue</span>
    <% end %>
    <i data-lucide="arrow-right" class="w-4 h-4"></i>
  <% end %>
</div>
If the previous_wizard_path matches the path for the current step, we know that there's no need to show the back button.
Then, we use the wizard_steps array to check if the current step is the last one to decide the text for the next step button.
Notice that we've used a button that submits the current form every time the user clicks continue. We could theoretically use a link here, but because we're processing everything in the update action, submitting the form makes sense.
Now we can include the partial in every step to navigate the form.
However, you might be wondering how we can track the progress to show a progress bar like we showed in the mobile version of the form. Let's see how to achieve that:
Tracking progress
At the beginning, we added a sidebar with the StepComponent which distinguishes the current step with a different color.
However, we also used the @progress value for the mobile version of the step component, but we haven't defined how to set the value for that variable:
class OnboardingController < ApplicationController
  # Rest of the code
  before_action :set_progress, only: [:show, :update]

  # Rest of the code

  private
  def set_progress
    if wizard_steps.any? && wizard_steps.index(step).present?
      @progress = ((wizard_steps.index(step) + 1).to_d / wizard_steps.count.to_d) * 100
    else
      @progress = 0
    end
  end
end
Because we have access to the wizard_steps and the step values, we can calculate the progress of the step regarding the whole array.
Then, we transform that into a percentage by dividing the current step count by the actual step count. We can use this percentage value to paint a progress bar or a relative value like a circle percentage. That's up to you.
Summary
Multistep forms are a rite of passage if you're building a Rails application with actual customers or users.
They're very useful to gather information about your users in a friendly way, especially after they perform key actions like signing up or subscribing to your application.
There are multiple ways of approaching this issue. However, the Wicked gem gives us a very straightforward way to solve it by defining the steps in a controller and handling most of the things for us.
Persisting the user information is usually required, but there are multiple ways to achieve that. We're using a preferences text field using SQLite that gets parsed to JSON to store and access the values.
Using the gem, we built a multistep form using Rails by defining the steps within a controller and then creating a view for each one of those steps using a show and update action within the desired controller.
Within the show view, we rendered the onboarding flow and within the update action, we performed the changes to the User instance to gather useful information from users.
Finally, we learned how to keep track of the steps using a _steps partial, and we also learned to keep track of the progress using helpers from the gem itself.
I hope the tutorial helps you implement a multistep form feature for your next Rails application.
If you have any doubts about doing so, please let us know! Have a good one and happy coding!
