Password-based authentication has been the bread and butter of most applications that required auth since the early days of the web.
However, there are many reasons why passwords are not ideal: they mainly revolve around the fact that most users manage dozens of accounts and keeping track of passwords is cumbersome and risky.
One way to replace passwords is to use secure login codes, which accomplish at least one authentication factor and prevent users from issues like data leaks or bad password practices.
In this article, we will learn how to add passwordless authentication in Rails with the NoPassword gem.
Let's start by understanding the motivations behind the gem and what makes it different from existing alternatives:
Why NoPassword
As of today, there are many solutions that offer passwordless authentication with Rails. We've even covered magic links with Rails using devise_passwordless in a previous article.
The main reason for using this type of auth flow are the issues passwords have:
- Password reuse: because of being tired of creating password after password, users tend to reuse passwords for different sites or services, even for critical services like banking or health.
- Weak passwords: generally, people choose weak passwords because they are easier to remember. And, if sites force users to pick stronger passwords, they usually forget about them or resort to things like annotating them on a sticky note.
- Forgotten passwords: most services resort to a second factor like email or SMS when resetting a password, which begs whether using those methods to authenticate isn't more convenient.
Unlike other gems, NoPassword focuses exclusively on the code generation and validation. It doesn't handle sessions, so we can use it on top of solutions like Devise or the Rails auth generator.
All in all, this gem is a nice alternative when we need to add temporary and secure login codes. Plus, it comes with a minimalistic approach to social login by providing pre-made controllers for Google and Apple Sign In.
How does it work
The main function of the NoPassword gem is to generate and verify codes securely. These are generated from user-provided data, which by default is an email address using the EmailAuthentication strategy.
The gem stores the codes using a nopassword_secrets table that looks like this:

The data is processed with a salt to generate the data_digest which is then used in combination with the verification code to generate the code_digest. After this, code verification attempts are validated against the code_digest while also considering the expiration and the allowed remaining attempts.
This secures the verification while providing sensible expiration and verification attempts configuration.
For the code generation and verification phase, the gem uses three models:
-
Secret: a class that inherits from
ApplicationRecordand uses thenopassword_secretstable to persist its values. Among others, its function is to persist an association between thedatawhich can be an email— or any other information like a phone number— and a generated code. The model is also responsible for generating default values for thesaltthat's used to produce a digest from the data and the code, thecodeitself, theexpires_at, set at 5 minutes by default, and theremaining_attemptswhich is 3. Lastly, the class is also in charge of verifying if a code is valid with thehas_authentic_code?method. -
Model: an abstract representation of the authentication method we use. By default, the gem adds the
EmailAuthenticationclass to handle the email flow, but we can add other classes likeSmsAuthenticationfor example. -
Verification: a class that inherits from
NoPassword::Modeland is responsible for adding validation errors and delegating the verification behavior to theSecretmodel.
As you can see, these three models are the building blocks for the EmailAuthentication strategy, and we can easily extend them by creating more classes that implement a verification method which makes a call to NoPassword::Verification and pass a salt if we want to customize that and a data value which for the default flow is an email address.
What we will build
For this tutorial, we will build an application with passwordless authentication using NoPassword.
For the email auth flow with NoPassword, the library will serve its main purpose, which is secure code verification.
If a user verifies the email successfully by inputting the correct code, we will handle the session using the Rails auth generator using the Current.user.
Finally, we will also show the OAuth integration that gem comes with by adding the ability to sign with Google.
The final result looks like this:
Let's start setting our application up:
Application Setup
To show how to use the NoPassword gem, we will build a simple Rails application with protected posts that can only be accessed by authenticated users.
The first step is to create a new Rails application:
rails new nopassword --css=tailwind --javascript=esbuild
Next, we will add nopassword to the Gemfile and install it:
bundle add nopassword && bundle install
Now, let's run the installation command, which will generate everything we need for the email flow:
bundle exec rails generate nopassword:install
This command adds the required routes using resource :email_authentication, the corresponding EmailAuthenticationsController with two views: new.html.erb where the user enters an email and edit.html.erb where we render the code verification form.
Please note, when running this command you might encounter the error: Don't know how to build task 'nopassword_engine:install:migrations' which is caused by a typo, so let's run the command after the error appears:
bundle exec rake no_password_engine:install:migrations
This migration creates the nopassword_secrets table we previously saw.
Now, we can run the pending migrations:
bin/rails db:migrate
Because the gem includes an email authentication flow by default, we will also install the letter_opener gem to intercept emails and access the auth codes to use them locally:
# Gemfile
group :development do
  gem "letter_opener"
end
And, after running bundle install we add the following to our development.rb configuration:
# config/environments/development.rb
config.action_mailer.delivery_method = :letter_opener
config.action_mailer.perform_deliveries = true
Setting the mailer
When we run the installation command, the gem adds an EmailAuthenticationsController to our application.
In there, a couple of methods that we can use to customize how the gem works are defined.
The one we care about now is the deliver_authentication method which, by default, calls the deliver method on the notification email which is defined within NoPassword::EmailAuthenticationMailer.
The gem also adds the notification_email.html.erb views, which are supposed to render the email. However, if we try to customize the views, we will notice that the changes don't reflect on the actual email that's sent.
To solve that, we need to remove the NoPassword namespace from the mailer, so we need to have the following in our controller:
# app/controllers/email_authentications_controller.rb
class EmailAuthenticationsController < NoPassword::EmailAuthenticationsController
  ## Rest of the code

  def deliver_authentication(authentication)
    EmailAuthenticationMailer.with(authentication: authentication).notification_email.deliver
  end
end
Now, the changes we make to the notification_email.html.erb file should be reflected when it’s rendered.
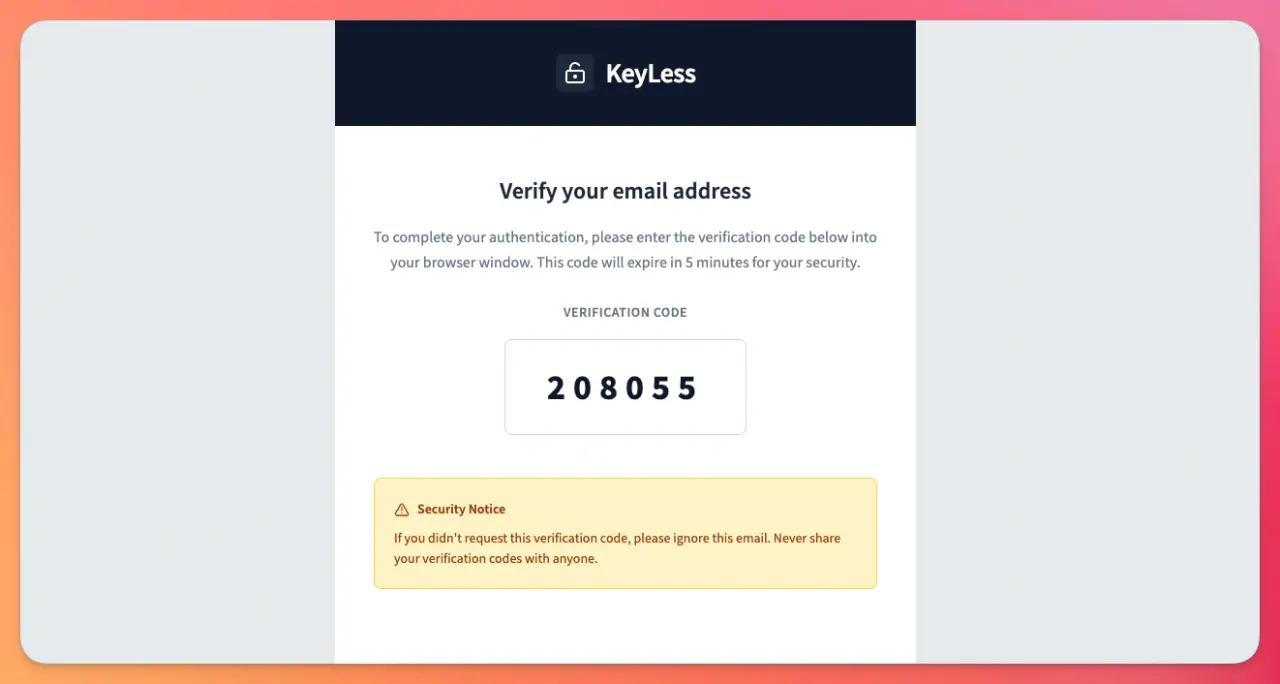
After some work with the visuals, our email looks like this:
Now that we have the gem setup, let's generate auth with the Rails generator so we can manage sessions and keep users signed in once they go through the flow.
Adding auth with the generator
Because we've previously shown how to add user authentication and registrations using the Rails auth generator, we will keep this section short.
Let's start by running the auth generator command that will add persisted User and Session models and a Current class which allows us to access to a thread-isolated attributes singleton: in our case, the current user who's authenticated.
bin/rails generate authentication
This also adds the corresponding controllers for session management and password recovery flows, which we won't need because users will not know about passwords at all.
However, we do need the User and Session models in order for users to stay signed in after they successfully complete the flow.
Now that we've set everything up, let's create the email authentication flow:
Email flow
When we run the installation commands, NoPassword adds a view at /email_authentication/new with a corresponding EmailAuthenticationsController that inherits its behavior from a corresponding controller from the library.
The new view is responsible for rendering the view where the user enters the data which will get processed into a unique and expiring code.
After some work with Tailwind, the view looks like this:
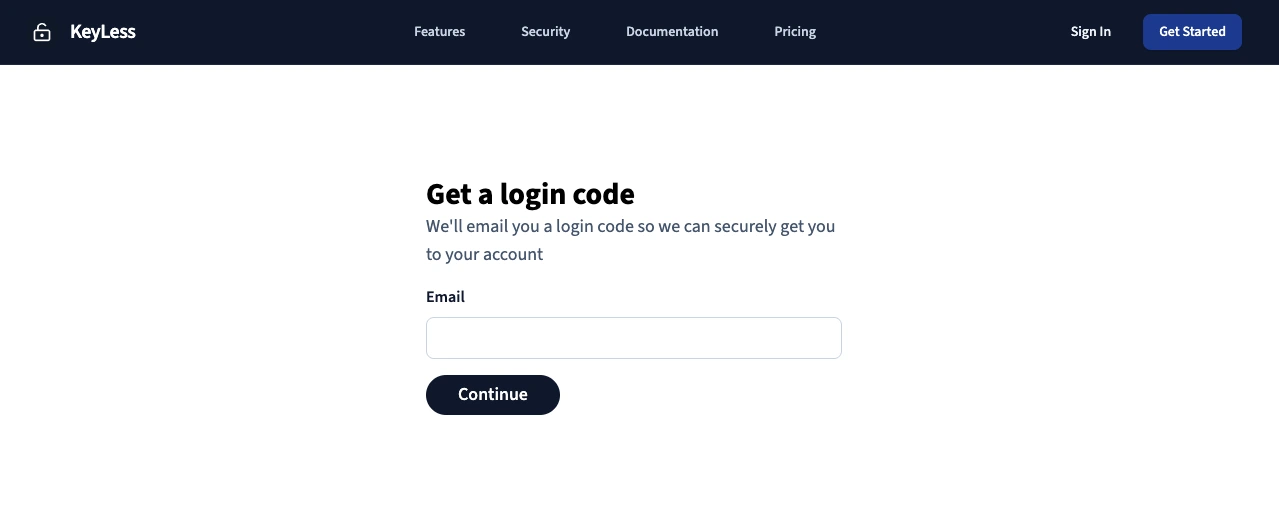
As you can see, it renders a form with an email input and a button to submit the form.
When we submit it, a POST request to the /email_authentication route is made, where NoPassword takes over and sends an email to the address the user provided with the auth code and redirects the user to the code verification view which is located at app/views/email_authentications/edit.html.erb.
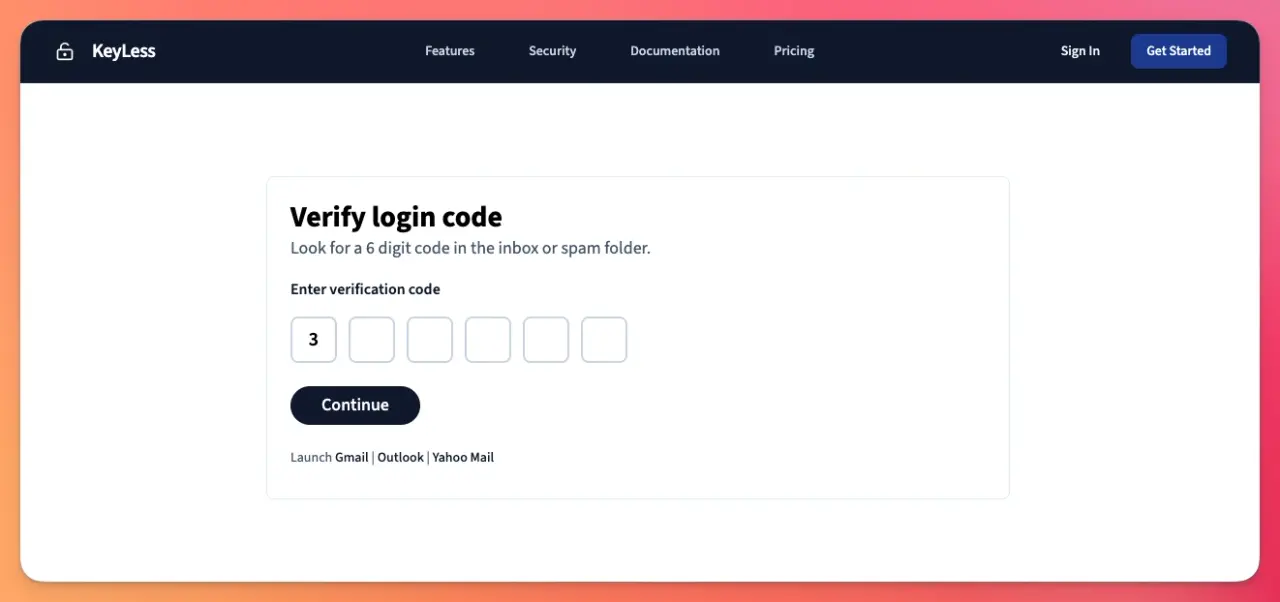
In the edit view, the user can enter or paste the code they received in their email. With some front-end work, the view looks like this:
When the user submits the code, it's verified by NoPassword by making sure it matches the corresponding NoPassword::Secret instance, which contains the code_digest.
There are three possible error scenarios:
- The code is incorrect: the user gets redirected to the code input view and an error is populated telling the user the code is incorrect.
- The code is expired: if a certain number of minutes, 5 by default, passed between the code generation and the verification, the code is considered expired, and the user gets redirected to the email input view.
- The number of attempts was exceeded: each code gets 3 verification attempts by default. If the user exceeds them, the code gets invalidated.
If it matches the expected value, the verification_succeededaction will get called.
By default, this action redirects the user to the root_url. Let's add session management and user registration ability with the following code:
class EmailAuthenticationsController < NoPassword::EmailAuthenticationsController
  allow_unauthenticated_access
  ## Rest of the code

  def verification_succeeded(email)
    user = User.find_by(email_address: email)

    if user.present?
      start_new_session_for user
      redirect_to root_url, notice: "Welcome back to KeyLess. You've been logged in"
    else
      user = User.create(email_address: email, password_digest: SecureRandom.hex(16))
      start_new_session_for user
      redirect_to onboarding_path(:profile), notice: "Welcome to KeyLess. You've been logged in"
    end
  end
end
If we're running this action, it's understood that a successful login attempt was made, so we are handling two scenarios:
- If the user exists in the database, we redirect to the root URL and start a new session for it.
- Otherwise, we assume we need to handle a new verified user, so we create a new
User. You might notice we're setting a randompassword_digesteven though we're not using it. This is because the Rails auth generator expects this field to exist. Our users will never need to actually know about the password.
You might have noticed that when we create a new account, we redirect the user to an onboarding wizard. That's in case we want to obtain information from the user that we usually obtain from a traditional sign-up form.
This is all we need to add passwordless authentication with email for a Rails application.
Now, let's implement Google sign in using the OAuth flow that the gem provides.
OAuth flow
In addition to passwordless authentication, NoPassword comes with a minimalistic social login integration which, unlike most approaches, doesn't use the omniauth-rails gem.
The first step to implementing this flow is to obtain the credentials from Google, following the steps in our OAuth with Rails tutorial: we need a CLIENT_ID and a CLIENT_SECRET. Don't forget to add http://localhost:3000/google_authorization to the list of authorized redirect URIs when configuring the client.
Then, we add the following to our routes file:
# config/routes.rb
resource :google_authorization, only: [:show, :create]
Let's also define the controller so we don't get an error when restarting the application. Note that we define the credentials we obtained previously as constants inside the controller:
class GoogleAuthorizationsController < NoPassword::OAuth::GoogleAuthorizationsController
  allow_unauthenticated_access

  CLIENT_ID = Rails.application.credentials.google.dig(:oauth, :client_id)
  CLIENT_SECRET = Rails.application.credentials.google.dig(:oauth, :client_secret)
  SCOPE = "email profile"

  protected

  def authorization_succeeded
    # Implementation pending
  end
end
Next, let's add a button to sign in with Google below the button for the email_authentications/new.html.erb view:
<div class="mt-3 flex items-center gap-4 w-full">
  <%= button_to google_authorization_path, method: :post, data: { turbo: false }, class: "w-full inline-flex justify-center py-3 px-6 bg-white border border-slate-300 rounded-md text-sm font-semibold text-gray-600 hover:bg-gray-50", form_class: "w-full" do %>
    <span class="sr-only">Sign in with Google</span>
    <%= image_tag "google-oauth-icon.png", alt: "Google", class: "w-5 h-5 mr-2 fill-gray-100" %>
    <span>Google</span>
  <% end %>
</div>
Which results in the following:

When a user clicks the Google sign-in button, they'll be redirected to Google's OAuth authorization page where they can grant permission to your application. After successful authorization, Google redirects them back to your application with an authorization code that gets exchanged for user information.
Now, we should be able to test the flow and see the Google OAuth2 authorization screen.
If the authentication succeeds, we should be able to define our authorization_succeeded method and receive the ssohash, which contains the information about the user:
{"sub"=>"382818589127430036306", "name"=>"Exequiel Rozas", "given_name"=>"Exequiel", "family_name"=>"Rozas", "picture"=>"https://lh3.googleusercontent.com/a/ACg8ocI8Hbed45cTTXo9gSLKCPrfQmKvEBAPvLi3lOFAdVxzvLjYyA=s96-c", "email"=>"example@gmail.com", "email_verified"=>true}
With this information, we can now retrieve the user and authenticate it if it already exists in our database:
class GoogleAuthorizationsController < NoPassword::OAuth::GoogleAuthorizationsController
  # Rest of the code

  protected

  def authorization_succeeded(sso)
    user = User.find_by(email_address: sso.fetch("email"))
    if user.present?
      start_new_session_for user
      redirect_to root_url, notice: "Signed in successfully using Google"
    else
      redirect_to root_url, alert: "You don't have an account with us. Please sign up first."
    end
  end

  def authorization_failed
    redirect_to new_email_authentication_path, alert: "Authorization with Google failed. Please try again."
  end
end
We also added behavior for the authorization_failed method, which gets called when use information is not present after it's requested from Google's OAuth API.
However, if we run the auth process again, we might find an undefined method build for an instance of URI::HTTP which is produced in the authorization_url action for the controller we're inheriting from. To solve this, let's overwrite the action in our controller:
class GoogleAuthorizationsController < NoPassword::OAuth::GoogleAuthorizationsController
# Rest of the code

  protected

  def authorization_url
    url = AUTHORIZATION_URL.dup
    url.query = URI.encode_www_form(
      client_id: client_id,
      redirect_uri: callback_url,
      response_type: "code",
      scope: scope,
      state: form_authenticity_token
    )
    url
  end
end
Now, we should be able to successfully authenticate using Google:
TL;DR
Email and password authentication is, by far, the most used authentication method since the dawn of web applications.
But it has some issues, especially because users tend to pick short and insecure passwords and tend to reuse them.
To solve this, we added a passwordless authentication flow using the NoPassword gem, which focuses on generating secure and expiring codes that we can send to users and later verify them using the gem.
To show how the gem works, we implemented the email authentication flow and then added an OAuth flow using the gem without the need for third-party libraries like the OmniAuth gem.
A good thing about NoPassword is that we can add other forms of authentication by implementing a class that inherits from NoPassword::Model and implements the verification method using the NoPassword::Verification model.
This can be useful, for example, if you want to add phone number authentication or verification to your application.
I hope you enjoyed the article and that it can help you implement passwordless flows in your projects.
Have a good one and happy coding!
