Active Storage has greatly simplified file uploads for Rails applications: it has become the de facto standard replacing alternatives that were dominant back in the day like Paperclip or CarrierWave.
Out of the box, it comes with everything we need to handle file uploads, including cloud services like Amazon S3.
In this article, we will learn how to add direct uploads to a Rails app using Active Storage.
Let's start by understanding what direct uploads are:
Direct uploads
The default flow for cloud file uploads implies that a user sends a file to our server, and we use the server to send the file to a cloud provider like S3, which returns an upload ID that Active Storage uses to persist the upload and access it later.
On the other hand, direct uploads imply that users can send files directly to our cloud file storage without the need to go through our server.
However, we cannot let any users upload files to our cloud buckets.
To validate each upload, users send a GET request to our server with information about the file in exchange for a signed request that they can use to upload the file to our cloud storage.
To achieve this, we require users to make a request to our server in order for their file:
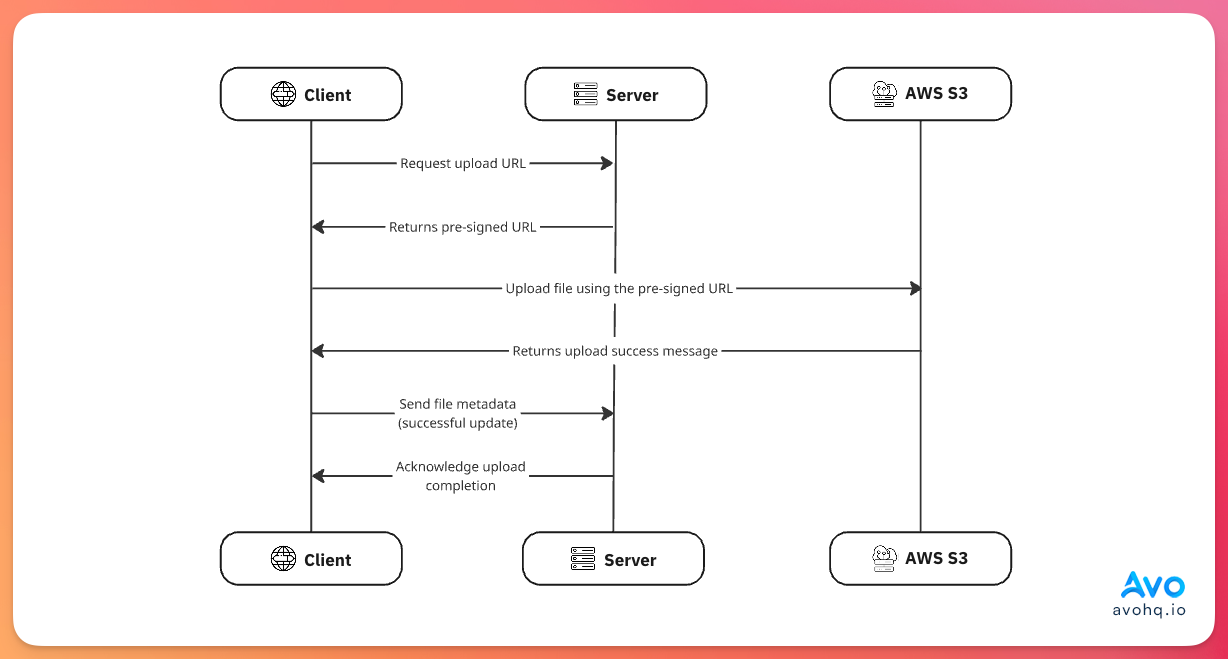
When the client, on behalf of the user, makes a request for an upload URL, it sends information about the file to be uploaded, which is processed by the server using the cloud provider credentials to generate a signed URL that the client uses to request a file upload.
Then, the client makes a POST request to the cloud server using the signed URL and the file to upload, and the server knows that the file upload originated from a legitimate request because our server “approved” the upload with the signed URL.
S3 configuration
Because we need our server to be able to generate the signed URL, we need to configure S3 as if we were doing regular Active Storage uploads to AWS.
The first part of the process is setting everything on AWS.
If you have an AWS account, and you have a provisioned bucket with the correct permissions set, you can skip this section altogether
Create an AWS account
Before anything, we need to create an AWS account. We can do so by following this link.
We should see something like this:
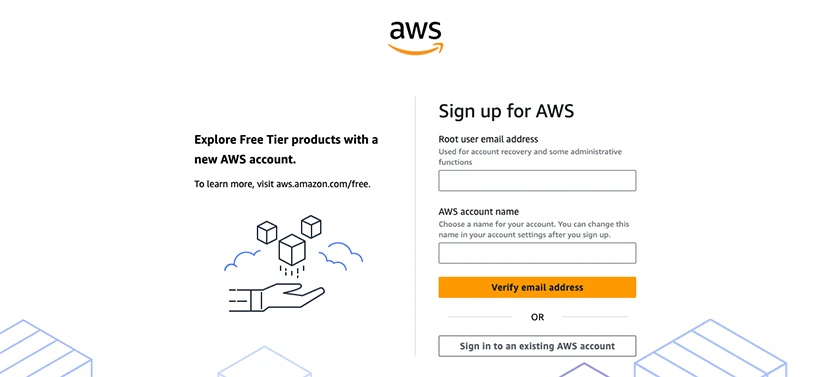
You will have to provide a valid email and an account name. After validating your email address, you will be prompted to set a password and then provide some information about you, including billing information.
After completing the registration steps you have access to the whole suite of AWS products and a 12-month period on the free tier.
Create an S3 bucket
Once we're inside the AWS console, we have to access S3. To achieve this we can simply use the search bar at the top typing Option + S on the context of the browser and typing “S3”.
A results dropdown should show S3 under “Services”.
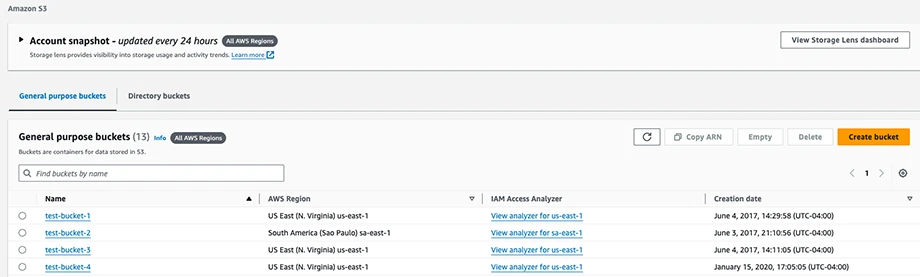
After we click on it, we should see the list of buckets in our account.
We then proceed to click on the “Create Bucket” button that's located in the top right corner of the table view:
Now we should see the options to create a new bucket.
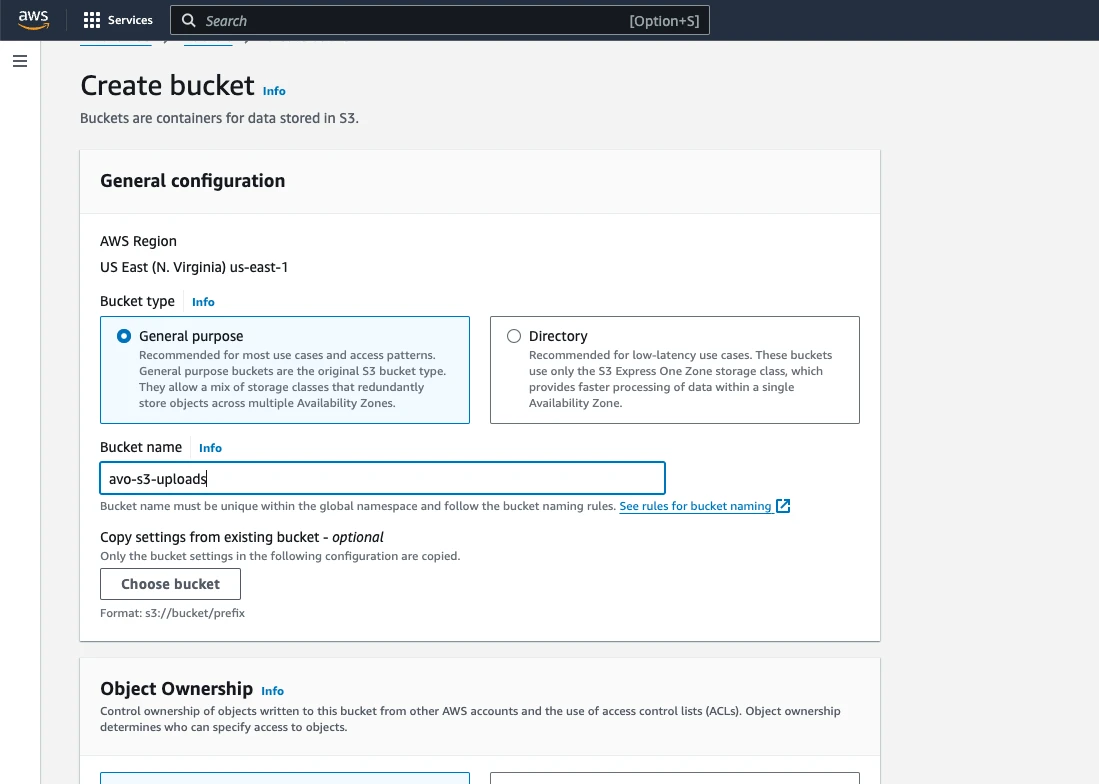
Remember to pick a descriptive name for your bucket and remember that only lowercase letters, numbers, dots, and hyphens are valid characters for it.
The configuration we should pick for this tutorial is:
- The bucket type should be “General purpose”.
- ACLs disabled on the “Object ownership section”: this means that we will set the access to the bucket and its objects using policies and not ACLs (Access Control Lists).
- Leave the “Block all public access” on. This will ensure that undesired access to the bucket and its resources is not allowed unless otherwise specified in the policies.
- Leave bucket versioning disabled we won't be needing it for the scope of this tutorial.
- There's no need to add tags, you can leave that empty.
- You can leave the default values for the “Default Encryption” and the “Object Lock” section.
Creating a user and configuring permissions for the bucket
We need to create an AWS user using IAM (Identity and Access Management) and then attach permissions to the bucket to make it work correctly.
To create a user we first navigate to the IAM section by searching for “IAM” (remember to open the search dialog using Option + S) and clicking on the “Users” link that appears below the IAM dropdown.
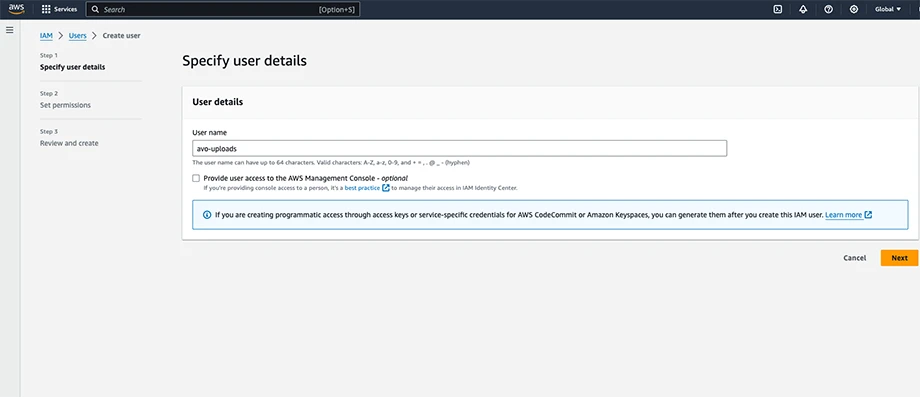
We don't need to give this user access to the AWS management console so we should leave that option unchecked.
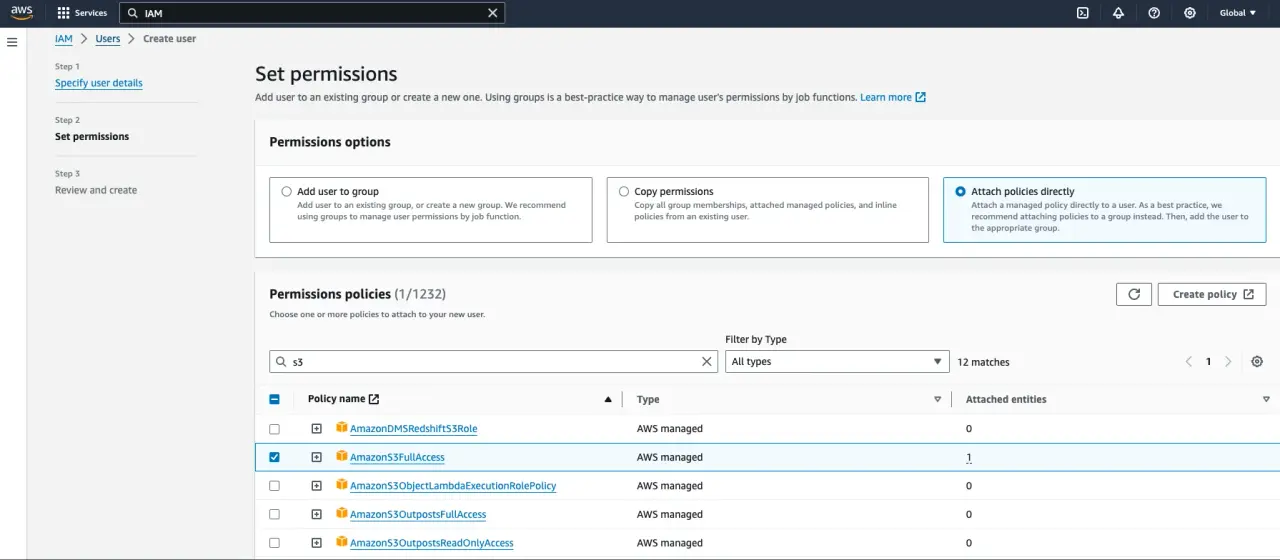
The next step is to attach a permission policy to our user. We select the AmazonS3FullAccess policy, which gives our user full access to the “S3” and “S3 Object Lambda” services.
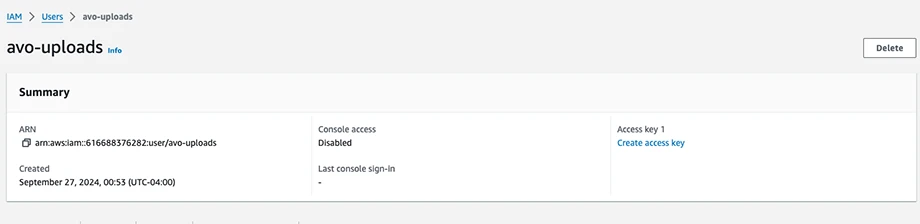
After creating the user, we need to add an Access Key. To do that we go to the Users list, click on the one we just created and then, on the Summary dashboard, we search for the "Create Access Key" link and click on it:
It will prompt us with the use case for the access key; we can select “Local code” if we are not planning to deploy the application or “Application running on an AWS compute service” or “Application running outside AWS” depending on your use case.
The next step is to optionally add a description tag. After this we will see our “Access Key ID” displayed and the “Secret Access Key” hidden.
Make sure to keep both in a safe place because we will be using them later and there's no way to retrieve the Secret Access Key later.
CORS Setup
CORS, or Cross-origin Resource Sharing is an HTTP-header security mechanism that defines who is allowed to interact with our API.
This mechanism allows our server to tell browsers which origins, methods and headers are allowed when making requests from a different domain.
In the context of Rails Direct Uploads, our user's browser will make requests directly to our S3 bucket from our Rails application domain and, by default, these cross-origin requests are blocked as a security measure.
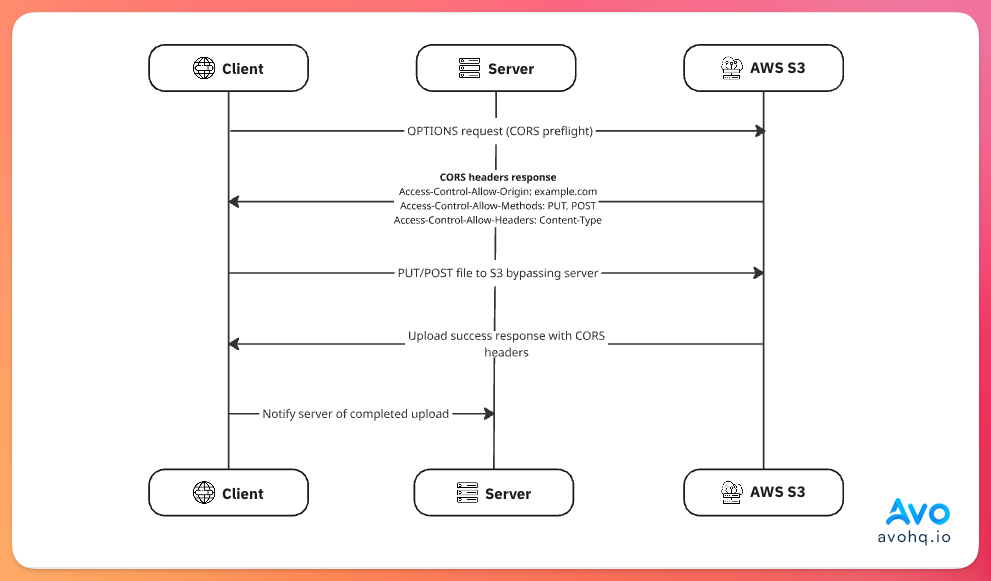
When a user attempts to upload a file, their browser sends a preflight OPTIONS request to S3 to check if the upload is allowed. S3 responds with CORS headers indicating whether the request can proceed.
Once we obtain the pre-signed URL from the server, the flow looks like this:
Considering this, we have to configure CORS in the AWS Console by navigating to our bucket's Permissions page, scrolling to the CORS section:
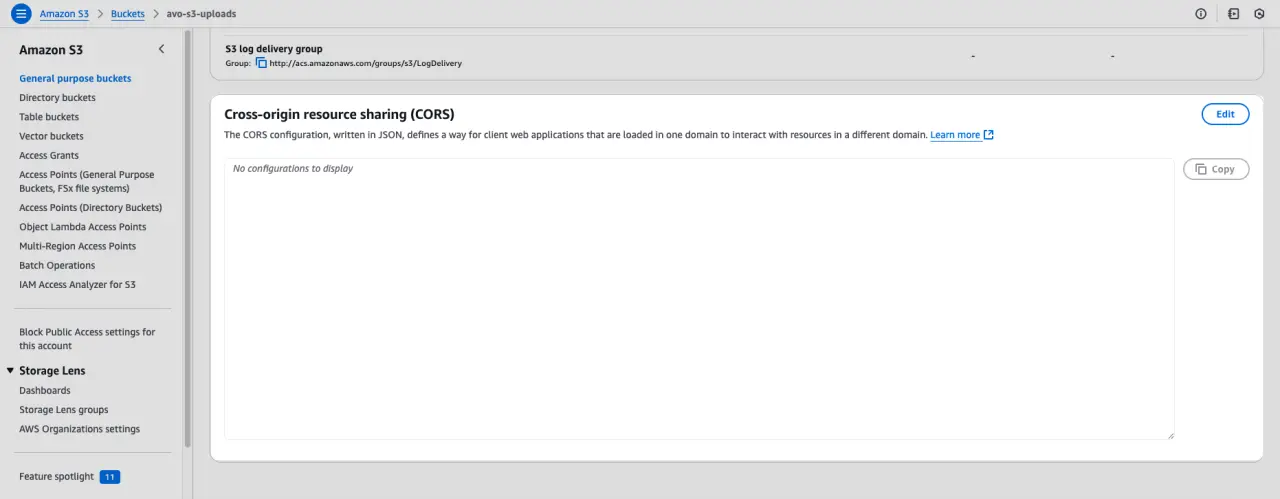
And we add the following:
[
    {
        "AllowedHeaders": [
            "Content-Type",
            "Content-Md5",
            "Content-Disposition"
        ],
        "AllowedMethods": [
            "POST",
            "PUT"
        ],
        "AllowedOrigins": [
            "http://localhost:3000",
            "https://avohq.io"
        ],
        "ExposeHeaders": [],
        "MaxAgeSeconds": 3600
    }
]
This tells our S3 bucket that it should allow POST and PUT requests from localhost:3000 and avohq.io .
The AllowHeaders defines the headers we can send from our application and ExposeHeaders defines the response headers that should be accessible to the client after the cross-origin request.
The MaxAgeSeconds determines for how much time the preflight request should be cached.
With this in place, we can start with our app setup:
Application Setup
We will create a simple Rails application with a Post model that has an associated cover and we will add a direct upload field.
Let's create the app:
rails new direct_uploads --css=tailwind
Then, we run the Active Storage installation command:
bin/rails active_storage:install
Now, let's create a Post scaffold:
bin/rails generate scaffold Post title excerpt content:text published_at:datetime
Let's add an associated cover to our post model:
class Post < ApplicationRecord
  has_one_attached :cover
end
Next, let's add the aws-sdk-s3 gem and uncomment the image_processing from our Gemfile:
gem "aws-sdk-s3"
gem "image_processing", "~> 1.2"
After running bundle install let's add Active Storage's JavaScript:
bin/importmap pin @rails/activestorage
And add it to our application.js:
// app/javascript/application.js
import * as ActiveStorage from "@rails/activestorage"
ActiveStorage.start()
Now, we can run the migrations and start the server
bin/rails db:migrate && bin/dev
Finally, we have to add the cover to the post_params in the PostsController:
# app/controllers/posts_controllers.rb
def post_params
  params.expect(post: [ :title, :excerpt, :content, :published_at, :cover ])
end
With this in place, let's add direct uploads to our app:
Direct uploads with Rails
The first thing we need to do is add direct S3 uploads to any Rails app is to configure Active Storage to upload images to S3 by modifying our storage.yml config file.
By default, the file looks like this:
# config/storage.yml
test:
  service: Disk
  root: <%= Rails.root.join("tmp/storage") %>

local:
  service: Disk
  root: <%= Rails.root.join("storage") %>
This uses the Disk service for development and testing. To add cloud file uploads, we need to create an amazon service but first we have to add our S3 keys to our credentials:
EDITOR=vim bin/rails credentials:edit --environment=development
We then add the following in the editor:
aws:
  access_key_id: AKIAIOSFODNN7EXAMPLE
  secret_access_key: wJalrXUtnFEMI/K7MDENG/bPxRfiCYEXAMPLEKEY
  region: us-east-1
  bucket: my-app-storage-bucket
Now, let's add the amazon service in our storage.yml file:
# config/storage.yaml
amazon:
  service: S3
  access_key_id: <%= Rails.application.credentials.dig(:aws, :access_key_id) %>
  secret_access_key: <%= Rails.application.credentials.dig(:aws, :secret_access_key) %>
  region: <%= Rails.application.credentials.dig(:aws, :region) %>
  bucket: <%= Rails.application.credentials.dig(:aws, :bucket) %>
Now, in our environment file, let's tell Active Storage to use amazon as the service:
# config/environments/development.rb
config.active_storage.service = :amazon
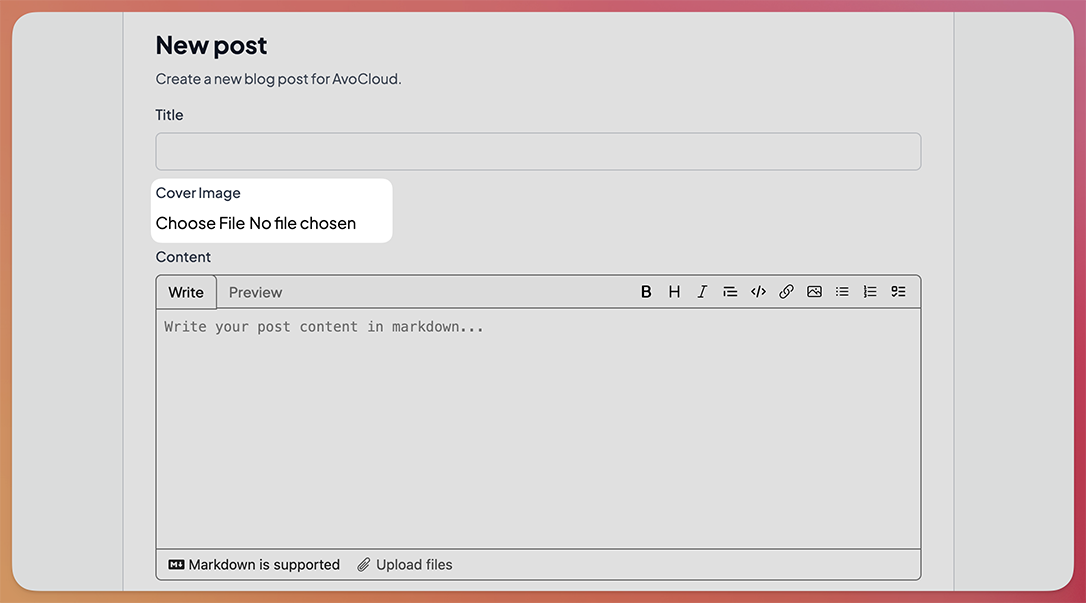
Now, let's test direct uploads using a simple, unstyled file input:
<%# app/views/posts/_form.html.erb %>
<%= form_with(model: post, class: "space-y-3") do |form| %>
  <%= form.file_field :cover, direct_upload: true %>
<% end %>
Which produces the following:
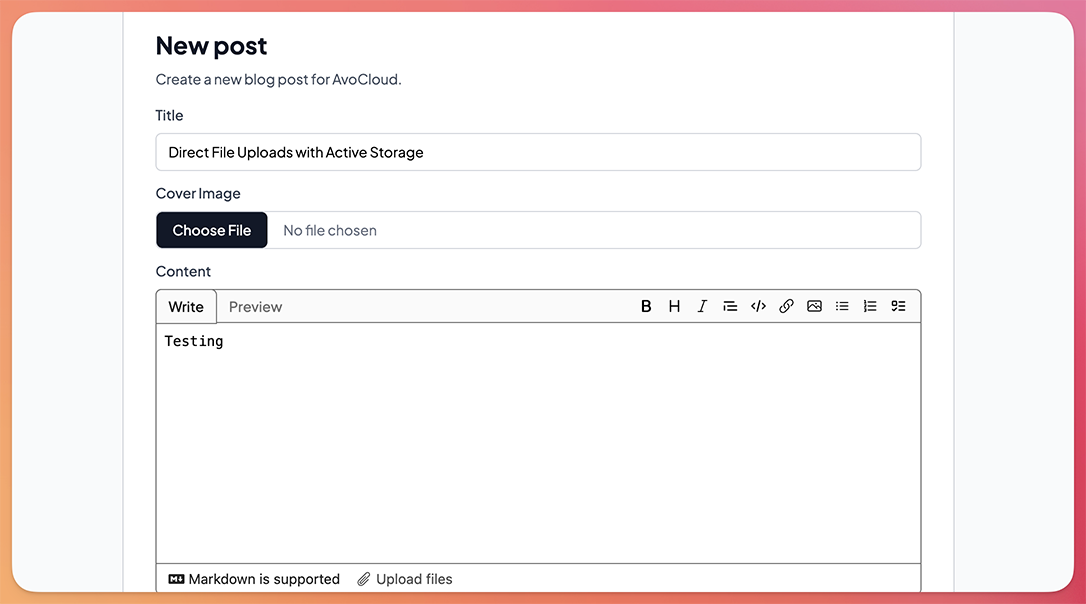
Next, let's add some styling to improve the way this looks so users can quickly understand it's a cover field:
<%= form_with(model: post, class: "space-y-3") do |form| %>
  <!-- Other fields -->
  <%= form.label :cover, "Cover Image", class: "block text-sm font-medium text-gray-700 mb-2" %>
  <%= form.file_field :cover, direct_upload: true, class: "block w-full text-sm text-gray-500 file:mr-4 file:py-2 file:px-4 file:rounded-md file:border-0 file:text-sm file:font-medium file:bg-gray-900 file:text-white hover:file:bg-gray-800 file:cursor-pointer border border-gray-300 rounded-md focus:border-blue-500 focus:ring-1 focus:ring-blue-500 focus:outline-none" %>
  <%= form.submit %>
<% end %>
Which produces an improved input:
By default, direct uploads with Active Storage get triggered when the form is submitted but it doesn't provide any feedback to the user so, if the upload takes some time, it might leave them a bit lost.
Let's add a Stimulus controller to upload the files to the cloud as soon as the users pick them and add an upload progress bar.
To achieve this, we will use the DirectUpload class which allows us to programmatically upload files.
We can start by defining the markup where we're attaching the change action to the upload event in the controller:
<div data-controller="direct-upload" data-direct-upload-url-value="<%= rails_direct_uploads_url %>">
  <%= form.label :cover, "Cover Image", class: "block text-sm font-medium text-gray-700 mb-2" %>
  <%= form.file_field :cover, placeholder: "Pick a cover file", class: "block w-full text-sm text-gray-500 file:mr-4 file:py-2 file:px-4 file:rounded-md file:border-0 file:text-sm file:font-medium file:bg-gray-900 file:text-white hover:file:bg-gray-800 file:cursor-pointer border border-gray-300 rounded-md focus:border-blue-500 focus:ring-1 focus:ring-blue-500 focus:outline-none", data: { direct_upload_target: "input", action: "change->direct-upload#upload" } %>
  <div data-direct-upload-target="progress" class="hidden mt-1.5 h-2 bg-gray-200 overflow-hidden relative rounded-full">
    <div class="w-full bg-blue-500 h-full rounded-full absolute left-0 transition-all duration-300 ease-in-out" style="width: 0%"></div>
  </div>
  <div data-direct-upload-target="success" class="hidden mt-1.5 text-xs rounded-sm text-emerald-600">
    <p>File uploaded successfully</p>
  </div>
  <div data-direct-upload-target="errors" class="mt-1.5 text-xs rounded-sm text-red-600 hidden"></div>
</div>
We also have hidden progress, success and errors targets that we will use to display the upload progress and provide feedback to the user about the status of the upload.
Then, in the Stimulus controller:
import { Controller } from "@hotwired/stimulus"
import { DirectUpload } from "@rails/activestorage"

export default class extends Controller {
  static targets = ["input", "progress", "errors", "success"]
  static values = {
    url: String
  }

  upload(evt) {
    evt.preventDefault()
    const file = evt.target.files[0]
    this.#uploadFile(file)
  }

  #uploadFile(file) {
    const upload = new DirectUpload(file, this.urlValue)

    upload.create((error, blob) => {
      if (error) {
        this.#hideSuccess()
        this.#populateErrors(error)
      } else {
        this.#showSuccess()
        const hiddenInput = document.createElement("input")
        hiddenInput.setAttribute("type", "hidden")
        hiddenInput.setAttribute("value", blob.signed_id)
        hiddenInput.name = this.inputTarget.name
        this.element.appendChild(hiddenInput)
      }
    })
  }

  #showSuccess() {
    this.successTarget.classList.remove("hidden")
  }

  #hideSuccess() {
    this.successTarget.classList.add("hidden")
  }

  #populateErrors(error) {
    this.errorsTarget.classList.remove("hidden")
    this.errorsTarget.textContent = error
  }
}
Here, we're executing the #uploadFile method when a change event is fired from the file input.
We then create an instance of DirectUpload passing the file we want to upload and the direct uploads URL (the one we use to get the pre-signed URL) and assigning it to the upload variable.
The create method accepts a callback function with two arguments: error and blob.
If error is not null we can assume there was an issue with the upload and we show and populate the errors target with the error message.
Otherwise, if blob is not null, we display a success message and create a hidden input with the blob's signed_id that will be used when we submit the form to attach the file to our object.
Currently, the flow looks like this:
To display the progress to the user, we have to pass the controller instance as a third argument to the DirectUpload constructor which is used to call a directUploadWillStoreFileWithXHR method where we can access the upload request and add an event listener to it so we can calculate the progress:
export default class extends Controller {
  // Rest of the code

  #uploadFile(file) {
    const upload = new DirectUpload(file, this.urlValue, this)
    this.#showProgress()

    upload.create((error, blob) => {
      if (error) {
        this.#hideSuccess()
        this.#populateErrors(error)
      } else {
        this.#hideProgress()
        this.#showSuccess()
        const hiddenInput = document.createElement("input")
        hiddenInput.setAttribute("type", "hidden")
        hiddenInput.setAttribute("value", blob.signed_id)
        hiddenInput.name = this.inputTarget.name
        this.element.appendChild(hiddenInput)
      }
    })
  }

  directUploadWillStoreFileWithXHR(request) {
    request.upload.addEventListener("progress",
      event => this.#progress(event))
  }

  #progress(evt) {
    const progress = (evt.loaded / evt.total) * 100;
    const progressBar = this.progressTarget.querySelector("div")
    if (progressBar) {
      progressBar.style.width = `${progress}%`
    }
  }

  #showProgress() {
    this.progressTarget.classList.remove("hidden")
  }

  #hideProgress() {
    this.progressTarget.classList.add("hidden")
  }

  // Rest of the code
}
Now, we show a progress bar to the user which is an improvement over our previous flow:
Alternative services
Having learned how to add direct uploads to Rails applications using AWS S3, we can produce the same results using S3-compatible services like Cloudflare R2, Digital Ocean Spaces, or any other compatible service.
The only thing we need to change about our configuration is the name of the config key in storage.yml:
cloudflare:
  service: S3
  endpoint: https://<%= Rails.application.credentials.dig(:cloudflare, :account_id) %>.r2.cloudflarestorage.com
  access_key_id: <%= Rails.application.credentials.dig(:cloudflare, :r2, :access_key_id) %>
  secret_access_key: <%= Rails.application.credentials.dig(:cloudflare, :r2, :secret_access_key) %>
  bucket: <%= Rails.application.credentials.dig(:cloudflare, :r2, :bucket) %>
  region: auto
  request_checksum_calculation: "when_required"
  response_checksum_validation: "when_required"
And change the service in our environment config file:
# config/development.rb
config.active_storage.service = :cloudflare
Summary
In this article, we learned how to add direct uploads to S3 with Active Storage.
To achieve this, we need to:
-
Obtain the appropriate credentials from S3: we need an
access_key_idasecret_access_key, abucket_nameand aregion. - Configure CORS: because we want the user browser to make requests directly to our cloud provider, we have to add CORS configuration and to allow the adequate headers, origins, and methods.
-
Install and import Active Storage JS: after we make sure that we have Active Storage's JS code, we import it somewhere like our
application.jsfile. -
Add the direct upload attribute to the input: the last step in the basic flow is to add the
direct_upload: trueto our file input. This results in direct uploads performed after the form submission.
This is about it for the basic flow but we also added immediate uploads with a Stimulus controller using the DirectUpload class which is provided by Active Storage to allow for more control.
In this controller, we added feedback about error and success states and a progress bar which is enough for a decent user experience.
I hope you enjoyed this article and that it can help you implement direct uploads for your Rails applications.
Have a good one and happy coding!
