In the past, there were a handful of libraries, like Paperclip or Carrierwave, that helped Rails developers handle file upload and storage. Nowadays, Active Storage comes out of the box with Rails so it's the preferred way to manage file uploads.
In this guide, we will learn how to implement S3 file uploads in a Rails applications using Active Storage. This includes regular uploads, direct uploads and using S3 compatible services like Cloudflare R2, Digital Ocean Spaces or Backblaze.
We will be using a very basic social media app clone to showcase how to implement these features.
Let's get started:
AWS configuration
The first part of the process is setting everything on AWS.
If you have an AWS account, and you have a provisioned bucket with the correct permissions set, you can skip this section altogether
Create an AWS account
Before anything, we need to create an AWS account. We can do so by following this link.
We should see something like this:

You will need to provide a valid email and an account name. After validating your email address, you will be prompted to set a password and then provide some information about you, including billing information.
After completing the registration steps, you have access to the whole suite of AWS products and a 12-month period on the free tier.
Create an S3 bucket
Once we're inside the AWS console, we need to access S3. To achieve this, we can use the search bar at the top, typing Option + S on the context of the browser and typing “S3”.
A result's dropdown should show S3 under “Services”.
After we click on it, we should see the list of buckets in our account.
We then proceed to click on the “Create Bucket” button that's located in the top-right corner of the table view:

Now we should see the options to create a new bucket.

Remember to pick a descriptive name for your bucket and that only lowercase letters, numbers, dots, and hyphens are valid characters for it.
The configuration we should pick for this tutorial is:
- The bucket type should be “General purpose”.
- ACLs disabled on the “Object ownership section”: this means that we will set the access to the bucket and its objects using policies and not ACLs (Access Control Lists).
- Leave the “Block all public access” on. This will ensure that undesired access to the bucket and its resources is not allowed unless otherwise specified in the policies.
- Leave bucket versioning disabled, we won't be needing it for the scope of this tutorial.
- There's no need to add tags, you can leave that empty.
- You can leave the default values for the “Default Encryption” and the “Object lock” section.
Creating a user and configuring permissions for the bucket
We need to create an AWS user using IAM (Identity and Access Management) and then attach permissions to the bucket to make it work correctly.
To create a user, we first navigate to the IAM section by searching for “IAM” (remember to open the search dialog using Option + S) and clicking on the “Users” link that appears below the IAM dropdown.

We don't need to give this user access to the AWS management console, so we should leave that option unchecked.
The next step is to attach a permission policy to our user. We select the AmazonS3FullAccess policy, which gives our user full access to the “S3” and “S3 Object Lambda” services.

After creating the user, we need to add an Access Key. To accomplish that, we go to the Users list, click on the one we just created and then, on the Summary dashboard, we search for the “Create Access Key” link and click on it:

It will prompt us with the use case for the Access Key, we can select “Local code” if we are not planning to deploy the application or “Application running on an AWS compute service” or “Application running outside AWS” depending on your use case.
The next step is to optionally add a description tag. After this, we will see our “Access Key ID” displayed and the “Secret Access Key” hidden.
Make sure to keep both in a safe place because we will be using them later and there's no way to retrieve the Secret Access Key later.
Remember: if you need to add a CDN for Active Storage uploads, you can follow the tutorial we wrote about it.
Setting up our application
To showcase the upload feature, we will be using a simple social media app clone called Avogram which will only have a Post and a User model that we will handle using Devise (I won't be showing that part in this tutorial).
bin/rails new avogram --css=tailwind # Create Rails app using SQLite and Tailwind
bin/rails db:create
bin/rails active_storage:install # This will create the Active Storage migrations
bin/rails db:migrate
Next, we create a Post scaffold that will create the model, route, controller, and CRUD views for the Post resource.
bin/rails generate scaffold Post caption:string
bin/rails db:migrate
Then we hook our model with Active Storage by adding the has_one_attached :image. This will set the association between the Post model and Active Storage and allow us to access the image attachment when we need it.
class Post < ApplicationRecord
  has_one_attached :image
  belongs_to :user

  validates :caption, presence: true
  validates :image, presence: true
end
Now, with a bit of customization using Tailwind, we have the following view:

The code is mostly the same as generated by the scaffold, but we added the left and right sidebars and the empty state for cosmetic purposes. And we also added the 'image' attribute to the permitted params hash:
def post_params
  params.require(:post).permit(:caption, :image)
end
Now, with the boilerplate done, we're going to test the default Active Storage uploads which persist the uploads to “Disk”: you can actually check the uploaded files in the top level “/storage” folder.
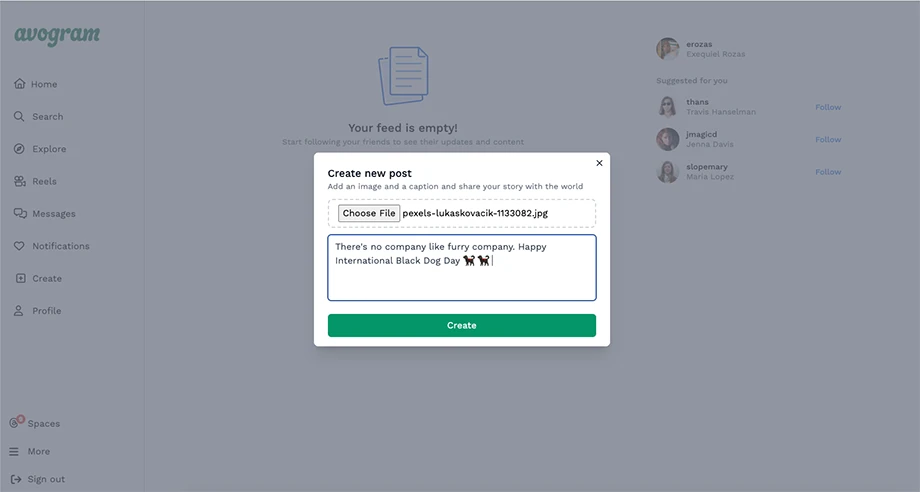
To achieve that, we create a simple form with two fields: a “caption” text input and an “image” file input:
<%= form_with model: @post, method: :post, class: "mt-4" do |form| %>
  <%= form.file_field :image, class: "w-full mb-4" %>
  <%= form.text_area :caption, placeholder: "What's on your mind?", rows: 4, class: "w-full border border-gray-300 rounded-md" %>
  <%= form.submit "Create", class: "w-full bg-blue-500 text-white py-2 rounded-md" %>
<% end %>
We display the form inside a modal to better imitate the original 'gram experience:
And after submitting the form, everything should be working correctly. And we now have file uploads to disk using Active Storage:

Configure Active Storage to upload to S3
Even though things are working, we want the images to be uploaded to S3. To achieve this, we must tell Active Storage that we want to upload the images to S3.
Currently, our storage.yml config file looks like this.
test:
  service: Disk
  root: <%= Rails.root.join("tmp/storage") %>

local:
  service: Disk
  root: <%= Rails.root.join("storage") %>
To have Active Storage upload our files to S3, we need to store AWS's Access Key ID and Secret Access Key values securely.
For this tutorial, we will use Rails credentials to store the access keys. In my case, I used vim to edit the development credentials with the following command:
EDITOR=vim bin/rails credentials:edit --environment=development
In case you want to use something like Code to edit your credentials, don't forget to add the --wait flag:
EDITOR='code --wait' bin/rails credentials:edit --environment=development
Consider that this command expects the code command to open the editor.
Once you are inside your editor, you should add your keys namespaced under the aws key. Remember that we're editing YAML, so indenting is important.
Our credentials should look something like this after we edit them (replace the Xs with your actual keys):
aws:
  access_key_id: XXXXXX
  secret_access_key: XXXXXXX
Now we can return to storage.yml and uncomment the 'amazon' key and add the pertinent information. It should look something like this:
amazon:
  service: S3
  access_key_id: <%= Rails.application.credentials.aws.access_key_id %>
  secret_access_key: <%= Rails.application.credentials.aws.secret_access_key %>
  region: us-east-1
  bucket: avo-s3-uploads
After that, we have to 'tell' Active Storage to use the S3 service in the development environment. So we set the service config key to :amazon
config.active_storage.service = :amazon
And lastly, let's not forget to add the S3 adapter gem so AST can handle the uploads correctly:
bundle add aws-sdk-s3
bundle install
Now, if we create a Post with an attached image, it should upload it to S3.
Direct uploads to S3 using Active Storage
We've successfully implemented file uploads to S3 from our Rails application, that's great, right?
Well, not so fast. You might now notice a slight delay when creating a Post.
This happens because the file needs to be sent to our server, stored temporarily in memory and then uploaded to S3 to receive the upload key which is stored in our active_storage_blobs table to reference it as an attachment.
While this may not seem like a lot of work, especially for small files, if our application needs to handle a high volume of uploads it could become a problem because of bandwidth, memory, and CPU usage.
To solve that, we will upload our files directly from the client– in this case, the browser– to S3 and then send the response to our server.
This reduces the load on our server and improves performance.
What happens behind the scenes is that we request a signed URL from our server (which has access to our AWS keys) with information about the file we want to upload. The server returns the signed URL and then, using the URL, we make a request to S3 directly from the browser. If the upload is successful, S3 responds with information about the recently uploaded file that we use to persist to our database.
This diagram might help you understand the behind-the-scenes that Active Storage handles for us:

That being said, let's see what we need to handle direct uploads:
Configure CORS in our S3 Bucket
CORS is an acronym for Cross-Origin Resource Sharing, which is a mechanism that allows a server to indicate origins apart from its own from which a browser should permit resource loading.
We need to configure it because browsers enforce the Same-Origin Policy, so when our application tries to upload files to S3 directly from the browser, the request is considered a cross-origin request and is not allowed, and we will receive an error like: Access to XMLHttpRequest at 'bucket-url' from origin 'our-applications-origin' has been blocked by CORS policy: Response to preflight request doesn't pass access control check: No 'Access-Control-Allow-Origin' header is present on the requested resource'
This means that we have to configure the allowed origins in our AWS console. To achieve that, we navigate to our bucket “Permissions” page, and we scroll to the bottom to the CORS section and paste the following:
[
  {
    "AllowedHeaders": ["Content-Type", "Content-Md5", "Content-Disposition"],
    "AllowedMethods": ["POST", "PUT"],
    "AllowedOrigins": ["http://localhost:3000", "https://avohq.io"],
    "ExposeHeaders": [],
    "MaxAgeSeconds": 3600
  }
]
This basically tells our S3 bucket that it should allow POST and PUT requests from 'localhost:3000' and also 'avohq.io'
The AllowedHeaders defines the headers we can send from our application, and the ExposeHeaders defines which response headers should be accessible to the client after a cross-origin request.
Finally, the MaxAgeSeconds defined how much time should the preflight request (the OPTIONS request) should be cached.
Direct Uploads frontend
Luckily for us, Active Storage handles most of the frontend work needed to achieve direct uploads.
First, we need to install the Active Storage's JS. I'm using importmap so we need to add the following line to importmap.rb
pin "@rails/activestorage", to: "activestorage.esm.js"
Then we need to import and initialize Active Storage's client, we can do it in our application.js file or wherever we want to use it:
import * as ActiveStorage from "@rails/activestorage";

ActiveStorage.start();
After doing all of this, we need to define a file field, using Rails form builder, with the direct_upload attribute set to true:
<%= form.file_field :image, direct_upload: true %>
That's about everything you need to get direct uploads with Rails nowadays. If you would like to upload multiple images at once (when you have has_many_attached in your model) you can do it by adding the multiple: true attribute.
The result should look something like this:
As you can see, direct uploads to S3 are simple with Active Storage. But the user experience could be improved by showing the upload progress to the user.
Develop apps 10 times faster with Avo
Develop your next Rails app in a fraction of the time using Avo as your admin framework.
Start for free today
Improving user experience with a progress bar
Active Storage's Javascript library comes with a set of events we can hook to improve user experience.
Currently, the user could user more feedback regarding the current state of the upload and the native HTML file input, while highly effective, is a little “dry”, especially when we compare it to common file upload experiences.
To improve this, we will be showing a progress bar using the global direct-upload:progress event.
First, we define the progress bar HTML structure:
<div class="w-full rounded-full bg-gray-200 h-1.5 mt-2 hidden"
  data-behavior="progress-container">
  <div class="rounded-full bg-blue-600 h-full transition-[width] duration-200"
    data-behavior="progress-bar" style="width: 0%"></div>
</div>
We hide the container, the div that acts as the background for the progress, by default and assign the width of the bar using the style attribute.
Then, we need to hook into the event, make the progress container visible and update the width of the progress bar.
window.addEventListener("direct-upload:progress", (event) => {
  const progressContainer = document.querySelector("[data-behavior='progress-container']")
  const progressBar = document.querySelector("[data-behavior='progress-bar']");
  const progress = event.detail.progress;
  progressContainer.classList.remove("hidden");
  progressBar.style.width = `${progress}%`;
});
After those steps, we should have something like this:
Handling uploads to S3 compatible providers
Cloud uploads became widespread after Amazon released its Simple Storage Service. That's why some cloud providers apart from Amazon released cloud storage services that implemented the same API as S3.
This means that you can use services like Cloudflare R2, Digital Ocean Spaces, Vultr or Backblaze without needing to change your code.
For example, to store your files in Digital Ocean Spaces, you would need a configuration like the following:
digital_ocean:
  service: S3
  endpoint: https://nyc3.digitaloceanspaces.com
  access_key_id: <%= Rails.application.credentials.digital_ocean.access_key_id %>
  secret_access_key: <%= Rails.application.credentials.digital_ocean.secret_access_key %>
Then we set the proper configuration:
# Set this in development.rb, production.rb or both
config.active_storage.service = :digital_ocean
After doing this and restarting the server, your application should handle uploads to the S3 Compatible server you chose.
TL;DR
In this article, we explored how to upload files to Amazon S3 (or API-compatible services).
The process consists of the following steps:
AWS Configuration
Before uploading to S3, we need to do some previous work:
- Creating an AWS account
- Creating an S3 bucket with specific information about it like it's name, access preferences, versioning preferences, among others.
- Creating an IAM user, attaching the AmazonS3FullAccess policy to it and generating our access keys to use them with Active Storage.
- Configuring the CORS permissions in the bucket to allow our browser to make requests to our bucket. This step is only required if you plan to have direct uploads.
Application setup
We created a simple application with Post and User models using Rails scaffolds and Devise for the user.
Then, we installed Active Storage using bin/rails active_storage:install to add the AS database migrations.
Added has_one_attached :image to our Post model, permitted the parameter in the PostsController and that's about it for the server part of the equation.
Active Storage configuration
To handle S3 uploads with Active Storage, we need to store our AWS keys and bucket info in our credentials or in ENV variables and reference them in the storage.yml config file.
Finally, in our environment-specific configuration (development.rbin my case) we tell Active Storage to use our amazon storage service:
config.active_storage.service = :amazon
Front end duties
If you don't need direct uploads, after configuring the S3 service with AS, the only thing you need to do is add a file_field to your form:
<%= form.file_field :image %>
But, if you do want direct uploads, you need to install the @rails/activestorage JS library using your preferred method (I'm using importmap for this tutorial). And then, you need to include and initialize it somewhere in your Javascript:
// This could be done in application.js or in a separate file if needed
import * as ActiveStorage from "@rails/activestorage";
ActiveStorage.start();
Then, add the direct_upload: true attribute to your file field.
<%= form.file_field :image, direct_upload: true %>
And that's about it. You now have S3 file uploads with optional direct uploads in your application!
I hope the tutorial was helpful for you. Stay tuned for more Active Storage tutorials.
