
As developers, there usually comes a time when we have to deal with syntax highlighting.
Whether we're building a blog, a CMS, a documentation site, or any other Rails app that accepts user-generated markdown, adding syntax highlighting to code blocks is an essential feature.
In this article, we will learn how to add syntax highlighting to Rails applications by showing different ways to do it and a couple of nice tricks to improve the user experience.
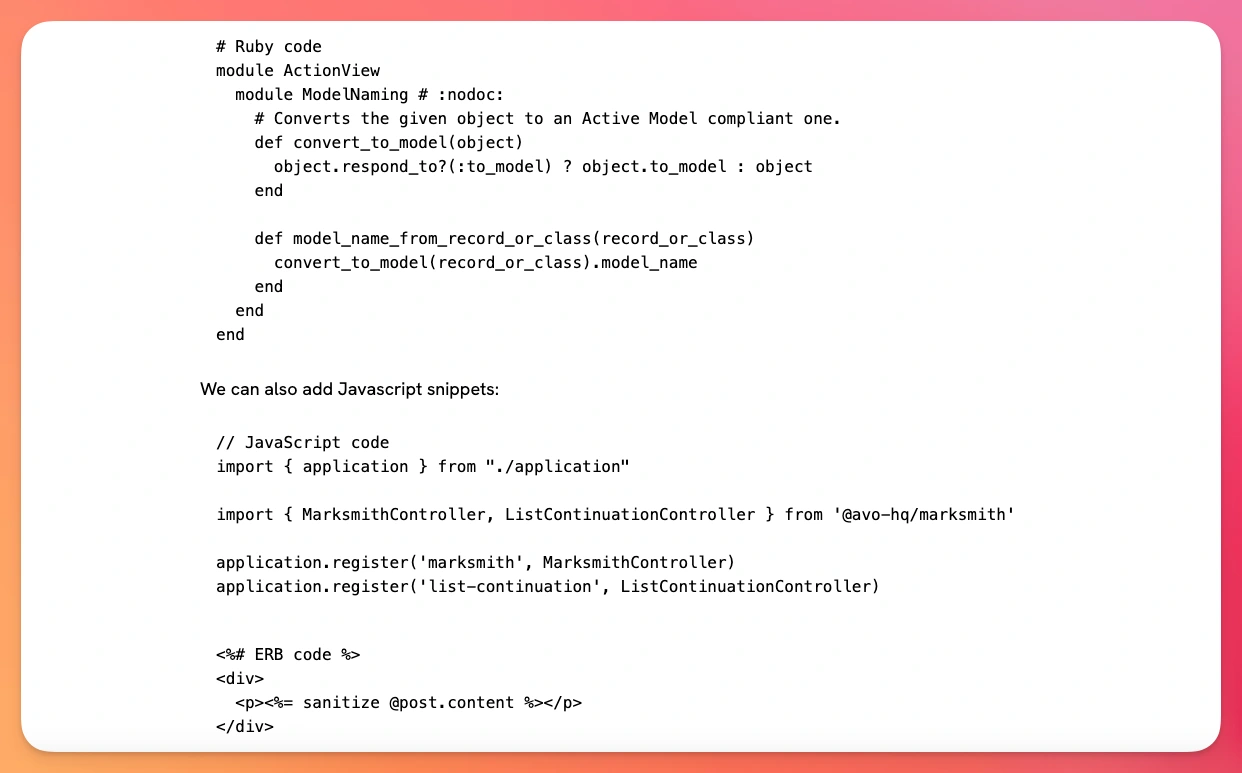
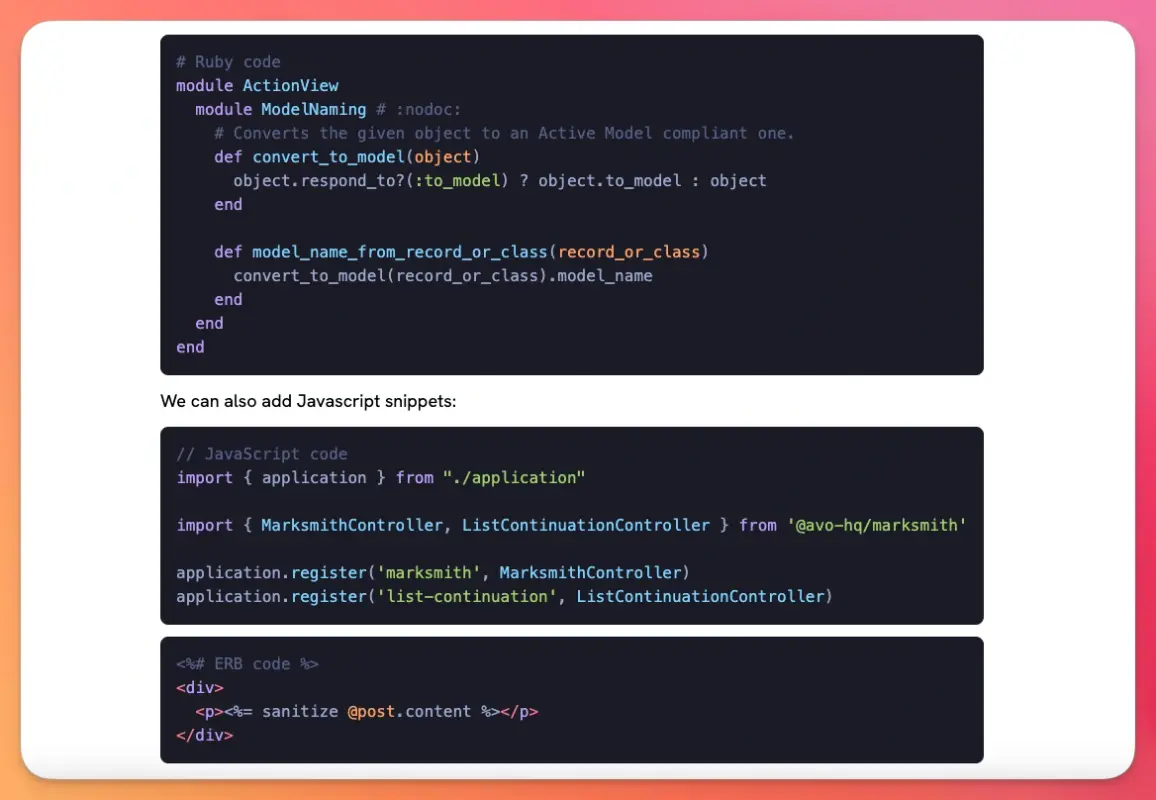
Let's start by seeing what we will build:
What we will build
To show the different ways to add syntax highlighting to a Rails application, we will add it in different circumstances:
- To the content of a
Postusing Markdown where we will use Commonmarker and itssyntax_highlighterplugin to highlight the code, just like we did in the GitHub-flavored Markdown in Rails with the Commonmarker gem article. - The same
contentbut using the Redcarpet and Rouge for markdown parsing into HTML and syntax highlighting respectively. - Using Markdown but producing the highlighting on the front-end using a library like Highlight.js.
- Using a WYSIWYG editor like the Rhino Editor, which uses the TipTap editor and Highlight.js under the hood.
Before anything, let's start by setting up our application:
Application setup
The first step is to create a new Rails application:
rails new syntax_highlight --css=tailwind --javascript=esbuild
Next, we will create a Post scaffold with a content field where we will include the Markdown that we will parse:
bin/rails generate scaffold Post title content:text published_at:datetime
We run the migrations:
bin/rails db:migrate
Then, we will add the most common Markdown parsing libraries used with Ruby and Rails applications:
bundle add commonmarker redcarpet kramdown
We then install those dependencies:
bundle install
As the content field will initially use Markdown, let's add the Marksmith Editor and install it:
bundle add marksmith && bundle install && yarn add @avo-hq/marksmith
Then, we add the appropriate JavaScript:
// app/javascript/controllers/index.js
import { MarksmithController, ListContinuationController } from '@avo-hq/marksmith'

application.register('marksmith', MarksmithController)
application.register('list-continuation', ListContinuationController)
Finally, we add the stylesheet tag to our application layout:
<!-- app/views/layouts/application.html.erb -->
<%= stylesheet_link_tag "marksmith" %>
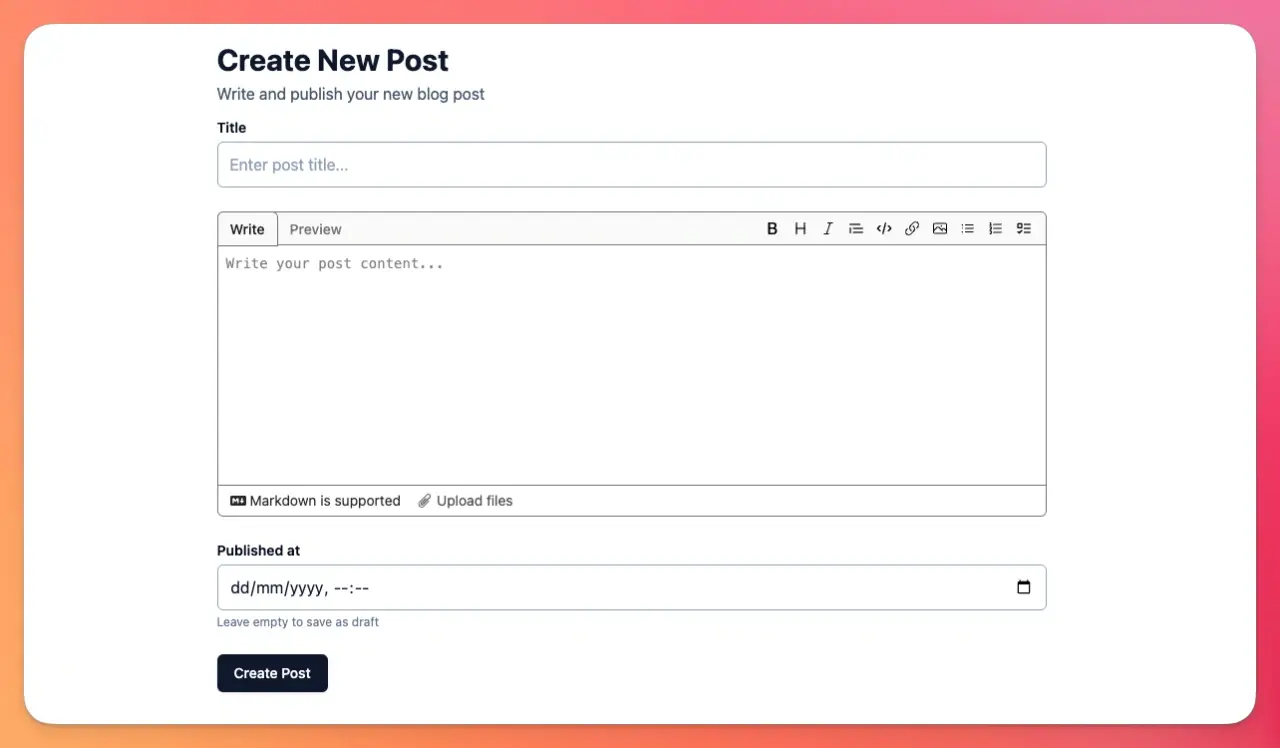
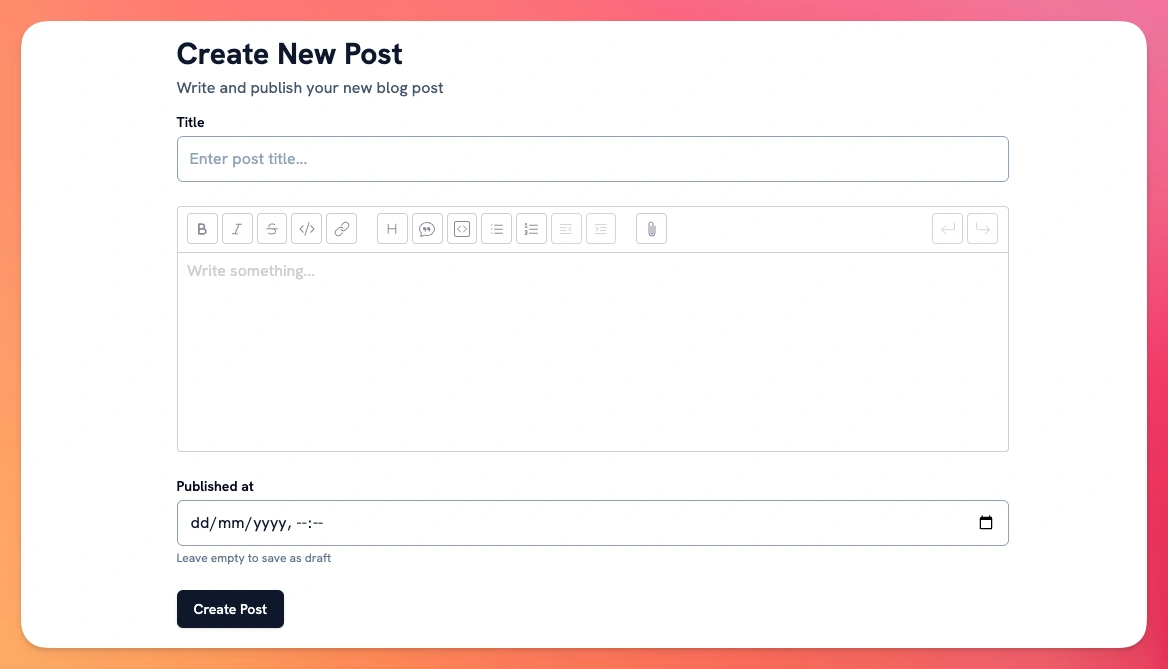
Now, after working a little on the scaffold's appearance, we get something like this:
Now that we have the initial setup ready, let's start by adding syntax highlighting, starting with the Commonmarker gem:
Using the Commonmarker gem
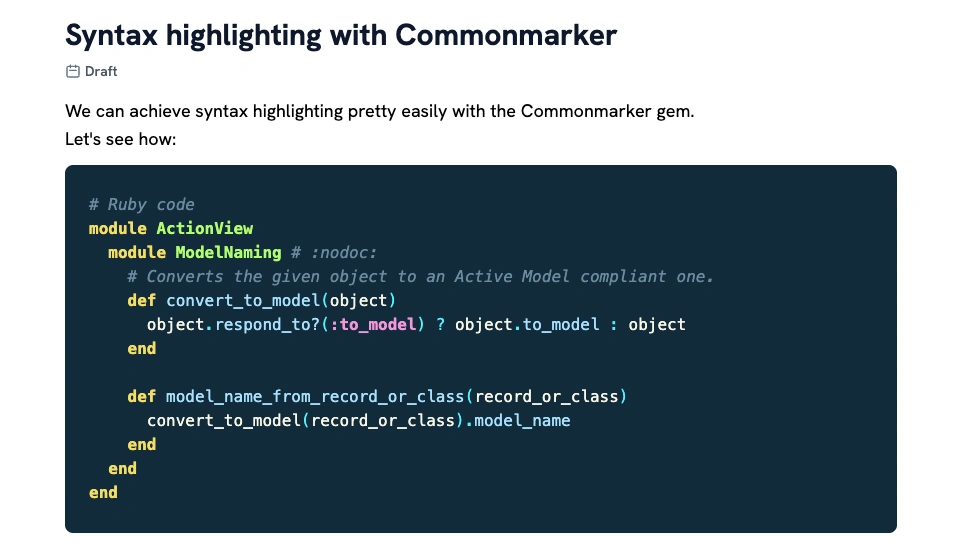
The easiest way to add the feature is using the Commonmarker gem, since it adds the syntax highlighting styles inline.
This means that we don't need to add a third-party library like we do with other alternatives.
Let's add a formatted_content method to the Post model that returns HTML with syntax highlighting:
class Post < ApplicationRecord
  # Rest of the code

  def formatted_content
    Commonmarker.to_html(content, options: {
      parse: {smart: true},
    },
      plugins: {
        syntax_highlighter: {
          theme: "base16-ocean.dark",
        },
      },
    )
  end
end
Then, in the show view, we add:
<%== @post.formatted_content %>
And we get the following:
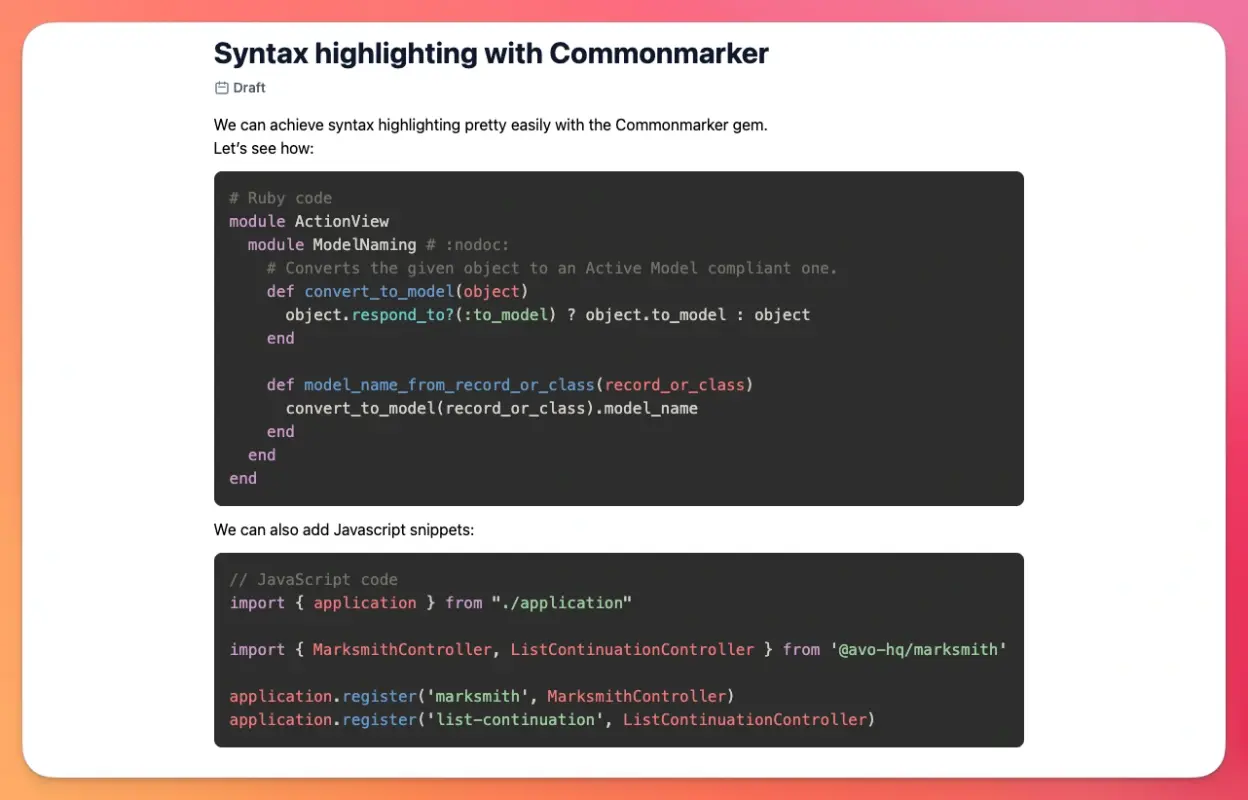
The gem comes with the following themes: base16-ocean.dark which is the default, base16-eighties.dark, base16-mocha.dark, base16-ocean.light, InspiredGitHub, Solarized (dark) and Solarized (light).
However, we can add new themes by explicitly declaring the theme path within our application:
def formatted_content
  Commonmarker.to_html(content, options: {
    parse: {smart: true},
  },
    plugins: {
      syntax_highlighter: {
        theme: "ayu-dark",
        path: Rails.root.join("app", "assets", "themes").to_s
      },
    },
  )
end
Commonmarker uses the tmTheme format behind the scenes, an XML-based format created by TextMate.
We could follow a tutorial to create new color schemes with this format, but to save time, we will use Google to find themes that we want and copy them into the app/assets/themes folder.
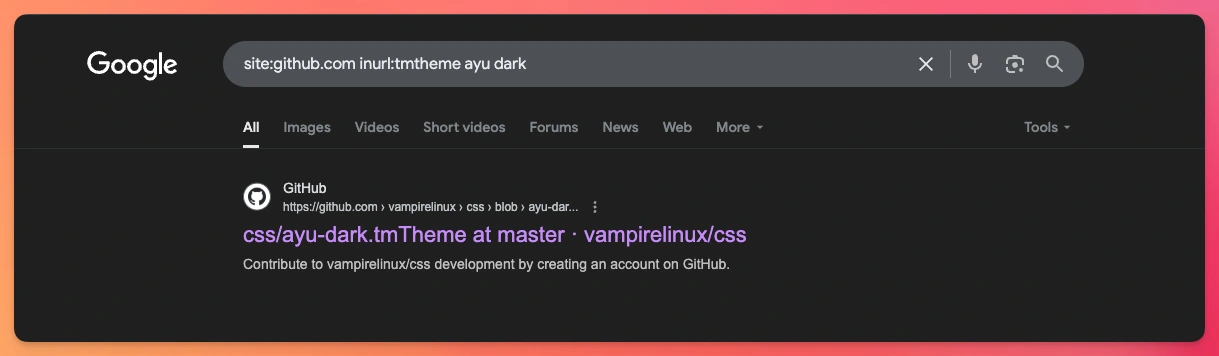
For example, if we intend to find the Ayu Dark theme, all we have to do is use the site and inurl operators to find it:
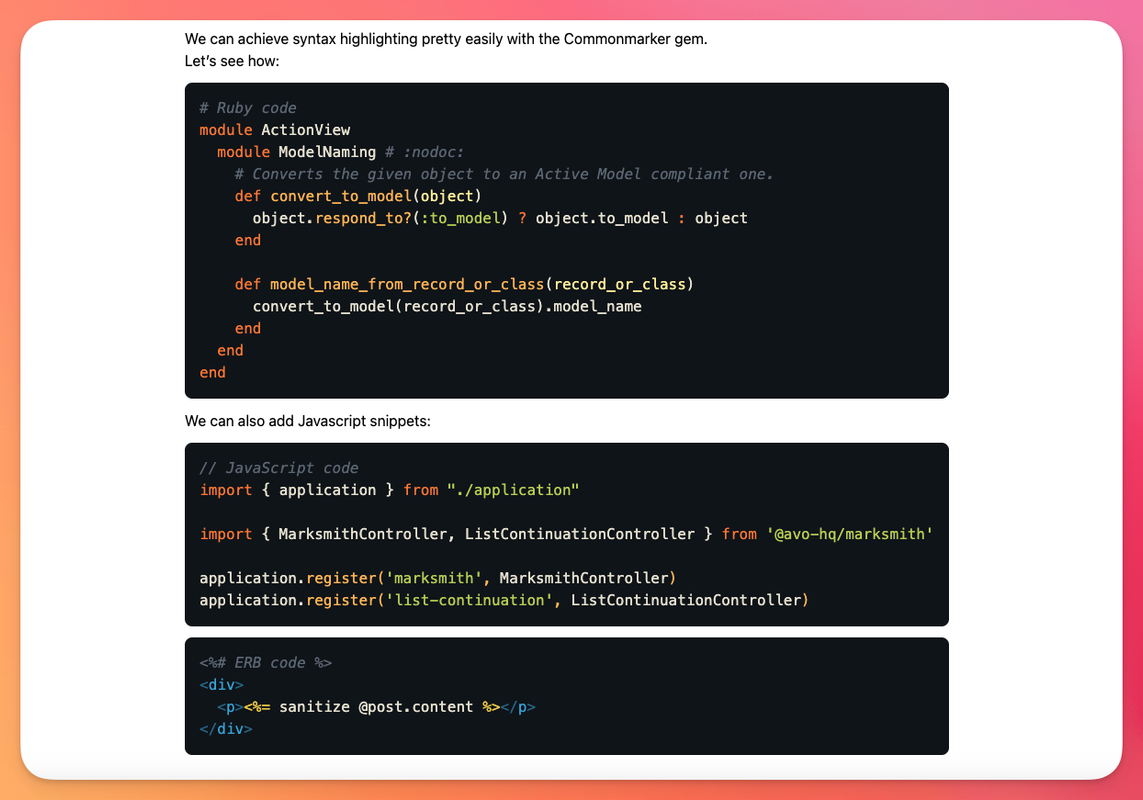
Then, we go to the file, copy its content into the app/assets/theme/ayu-dark.tmtheme file and then, our custom theme should work:
Using Redcarpet with Rouge
This is probably the most common stack Rails developers pick when adding syntax highlighting to their applications.
As we've already installed the redcarpet gem, let's install Rouge:
bundle add rouge && bundle install
To avoid cluttering our Post class, let's create a custom HTML renderer that inherits from Redcarpet::Render::HTML where we will include Rouge:
# app/models/html_renderer.rb
require 'redcarpet'
require 'rouge'
require 'rouge/plugins/redcarpet'

class HtmlRenderer < Redcarpet::Render::HTML
  include Rouge::Plugins::Redcarpet

  def initialize(options = {})
    super(options)
  end
end
Now, let's change the formatted_content method to use Redcarpet instead of Commonmarker like we did before:
class Post < ApplicationRecord
  # Rest of the code

  def formatted_content
    Redcarpet::Markdown.new(HtmlRenderer, {
      fenced_code_blocks: true,
    }).render(content)
  end
end
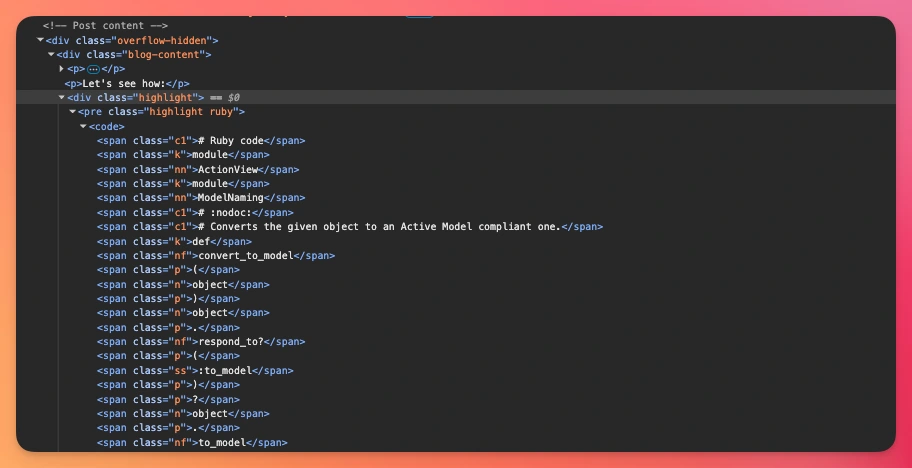
Now, after we create a new post and add code to it, we should see the following result:
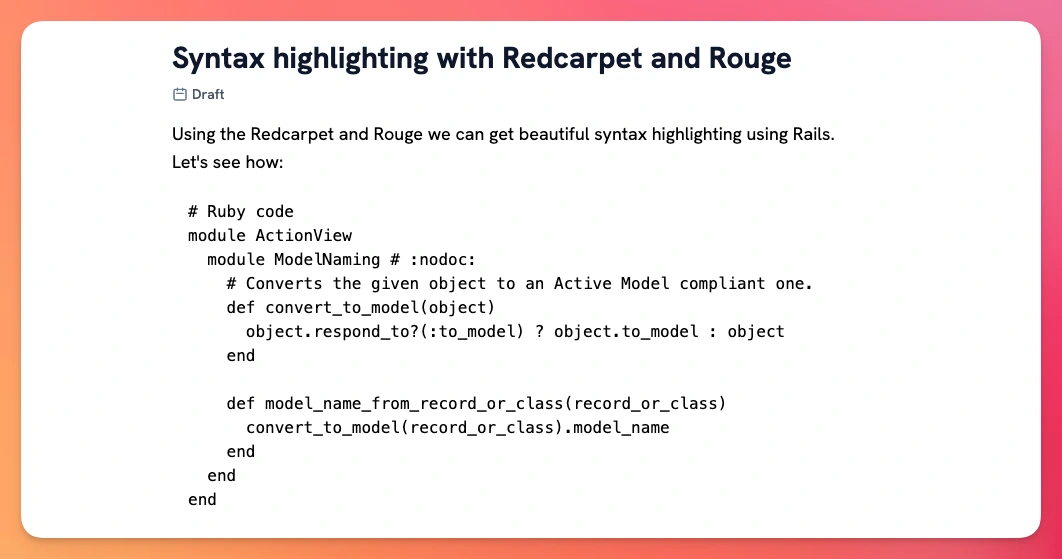
Even though the actual highlighting is not produced, if we inspect the source we can see that CSS classes are added to the code nodes:
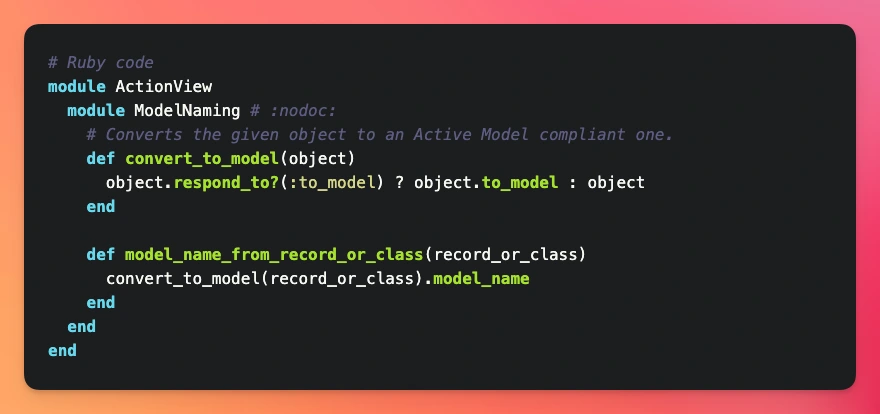
Now, the easiest way to add a theme is to render it within a style tag:
<% content_for :head do %>
  <style><%= Rouge::Themes::Molokai.render %></style>
<% end %>
Producing the following result:
Further reading
Adding shortcodes to the Marksmith editorIf you are not a fan of adding CSS within <style> tags in the head of the document, we can add a themes folder within app/assets/stylesheets and generate the styles by running rougify with the theme name.
Let's add a generate_rouge_themes.rb script into the script folder:
#!/usr/bin/env ruby
require 'fileutils'

OUTPUT_DIR = 'public/stylesheets/rouge_themes'
FileUtils.mkdir_p(OUTPUT_DIR)
THEMES = [
  'base16', 'base16.dark', 'base16.light', 'base16.monokai', 'base16.monokai.dark',
  'base16.monokai.light', 'base16.solarized', 'base16.solarized.dark', 'base16.solarized.light',
  'bw', 'colorful', 'github', 'github.dark', 'github.light', 'gruvbox', 'gruvbox.dark',
  'gruvbox.light', 'igorpro', 'magritte', 'molokai', 'monokai', 'monokai.sublime',
  'pastie', 'thankful_eyes', 'tulip'
]

THEMES.each do |theme|
  safe_filename = theme.gsub('.', '_')
  output_file = "#{OUTPUT_DIR}/#{safe_filename}.css"

  css = `bundle exec rougify style #{theme} 2>/dev/null`
  if $?.success? && !css.empty?
    File.write(output_file, css)
    puts "✓ #{safe_filename}.css"
  else
    puts "✗ Failed: #{theme}"
  end
end
Now, we run chmod +x script/generate_rouge_themes, and run it with ruby script/generate_rouge_themes.rb to get the themes generated into the public/stylesheets/rouge_themesfolder.
After doing this, we can include the theme we want in our layout file:
<%= stylesheet_link_tag "/stylesheets/rouge_themes/thankful_eyes.css" %>
To add the theme file to a single view, we can add a helper function:
# app/helpers/application_helper.rb
module ApplicationHelper
  def rouge_theme_inline(theme_name)
    content_for :head do
      content_tag :style do
        File.read(Rails.root.join('public', 'stylesheets', 'rouge_themes', "#{theme_name}.css"))
      end
    end
  end
end
We can then add the function with the theme name in the view we want to use the theme:
<%# app/views/posts/show.html.erb %>
<%= rouge_theme_inline("thankful_eyes") %>
Which produces the following result:
Now that we know how to use Rouge with Redcarpet, let's add syntax highlighting using a front-end library like Highlight.js
Using Highlight.js
Highlight.js is perhaps the most popular front-end syntax highlighting library.
To use Highlight.js with Rails for Markdown content, we need to parse the Markdown into HTML because that's what the library expects.
The first thing we will do is add a formatted_plain method to the Post model, where we will use Commonmarker to parse the Markdown content without adding syntax highlighting:
class Post < ApplicationRecord
  def formatted_plain
    Commonmarker.to_html(content, plugins: {syntax_highlighter: nil})
  end
end
Which produces the following result:
Now, let's start by installing Highlight.js:
yarn add highlight.js
Then, let's create a syntax_highlight.js file where we add the initial configuration and import the tokyo-night-dark theme:
// app/javascript/syntax_highlight.js
import hljs from "highlight.js"

hljs.configure({
  languages: ["ruby", "erb", "javascript"],
})

document.addEventListener("turbo:load", () => {
  const codeBlocks = document.querySelectorAll("pre code")
  if (codeBlocks.length > 0) {
    codeBlocks.forEach((block) => {
      hljs.highlightElement(block)
    })
  }
})
Because we're using cssbundling, we have to require the CSS in .css files like application.tailwind.css:
@import "highlight.js/styles/tokyo-night-dark.css"
Then, we can import the file into application.js without any issues:
// app/javascript/application.js
import "./syntax_highlight"
And everything should be working. However, consider that we're importing the CSS globally, and we probably don't need syntax highlighting on every page of our application.
To solve this, let's import the CSS into the JavaScript file but, instead of importing it into application.js, which produces an error, let's include it directly in the layout:
// app/javascript/syntax_highlight.js
import hljs from "highlight.js"
import "highlight.js/styles/tokyo-night-dark.css"
<%= javascript_include_tag "syntax_highlight", "data-turbo-track": "reload" %>
Lastly, we can also avoid including the syntax_highlight file everywhere and add it exclusively on views that require it using the following:
<%# app/views/posts/show.html.erb %>
<%= content_for :head do %>
  <%= javascript_include_tag "syntax_highlight", "data-turbo-track": "reload" %>
<% end %>
This is what we get after successfully adding Highlight.js:
However, when we import hljs we're importing every language the library can handle. To avoid loading unnecessary code and making our requests slower, let's replace what we have with the following:
import hljs from "highlight.js/lib/core"
import ruby from 'highlight.js/lib/languages/ruby'
import erb from 'highlight.js/lib/languages/erb'
import javascript from 'highlight.js/lib/languages/javascript'
import bash from 'highlight.js/lib/languages/bash'

hljs.registerLanguage('ruby', ruby);
hljs.registerLanguage('erb', erb);
hljs.registerLanguage('javascript', javascript);
hljs.registerLanguage('bash', bash);

document.addEventListener("turbo:load", () => {
  const codeBlocks = document.querySelectorAll("pre")
  codeBlocks.forEach((block) => {
    hljs.highlightElement(block)
  })
})
Finally, we add a bit of CSS to add padding and rounded borders:
pre {
  @apply rounded-lg my-3 px-4 py-3;
}
Using the Rhino Editor
Now that we added syntax highlighting using Highlight.js with Markdown, let's see how to approach the feature using the Rhino Editor, an Action Text compatible WYSIWYG editor.
Let's start by installing Action Text and Active Storage:
bin/rails active_storage:install && bin/rails action_text:install
That will create a couple of migrations and plenty of files that come from Action Text. Let's run the migrations:
bin/rails db:migrate
Now, considering that we have a content field that we use to store Markdown, let's set a body association with Action Text:
class Post < ApplicationRecord
  has_rich_text :body
end
The next step is to install the Rhino Editor:
yarn add rhino-editor
Then, we import the JS code into application.js:
import "rhino-editor"
We also have to import the styles for it, but as we're using cssbundling we need to import the CSS into our application.tailwind.css file or to a separate file if you like:
@import "tailwindcss";
@import "rhino-editor/exports/styles/trix.css";
Now, let's comment the Marksmith field out and add the following:
<%= form.hidden_field :body, id: form.field_id(:body), value: form.object.body.try(:to_trix_html) || form.object.body %>
<rhino-editor
  input="<%= form.field_id(:body) %>"
  data-blob-url-template="<%= rails_service_blob_url(":signed_id", ":filename") %>"
  data-direct-upload-url="<%= rails_direct_uploads_url %>"
></rhino-editor>
Now, if we refresh the form, we get the following:
Don't forget to add body to the permitted params in the PostsController:
def post_params
  params.expect(post: [ :title, :content, :body, :published_at ])
end
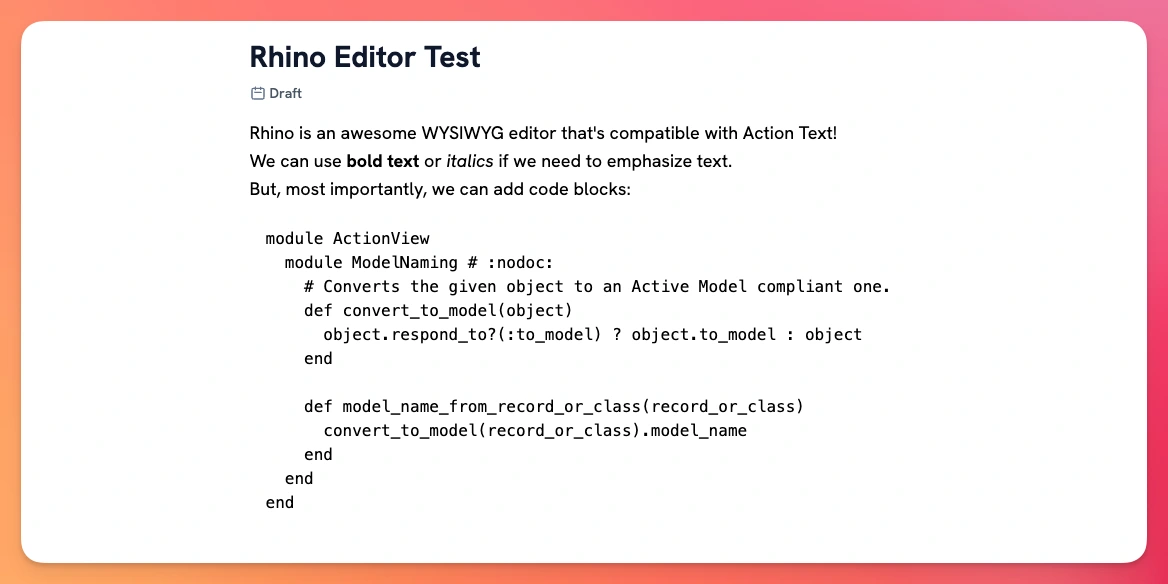
Now, if we create a post that has a code block in it:
We get the following result:

Because we previously added Highlight.js, we get syntax highlighting out of the box automatically. It works because Highlight.js is capable of auto-detecting the language inside the code block, and then it processes the content to add the appropriate CSS selectors.
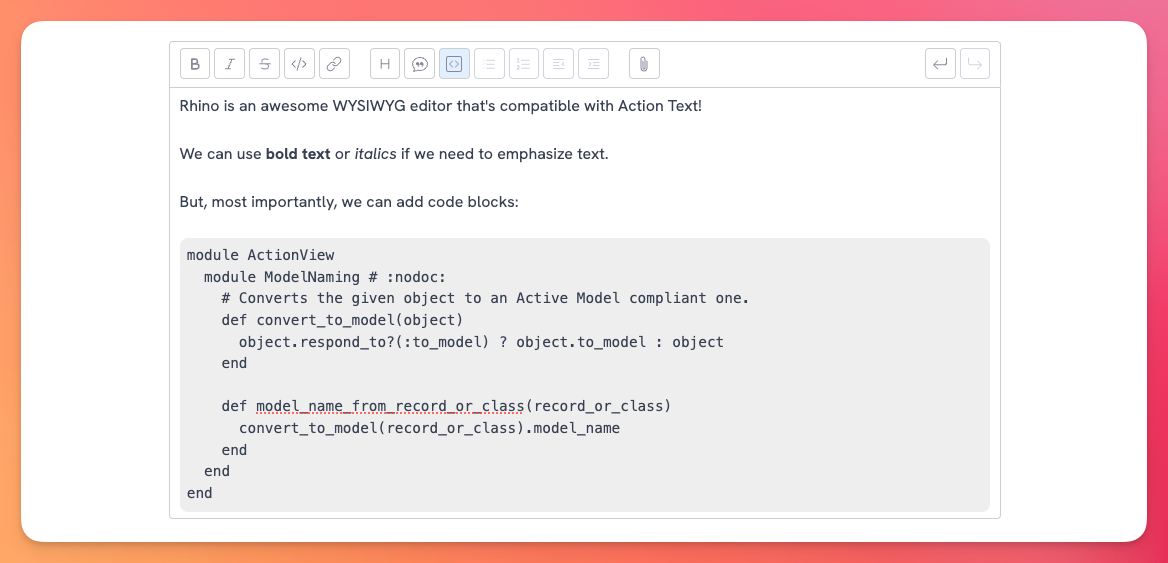
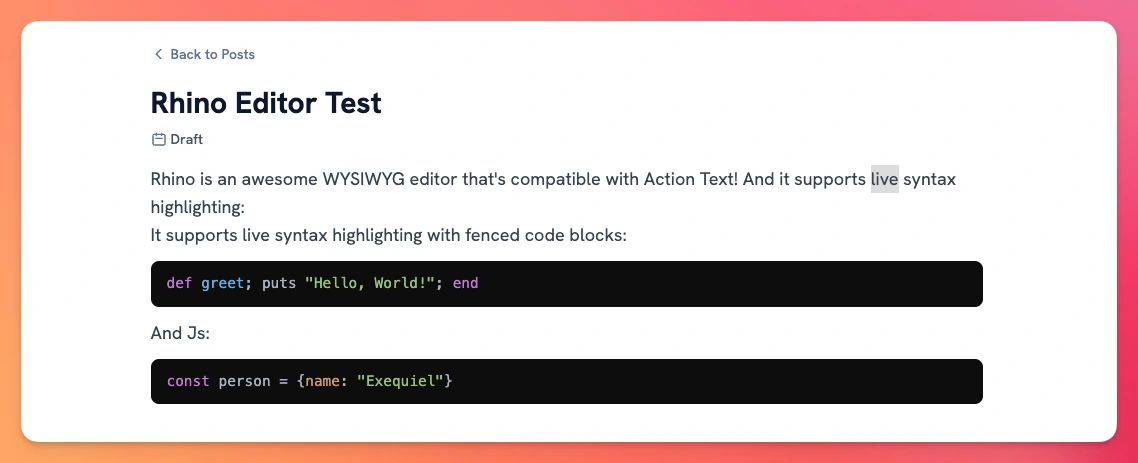
However, Rhino has the ability for us to highlight code while we're editing the content using the lowlight extension for Tip Tap. Let's see how to achieve that:
With the lowlight extension
Before anything, let's remove any reference to the syntax_highlight file we might have. This should produce the following result:
Before starting with the process, we need to understand the way the feature works in Rhino.
Unlike our previous examples, the intended way to use syntax highlighting with Rhino is to:
- Use lowlight with the
CodeBlockLowlightextension to add syntax highlighting and fenced code blocks on the editor. - Store the highlighted syntax in the database by processing the content using the
hast-util-to-htmllibrary.
However, I found that the demo code had some issues, especially when editing the content multiple times and, even though the purpose of WYSIWYG is storing HTML in the database, I think that the approach where we store the code without any syntax highlighting classes added and then using a library like Highlight.js to achieve the task is probably a better decision.
So, we will skip the second part of the documentation where they process the content before submitting the form to the server.
Let's start by adding lowlight and the code block extension for Tip Tap that uses it:
yarn add lowlight @tiptap/extension-code-block-lowlight
Now, let's replace the default codeBlock from the starterKitOptions using the extension by extending the Rhino editor before the initialization process.
Let's start by creating a new file to customize the editor without polluting application.js and adding the imports:
// app/javascript/rhino_editor.js
import "rhino-editor"

import { common, createLowlight } from 'lowlight'
import CodeBlockLowlight from '@tiptap/extension-code-block-lowlight'
Then, we will create an instance of lowlight and assign it to a variable with the same name that we pass to the CodeBlockLowlight.configure method:
// Imports go here
const lowlight = createLowlight(common)
const syntaxHighlight = CodeBlockLowlight.configure({
  lowlight,
})
With this, the extension will know to use lowlight for the syntax highlighting.
Let's define a extendRhinoEditor function that we will call before initialization:
// Rest of the code
function extendRhinoEditor(event) {
  const editor = event.target
  if (editor === null) return

  editor.starterKitOptions = {
    ...editor.starterKitOptions,
    codeblock: false
  }

  editor.extensions = [syntaxHighlight]
  editor.rebuildEditor()
}

document.addEventListener('rhino-before-initialize', extendRhinoEditor)
Now, we get fenced code blocks with live syntax highlighting:
However, to get syntax highlighting on the post itself, we have to add the syntax_highlight back, producing the following result on the post content itself:
Choosing the right approach
For a short answer, we can probably use server-side parsing with gems like Commonmarker, redcarpet working alongside Rouge or other libraries like Pygments most of the time, especially if we're building vanilla Rails applications.
However, there are a couple of reasons where we might choose a front-end library:
- We need real-time highlighting: there are some cases where this is a need, and are most likely the perfect use case for a FE highlighting library.
- We use a mixed front-end: if we're using a front-end framework to render our views, like if we're using Inertia Rails we could use server-side syntax highlighting, but that might require some workarounds so using a library like Highlight.js might be a good idea.
- Theme variety: Highlight.js has 512 themes we can pick from, while Rouge comes with 13 themes out of the box and Pygments 48. Of course, we can always add themes, but the defaults usually matter, so you might be inclined to pick one over the other for this motive.
Conversely, we might not want to choose a front-end library because:
- Bundle size increase: if we're not careful with what we load, our bundle size can increase, thus making requests slower and degrading the user experience without much to show for.
- Highlight flickering: because the parsing and highlighting happens on the client, users might notice a flicker between an unstyled code block and the final result.
- Language limitation: probably not a problem for most use cases, but Rouge has compatibility with more languages than Highlight.js.
Summary
In this article, we learned how to add syntax highlighting to a Rails app by showing a couple of ways to do it:
- With a Markdown field and a server-side parser like Commonmarker.
- With front-end parsing using Highlight.js.
- With the Rhino Editor, an Action Text compatible WYSIWYG editor.
- With static content.
Using a gem like Commonmarker, we get syntax highlighting without any extra dependency because the gem adds inline styles and comes with 7 default themes, but we can easily add more themes using the TmTheme format.
To get syntax highlighting using Commonmarker with Markdown content, we need to do the following:
def formatted_content
  Commonmarker.to_html(content, options: {
    parse: {smart: true},
  },
    plugins: {
      syntax_highlighter: {
        theme: "base16-ocean.dark",
      },
    },
  )
end
We can also customize the theme by providing a path to the .tmtheme file.
Besides Commonmarker, we can also use Redcarpet together with the Rouge gem to add syntax highlighting from Markdown content. The first step is to create a custom HtmlRenderer class inside our models directory:
require 'redcarpet'
require 'rouge'
require 'rouge/plugins/redcarpet'

class HtmlRenderer < Redcarpet::Render::HTML
  include Rouge::Plugins::Redcarpet

  def initialize(options = {})
    super(options)
  end
end
Then, we use this custom renderer with the Redcarpet gem:
def formatted_content
  Redcarpet::Markdown.new(HtmlRenderer, {
    fenced_code_blocks: true,
  }).render(content)
end
Finally, we include the styles for our desired theme, Rouge provides 18 themes out of the box:
<% content_for :head do %>
  <style><%= Rouge::Themes::Molokai.render %></style>
<% end %>
The other way to add syntax highlighting is by using a front-end library like Highlight.js to add the appropriate structure and CSS classes to the code. We start by installing the library, creating a syntax_highlight.js file within our application's JavaScript and including the following:
import hljs from "highlight.js/lib/core"
import ruby from 'highlight.js/lib/languages/ruby'
import erb from 'highlight.js/lib/languages/erb'
import javascript from 'highlight.js/lib/languages/javascript'
import bash from 'highlight.js/lib/languages/bash'
import "highlight.js/styles/base16/gruvbox-dark-hard.css"

hljs.registerLanguage('ruby', ruby);
hljs.registerLanguage('erb', erb);
hljs.registerLanguage('javascript', javascript);
hljs.registerLanguage('bash', bash);

document.addEventListener("turbo:load", () => {
  const codeBlocks = document.querySelectorAll("pre > code")
  if (codeBlocks.length > 0) {
    codeBlocks.forEach((block) => {
      hljs.highlightElement(block)
    })
  }
})
In order for this not to break because of the CSS import within JS, we have to make sure to include our app's JavaScript using type: "module":
<%= javascript_include_tag "application", "data-turbo-track": "reload", type: "module" %>
Finally, there's another approach which is using a WYSIWYG editor like Rhino, which produces HTML that we can parse in the frontend using the same code we used above.
However, if we want to add live syntax highlighting while editing the code, we need to add lowlight and Tip Tap's code block extension for it:
import "rhino-editor"

import { common, createLowlight } from 'lowlight'
import CodeBlockLowlight from '@tiptap/extension-code-block-lowlight'

const lowlight = createLowlight(common)
const syntaxHighlight = CodeBlockLowlight.configure({
  lowlight,
})

function extendRhinoEditor(event) {
  const editor = event.target
  if (editor === null) return

  editor.starterKitOptions = {
    ...editor.starterKitOptions,
    codeblock: false
  }

  editor.extensions = [syntaxHighlight]
  editor.rebuildEditor()
}

document.addEventListener('rhino-before-initialize', extendRhinoEditor)
I hope you enjoyed this article and that it helps you add the feature to your next project and makes you save some time. Let us know about it!
Have a good one and happy coding!
